❏
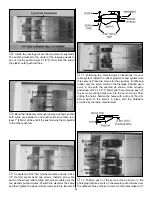
4. Paint the canopy frames from the inside of the canopy
with black paint. We recommend this be done with paints like
Pactra Formula U, or any of the many varieties of acrylic
paints available.
❏
5. Once the paint has dried, position the canopy on the
fuselage. Drill four 1/16" [1.5mm] holes in the bottom of the
canopy on both sides of the canopy. Apply a drop of thin CA
to each of the holes drilled in the fuselage. Mount the
canopy with eight (four per side) #2 x 3/8" machine screws
and eight #2 washers.
❏
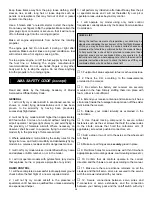
1. Use the above sketches and box cover to position the
decals on your model. Even though these decals are self
adhesive, the easiest and most accurate way to position the
decals is to first cut them from the sheet. When ready to
apply one of the decals, submerge it in a tub of warm water
mixed with liquid dish soap (about a teaspoon of soap per
gallon of water) and peel the decal from the backing. Lay the
decal on the model and position it exactly where you want it.
Use a paper towel to wipe away most of the water. Then use
a soft balsa sheet or something similar to squeegee the rest
of the water from under the decal. Allow to dry overnight
before flying the model.
❏
1. Turn on the transmitter and receiver and center the
trims. If necessary, remove the servo arms from the servos
and reposition them so they are centered. Reinstall the
screws that hold on the servo arms.
❏
2. With the transmitter and receiver still on, check all the
control surfaces to see if they are centered. If necessary,
adjust the clevises on the pushrods to center the control
surfaces.
❏
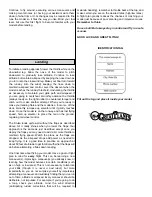
3. Make certain that the control surfaces and the
carburetor respond in the correct direction as shown in the
diagram. If any of the controls respond in the wrong
direction, use the servo reversing in the transmitter to
reverse the direction of the servos connected to those
controls. Be certain the control surfaces have remained
centered. Adjust if necessary.
❏
Use a Great Planes AccuThrow
™
(or a ruler) to accurately
measure and set the control throw of each control surface as
indicated in the chart that follows. If your radio does not have
dual rates, we recommend setting the throws at the low rate
setting. Note: The throws are measured at the widest part
of the elevators, rudder and ailerons.
Set the Control Throws
4-CHANNEL
TRANSMITTER
4-CHANNEL
TRANSMITTER
4-CHANNEL
TRANSMITTER
4-CHANNEL RADIO SET-UP
(STANDARD MODE 2)
TRANSMITTER
4-CHANNEL
ELEVATOR MOVES UP
RIGHT AILERON MOVES UP
LEFT AILERON MOVES DOWN
RUDDER MOVES RIGHT
CARBURETOR WIDE OPEN
Check the Control Directions
GET THE MODEL READY TO FLY
APPLY THE DECALS
27


