


❏
3. Attach the clevis to the control horn and slide the clevis
retainer onto the clevis.
❏ ❏
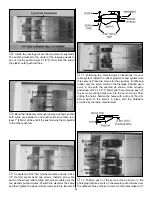
4. Install the clevis and clevis retainer onto the 36"
[914mm] wire pushrod. Turn the clevis onto the threaded end
of the pushrod approximately 25 turns. Mount the control
horn in line with the pushrod as previously done with the
rudder,
except, mount the horn at a slight angle as shown.
After mounting the control horn, slide the threaded wire into
the pushrod opening. You will see that the pushrod does not
exit the fuselage and line up exactly with the control horn.
Make two angled bends to bring the pushrod in alignment
with the control horn as shown in the photograph. Do not make
either bend at 90 degrees and do not bend the threaded
part of the pushrod. Make both bends on the solid wire.
❏
5. Repeat step 4 for the other half of the elevator.
❏
6. Drill a 3/16" [5mm] hole in firewall. This hole should be
in close alignment to the carburetor. Locate the 12" [305mm]
long gray plastic outer pushrod. Roughen one end of it with
200-grit sandpaper, then install it into the fuselage through
the hole you drilled. Apply 6-minute epoxy to the roughened
end of the tube and insert it flush with the firewall.
❏
7. Locate a 2-56 x 17-1/2" wire pushrod. Install a nylon
clevis and clevis retainer onto the pushrod approximately 25
turns. Slide the wire pushrod into the plastic outer pushrod
tube on the firewall. Attach the clevis to the throttle arm and
slide the clevis retainer onto the end of the clevis.
Note: For
our installation it was necessary to make a bend in the wire
to get it to align with the carburetor throttle arm. Adjust your
wire as needed to get smooth operation of the throttle arm.
19


