CHAPTER 3. CRAFT ROBO CONTROLLER
Cutter Operation
3.4.1 Test Printing
To reduce the waste of media, it is recommended to do a test plot when cutting design data for the first time
or when changing the design data.
Test plot allows to visually confirm, by plotting cut lines with a ball pen, that they will be fully output and in a
proper position.
1.
Press the standby switch of the Craft ROBO to turn the LED lamp on.
2.
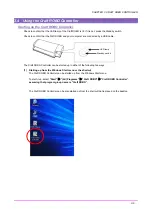
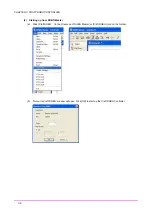
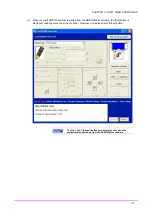
Launch the Craft ROBO Controller from the Craft ROBO software.
(See 3.4 Starting up the Craft ROBO
Controller (2).)
3.
Set Media Type to ”Pen”.
(See 3.5.7 Media Type.)
4.
Place a commercially available ballpoint pen in the provided ballpoint penholder and place it in the Craft
ROBO.
5.
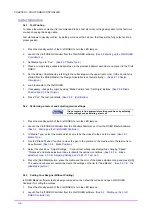
Set the Design Orientation by referring to the cutter image in the upper right corner. (If the Controller is
started from the ROBO Master, the Design Orientation is set automatically.)
(See 3.5.10 Design
Orientation.)
6.
Load the media to the Craft ROBO.
7.
If necessary, change the origin by using “Blade Position” and “Set Origin” Buttons.
(See 3.5.8 Blade
Position and 3.5.9 Set Origin.)
8.
Press “Cut”. The test print starts.
(See 3.5.5 [Cut] Button.)
3.4.2 Performing a test cut and adjusting media settings
It is necessary to find appropriate cutting conditions by adjusting
media settings and performing a test cut.
1.
Press the standby switch of the Craft ROBO to turn the LED lamp on.
2.
Launch the Craft ROBO Controller from the Windows Start menu or from the ROBO Master Software.
(See 3.4 Starting up the Craft ROBO Controller.)
3.
In “Media Type,” select the media which seems to be the closest to the one to be used.
(See 3.5.7
Media Type.)
4.
Use the “Blade Position” function to move the pen to the position on the media where the test cut is to
be performed.
(See 3.5.8 Blade Position.)
5.
Select the check box, “Adjust Settings.” Conduct test cutting repeatedly while changing “Speed,”
“Thickness” and blade adjustment caps to identify the optimum conditions.
(See 3.5.7-A Blade
adjustment cap, 3.5.7-B Adjusting Settings, and 3.5.7-D Test Cut.)
6.
Press the [Add Media] button, place the media and the color of the blade adjustment cap and press [OK].
The next and subsequent operations create the settings on the list for “Add Media.”
(See 3.5.7-E The
[Add Media] button.)
3.4.3 Cutting Your Designs (Without Printing)
In ROBO Master software create a design composition, then draw the cutlines and open Craft ROBO
Controller for cutting the cutlines.
1.
Press the standby switch of the Craft ROBO to turn the LED lamp on.
2.
Launch the Craft ROBO Controller from the Craft ROBO software.
(See 3.4 Starting up the Craft
ROBO Controller (2).)
3-8
Содержание Craft ROBO CC100
Страница 1: ...User s Manual MANUAL NO CC100m UM 152...

