


22
Oil filler plug
18.
Bumper spike
19.
Guide bar
20.
Chain
21.
Guide bar chain wheel
22.
* Differences may appear between the product and drawing
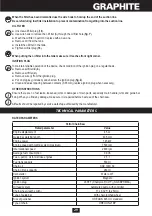
MEANING OF SYMBOLS
CAUTION
WARNING
ASSEMBLY/SETTINGS
INFORMATION
EQUIPMENT AND ACCESSORIES
Guide bar cover
– 1 pce
1.
Guide bar
– 1 pce
2.
Chain
– 1 pce
3.
Key for ignition plugs + Screwdriver for carburettor adjustment
– 1 pce
4.
PREPARATION FOR OPERATION
CARRYING THE CHAIN SAW
Prior to carrying the chain saw slide chain cover onto guide bar and chain. When carrying the chain saw, hold it by
front handle. Do not carry the saw when holding main handle. If several cuttings are to be made, switch off the chain
saw with the ignition switch between consecutive tasks.
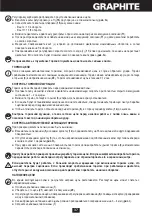
INSTALLATION OF GUIDE BAR AND SAW CHAIN
Prior to guide bar installation remove plastic transport spacer, placed on guide fixing screws under the guard. Use
pin and adjustment screw for adjustment of chain tension. It is very important that the bolt located on adjustment
screw falls into hole in the guide bar during installation of the guide bar.
You can move the bolt to the front and back by turning the adjustment screw. Those parts must be set appropriately
prior to starting guide bar installation in the saw.
Guide bar and chain are supplied separately.
Brake lever (
●
6
) must be in the upper (vertical) position (
fig. A
).
Unscrew the guide bar fixing nuts (
●
7
) and remove the casing (
10
).
Put the chain (
●
21
) onto driving chain wheel located behind the clutch.
Install the guide bar (
●
20
) (slide it behind the clutch) onto guiding screws (
c
) and push towards driving chain wheel (
fig. B
).
Put the chain (
●
21
) onto guide bar chain wheel (
22
) from below.
Move the guide bar (
●
20
) away from the driving chain wheel, so chain guiding links are placed in the guide bar groove.
Ensure the pin (
●
a
) of the chain tension adjustment screw (
8
) is in the middle of the lower hole (
b
) of the guide bar (
20
),
adjust when necessary (
fig. B
).
Place the casing (
●
10
) in its place and fix by slightly tightening guide bar fixing nuts (
7
).
Strain the chain appropriately using the chain tension adjustment screw (
●
8
). Chain tension is appropriate when the chain
can be lifted by 3 to 4 mm in the middle of the guide bar in horizontal position.
Firmly tighten guide bar fixing screws (
●
7
) while holding the guide bar tip.
Prior to guide bar and chain installation ensure that position of chain cutting blades is appropriate (correct
position of the chain on the guide bar is shown on the tip of the guide bar). Always wear protective gloves during
checks and installation of the chain to prevent cuts from sharp edges of the chain.
New chain requires start-up period, which lasts approximately 5 minutes. Chain lubrication is very important in
this phase. Check chain tension after start-up period and readjust if necessary.
Содержание 58G945
Страница 2: ......
Страница 31: ...31 58G945 a b a b c a b c d a...
Страница 32: ...32 90...
Страница 33: ...33 1 2 3 4 5 6 7 8 9 10 1 2 3 4 5 6 7 8 9 10 11 12 13 14...
Страница 34: ...34 15 L H 16 T 17 18 19 20 21 22 1 1 1 2 1 3 1 4 6 A 7 10 21 20 c B 21 22 20 a 8 b 20 B 10 7 8 3 4 7...
Страница 35: ...35 5 18 260 18 SAE 10W 30 SAE 30W 40 SAE 20W 30 95 20 20 1 20 25 1 15 550 15 6 2 14 C 13 D 1 11 11 6...
Страница 36: ...36 2 11 14 STOP E 9 20 9 MIN MAX F 9 MAX 9 MIN 260 15 40 20...
Страница 37: ...37 L H 16 G 16 L 1 1 4 H 1 3 8 11 11 L 1 4 T 17 G 6 20 0 12 1 2 6 6 12 5 12 35 5 H 6 7 21 20 8 3 4 I 7...
Страница 38: ...38 J 1 11 K 11 L...
Страница 39: ...39 45 0 M 1 3 N 2 5 M 19 O 12 19 12 1 3...
Страница 40: ...40 1 3 P R S 5 4 3 4 d T 4 4...
Страница 41: ...41 5 14 7 10 20 21 e 20 U 22 f W 21 15 g X 15 18 h Y 18 4 d i Z 0 65...
Страница 43: ...43 58G945 a b a b c a b c d a...
Страница 44: ...44 90...
Страница 45: ...45 1 2 3 4 5 6 7 8 9 10 1 2 3 4...
Страница 46: ...46 5 6 7 8 9 10 11 12 13 14 15 L H 16 T 17 18 19 20 21 22 1 1 1 2 1 3 1 4 6 A...
Страница 48: ...48 6 2 14 C 13 D 1 11 11 6 2 11 14 STOP E 9 20 9 MIN MAX F 9 MAX 9 MIN 15 40 260...
Страница 49: ...49 20 L i H 16 G 16 L 1 1 4 H 1 3 8 11 11 L 1 4 T 17 G 6 20 0 12 1 2 6 6 12...
Страница 50: ...50 5 12 35 5 H 6 7 21 20 8 3 4 I 7 J 1 11 K 11...
Страница 51: ...51 L 45 0 M N 2 5 M...
Страница 52: ...52 19 O 12 19 12 1 3 P R S...
Страница 53: ...53 5 4 3 4 d T 4 4 5 14 7 10 20 21 e 20 U 22 f W 21...
Страница 54: ...54 15 g X 15 18 h Y 18 4 d i Z 0 65 TOPEX...


