


40
11.1.4 Camera Setup
The buttons in the bottom of each channel are the functions for current channel only.
11.1.4.1 Setup
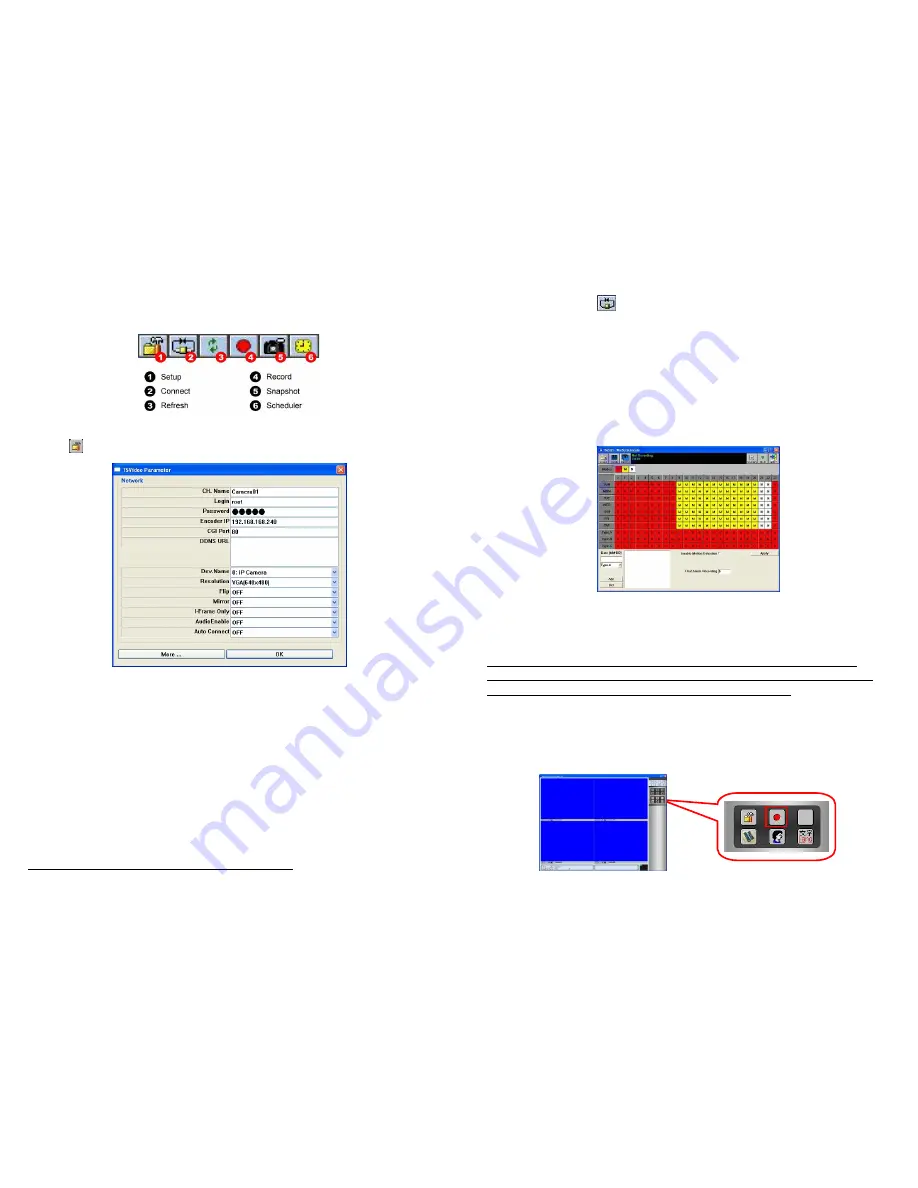
Press the
button and the
TSVideo Parameters
window will be displayed.
(1)
CH. Name
: Enter the channel name.
(2)
Login
: Enter the User ID of the camera (default login:
root)
.
(3)
Password
: Enter the password of the camera (default password:
admin
).
(4)
Encorder IP
: Enter the IP address of the camera.
(5)
CGI Port
: Enter the CGI port of the camera (default CGI port: 80).
(6)
DDNS URL:
Enter the URL address of the network camera into the block.
(7)
Dev. Name
: Select the connected device (select to the IP Camera).
(8)
Resolution
: Select the resolution among 160x120/ 320x240/ 640x480/ 1280x1024.
(9)
Flip
: Vertically rotate the video.
(10)
Mirror
: Horizontally rotate the video.
(11)
I-Frame Only
: Enable/ disable the I-Frame function.
(12)
Audio Enable
: The Grand iFalcon IP Cam does not support audio function.
NOTE: Press the OK button to save and apply the configuration.
41
11.1.4.2 Connect:
Click the
button to connect the camera directly, the image of camera will display
in the preview window.
11.1.4.3 Refresh:
To refresh the videos, the recording process will be stopped and restart again.
If the video is unstable after some high CPU resource programs, CPU usage may come to 100% and all
the resources are taken. In that case, the system may run in slower mode than ever. Please click
“Refresh” to renew the system and get it backs to higher performance.
11.1.4.4 Record:
Record the current camera only.
11.1.4.5 Snapshot:
Take a snapshot of live video.
11.1.4.6 Scheduler:
Set the recording mode based on the weekday hour.
(1) Please click on the weekday hour block to change the recording mode or just drag the mode to the
weekday hour block.
(2)
Enable Motion Detection
: Enable/ Disable the motion detection function.
(3)
Post-Alarm Recording
: Enter the recording duration (seconds) after motion is detected
NOTE
: If you want to use the motion detection recording function, be sure to enable the
Motion
Detection
function and set the
Post-Alarm Recording
, and confirm the
Motion Detection
(refer to
section 8.11) and the
Alarm Picture
(refer to section 8.10) have been enabled.
(4) Please save the file before exiting the setting dialog.
(5) Press
the
Apply
button to update the current scheduler, and press the
SAVE
or
Save As
button to
save the configuration. Press the
QUIT
button to exit.
(6) Repeat the above steps to set up the other cameras.
(7) After setting, press the
Record
button on the right side of the screen to start scheduled recording.


