OM−05229
JSV3H
PAGE E − 8
MAINTENANCE AND REPAIR
as a unit, remove the allen screws (237), and
pull the assembly out of the motor cover (230).
7.
If desired to separate the parts removed in
Step 6, lubricate the motor cable (234) to ease
removal.
Removing Rotor and Shaft Assembly
1.
See
LUBRICATION
at the end of SECTION E,
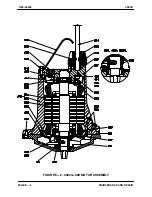
and drain the oil from the motor housing (257).
2.
With the pump end components and motor
cover removed, tap the motor cover end of the
rotor and shaft assembly (201) with a soft-
faced mallet until the bearing housing (213)
comes free of the stator housing (302). Care-
fully slide the bearing housing and rotor and
shaft assembly out of the motor housing as a
unit.
3.
Remove the O-ring (252) from the groove in the
bearing housing.
NOTE
The stator (301) is a hot shrink fit in the motor hous-
ing (302). No instructions are given in this manual
for separating the stator, motor housing, or thermal
protectors (307). It is strongly recommended that
the stator/motor housing be returned to the factory
or an authorized Gorman-Rupp repair facility if any
of the components require service.
Removing Bearings
1.
Remove the retaining ring (206), and slide the
shaft and rotor and assembled bearings out of
the lower bearing housing.
2.
Remove the retaining ring (209), and support
ring (208) from the shaft.
NOTE
Because bearings can be damaged while being re-
moved, it is recommended that they be inspected in
place. The bearings are secured by a press fit onto
the shaft.
If the bearings will not be replaced, it is also recom-
mended that they be cleaned in place (see
IN-
SPECTION AND CLEANING
).
3.
If the bearings require replacement, use a
bearing puller to remove them from the shaft.
INSPECTION AND CLEANING
Carefully inspect all O-ring seating areas to deter-
mine if they formed a proper seal. If sealing was
faulty, determine the cause before reassembling
the pump. After inspection, remove and discard all
O-rings.
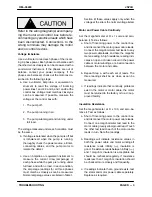
Most cleaning solvents are toxic and
flammable. Use them only in a well-ven-
tilated area free from flame, sparks, and
excessive heat. Read and follow all pre-
cautions printed on solvent containers.
Bearings
1.
It is recommended that bearings be cleaned in
place.
2.
Clean bearings thoroughly in
fresh
cleaning
solvent; dry with filtered compressed air. Ro-
tate the bearings by hand to check for rough-
ness or binding; replace as necessary.
3.
Coat external surfaces with light oil to ease
reassembly; these bearings are permanently
sealed and require no additional lubrication.
4.
Cover the bearings with clean cloth to keep ex-
ternal surfaces free of all dirt and foreign mate-
rial;
failure to do so could damage the bear-
ings or their mating surfaces
.
Other Reusable Parts (Except Seal Assembly)
1.
Thoroughly clean all reusable parts.

