


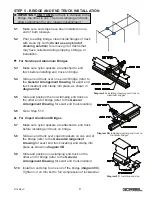


STEP 5 - BRIDGE AND END TRUCK INSTALLATION (CONTINUED)
5.11
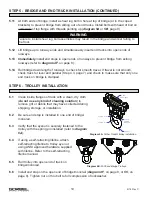
At both ends of bridge, install a shear lug bolt in hole at top of bridge (or in the coped
brackets) to prevent bridge from sliding out of end trucks. Install bolts with head of bolt on
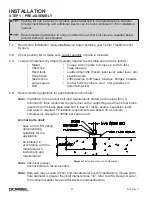
underside of top flange with threads pointing up (
diagram 5A
or
5B
, page 9).
5.12
Lift bridge up to runway ends and simultaneously insert end trucks into open ends of
runways.
5.13
Immediately
install end stops in open ends of runways to prevent bridge from exiting
runways (refer to
diagram 4F
, on page 8).
5.14
Roll bridge down length of runways to check for smooth travel. If travel is not smooth,
check track for level and parallel (Step 4.3, page 7) and check to make sure that only one
end truck on bridge is clamped.
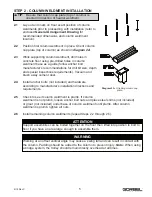
STEP 6 - TROLLEY INSTALLATION
6.1
Clean inside flanges of track with a clean, dry cloth
(
do not use any kind of cleaning solution
) to
remove grit or debris that may have collected during
shipping, storage, or installation.
6.2
Be sure end stop is installed in one end of bridge/
monorail.
6.3
Verify that the eyenut is securely fastened to the
trolley with the spring pin installed (refer to
diagram
6A
).
6.4
If using a self-retracting lifeline, attach
self-retracting lifeline to trolley eye nut
using ANSI approved hardware supplied
with lifeline. Refer to the self-retracting
lifeline manual.
6.5
Roll trolley into open end of track on
bridge/monorail.
6.6
Install end stop on the open end of bridge/monorail (
diagram 4F
, on page 8, or
5C
, on
page 9). Tighten nut on thru bolt to full compression of lockwasher.
10
9/18 Rev C
Diagram 6B.
F500 and Bridge Trolleys.
WARNING
Failure to install shear lug bolt assemblies may result in the bridge and worker falling to
the floor.
SPRING PIN
CLAMP PLATE
EYENUT
BLACK
SPRING
WASHER
GUIDE
BUSHINGS
Diagram 6A.
Tether Track® trolley installation.