background image

1

LCD panels are produced with state-of-the-art technology. However, there may be missing or 

lit spots on the screen under certain circumstances. That does not mean that the product is 

faulty.

1.1-Cleaning the screen and cabinet...

After powering off, wipe the screen and the cabinet clean with a soft and dry cloth. We 

recommend that you do not use patented polishes or solvents on the screen or cabinet since 

they may cause damage.

1.2-Disposing of your TV at the end of service life...

The cold cathode fluorescent lamp found in your LCD screen contains a very small amount of 

mercury. Once your TV set has completed its physical life, please dispose of it in accordance 

with local government regulations or leave it at a recycling centre.

1.3-Superior features of your integrated digital television

This television can receive all Freeview Digital and normal Analogue TV broadcasts. This 

television set has an integrated digital and analogue receiver. TV Guide (valid for digital 

broadcastings only) informs you about changes in the program list briefly and provides program 

lists of all digital broadcastings for a number of forthcoming days. You can display detailed 

information about each program by pressing a single button if this feature is supported by 

the broadcasting enterprise. This television has a comprehensive and user friendly menu 

configuration.

1.4-Receiving digital broadcasting channels

To receive trouble free digital TV reception it is essential that a good quality high gain wide 

band digital TV aerial is used. The aerial preferably is to be roof mounted and not placed in an 

attic as this will cause a loss of signal.

Important Information

An integrated digital TV lets you access the 

free digital channels that are broadcast in 

the UK.

 It uses a digital signal, received through 

your normal aerial. For more information 

please visit www.digitaluk.co.uk

Freeview digital TVs give you over 40 

free channels that you can watch for no 

subscription. 

For more information on Digital Television 

and Freeview, and to check reception in 

your area please visit www.freeview.co.uk

Содержание GML26W37HDF

Страница 1: ...GML26W37HDF Digital TV Instruction Manual IMPORTANT Please read all instructions carefully before use and keep for future reference Helpline 0871 2301777...

Страница 2: ...g on your TV and the initial use 10 5 3 Batteries 10 5 4 Turning on your television for the first time and tuning 10 5 5 Performing Digital channel settings 11 6 6 Performing the initial power on sett...

Страница 3: ...r TV Guide valid for digital broadcastings only informs you about changes in the program list briefly and provides program lists of all digital broadcastings for a number of forthcoming days You can d...

Страница 4: ...air transmission Wide angle of vision Scart S Video PHONO connection inputs PC connection Low energy consumption AVL Automatic Volume Limiting feature Programmable power on off feature Graphic equali...

Страница 5: ...on the TV The screen glass may break and cause serious injuries if something hits it 7 To ensure adequate ventilation please leave a clearance area of at least 10 cm around the television This cleara...

Страница 6: ...e then it can cause fire due to arching Refer to an electrician to have your socket replaced 13 Make sure that the power cable is not stepped on and that there is no bending at the plug sections plug...

Страница 7: ...s to be replaced please follow the wiring instructions below The plug removed must be disposed of immediately It must not be plugged into a supply socket as this will be an electrical hazard If the fu...

Страница 8: ...the rear cover 1 C Fix a wall mount bracket to the six screws 6 by using M6x12 screws Wall mount bracket are available from most TV or high street electrical suppliers C B A A Locate and fit push the...

Страница 9: ...4 1 Power indicator and TV Control panel P P Av MENU V volume up V volume down Power on Standby button Remote control sensor Power on Standby indicator Remote control sensor Power on Standby indicato...

Страница 10: ...put L Audio input R SPDIF Digital audio output Component inputs VGA PC input PC Audio input TUNER UHF aerial Scart AC mains power Audio R input CI slot HDMI 1 S VHS HDMI 2 Video input Stereo headphone...

Страница 11: ...ackward VOL Volume up VOL Volume down PR Program selection forward BACK Returns to previous menu Navigetion Up Move up in menu NEXT selects next teletext page OK Menu selection confirm and program tab...

Страница 12: ...ns input socket located on the back panel of the TV 3 To power on your television press any numerical key or P or P keys on the remote control Note If you are not going to use your television for a lo...

Страница 13: ...gue TV tab by pressing the Down navigation button and select DTV option by CHANNEL SETUP Select Analogue TV or Digital TV tuning Press OK to starat channel scan Make sure Aerial is connected Country S...

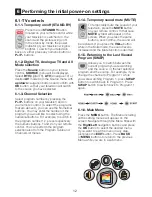
Страница 14: ...ess respectively the numeric buttons 1 and 2 on your remote control You can perform the program selection also from the Program Table and Channel List menus 6 1 4 Temporary sound mute MUTE To temporar...

Страница 15: ...channel scan Make sure Aerial is connected Country Selection U K Scan Type DTV Select Back Exit 6 2 2 Manual tuning of analogue channels and storing in the memory 6 2 2 1 If you already know the chann...

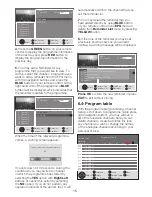
Страница 16: ...ine Tuning 00 Search Programme No 1 Skip No Frequency Select Save Back Exit 62 25 Mhz News 13 Nov 2008 22 00 22 40 ALL CHANNELS 4 Channel 2 22 00 News 22 40 Film Select Radio Reminder List Reminder In...

Страница 17: ...hannel 5 14 Channel 6 24 Channel 7 Mon 13 Nov 2008 22 15 Next Day This will interruput a Reminder previously set Press OK to allow Press Exit to disregard this Reminder 4 Press the GREEN button on you...

Страница 18: ...lete this channel from the Programme Table menu Enter the PIN code to delete the channel 6 4 5 Locking a stored channel For this feature please see page 23 24 7 5 Parental Control 6 4 6 Skipping a sto...

Страница 19: ...e characters store the name you have written in the memory by pressing the OK button To write names for any of the other programs simply repeat the above procedure Press MENU button to return to the p...

Страница 20: ...e same sound level as you switch from program to program Select Off to cancel it 7 1 2 Sound Mode If you would like to add some depth to the sound of the program you are watching press Right Left navi...

Страница 21: ...You can select either one of the four non adjustable settings in the memory or one of the user options by pressing the button on your remote control Vivid Natural Cinema and Sports are default values...

Страница 22: ...dimmer picture can be sent to the screen according to the brightness level of the picture Thus a wider effect is obtained in terms of contrast Select Dynamic Contrast tab with the Up Down navigation...

Страница 23: ...e the black stripes on the background by zooming in the picture without diffusing it 7 2 6 7 Panorama This setting will enlarge the image to fit the screen by stretching the image horizontally while h...

Страница 24: ...b by pressing the Up Down navigation button in TIMER menu and confirm your selection with the Right navigation button or OK button In the On Time menu you can set the on time for your television with...

Страница 25: ...e installed automatically Select Software Update tab and press the OK button Your television will start to search for a new software and perform the software install process if a new software exists N...

Страница 26: ...to switch your television to the teletext broadcast please press the TXT button in a program that has a teletext broadcast To switch back to the television broadcast press the TXT button for two conse...

Страница 27: ...s one by one by pressing the RED GREEN buttons You can exit the sub page by pressing the SUB button again 8 7 Temporary TV Picture UPDATE This button allows you to switch to the television picture whi...

Страница 28: ...or the external device connection These inputs are 1 Aerial input 2 SCART input 3 AV input 4 S Video input 5 PC input 6 HDMI1 input 7 HDMI2 input 8 YPbPr Component input 9 CI slot input You can connec...

Страница 29: ...via the S Video connection Connect the video and audio from the external device using the S VHS connector and the white and red L and R RCA inputs on the TV side panel Select the S Video option in th...

Страница 30: ...from a PC with a DVI to HDMI or HDMI to HDMI cable HDCP Your TV supports HDCP feature This means that no picture or sound will show on Scart output socket when playing any HDMI source This is legal re...

Страница 31: ...and press the OK button 9 7 2 PC Access Setting Enter into the SETUP menu from the Main Menu by pressing the MENU button in the PC mode In order to make the necessary settings in this menu you can se...

Страница 32: ...u to watch the scrambled services pay services in some channels If you remove the CI Module you can only watch the available non scrambled digital programmes 2 Press the Standby button on the remote t...

Страница 33: ...ilable Select the broadcast system PALI is UK Problem in channel broadcasting Test with another channel No or defective teletext Television channel no teletext or Aerial system Test another channel fo...

Страница 34: ...input Standard CI Slot Input Standard Dimensions WxDxH 490x665x178 Weight Kg 9 5 General technical specifications Power supply AC 230V 50 Hz Program memory 100 RF Aerial input 75 Ohm Co axial Loudspea...

Страница 35: ...Y3B 801...

Отзывы: