background image

21

3-1 

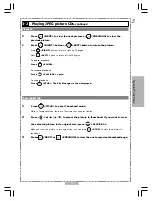
  Playing Kodak Picture CDs

Basic Playback

Insert a Kodak picture CD into the player.

After few seconds, the portable DVD player will start to playback the pictures in slide show automatically.

OR

Enter the number of the picture to be shown using the numerical keys, then press


<PLAY/SEL.> to start slide show with that picture.

Press 


<INFO.>

, the current photo number and total photo numbers will be shown on the screen.

To pause slide show

Press 

 <PAUSE>.

To stop slide show

Press 

 <STOP>.

To resume slide show

Press 

 <PLAY/SEL.> again.

During a Slide Show

1

Press 

 <NEXT> to view the next picture or 

<PREVIOUS> to view the

previous picture.

2

Press 


<RIGHT> button or 

 <LEFT> button to rotate the picture.

Press 

 <RIGHT> 

button to rotate right by 90 degree.

Press 


<LEFT>

 button to rotate left by 90 degree.

Thumbnail Mode

1


Press 

 <TITLE> to enter Thumbnail mode.

While in Thumbnail mode, there are 12 pictures per page for viewing.

2

Press 

 <  /   /   /  > to select the picture in thumbnail. If you want to view

the selected picture in its original size, press 

 <PLAY/SEL.>.

When you view the picture in its original size, you can press 


<STOP> 

to view the pictures in

thumbnail.

3

Press 


<NEXT> or 

 <PREVIOUS> to view the next or previous thumbnail page.

3

Special Functions

Содержание GDVD67W4LCDK

Страница 1: ...82 182 00420 Goodmans Product Information Helpline 0870 873 0080 GDVD67W4LCDK Portable DVD Player with Remote Control User Guide ...

Страница 2: ...c Points A B Repeat 15 1 2 Convenient functions 16 Scene Information 16 Changing Audio Soundtrack Language 16 Subtitles 16 Viewing From Another Angle 17 To Mute the DVD Player 18 DVD Menu 18 Using the Menu Function 18 Chapter 2 Audio CD 2 1 Audio CD Playback 19 Basic Playback 19 Stopping Playback 19 Rapid Advance Rapid Reverse 19 Skip to Previous or Subsequent Tracks 20 Pause Playback 20 2 2 Infor...

Страница 3: ...ystem Setting 29 4 3 AUDIO Setup 30 Digital Out Setting 30 Analog Out Setting 31 4 4 Custom Setup 32 Parental Control Setting DVD 32 Password Setting DVD 33 Angle Mark Setting DVD 34 Default Setting 35 4 5 LCD Setup 36 Panel Setting 36 Colour Setting 36 Bright Setting 37 Chapter 5 For Your Reference 5 1 Important Safety Information 38 5 2 Disc Use and Care 40 5 3 Precautions 41 5 4 Troubleshooting...

Страница 4: ...FT button 6 PLAY SEL button 7 PREVIOUS button 8 STOP DOWN button 9 NUMERICAL buttons 10 SUBTITLE button 11 LCD button 12 ANGLE button 13 TITLE button 14 AUDIO button 15 F FWD RIGHT button 16 NEXT button 17 A B REPEAT button 18 1 ALL REPEAT button 19 MUTE button 1 2 3 4 5 6 7 8 9 10 11 12 13 14 15 16 17 18 19 ...

Страница 5: ...5 Front View Location of controls 1 LCD screen 2 SPEAKERS 3 PLAY button 4 PAUSE button 5 STOP button 6 Remote sensor 7 Power indicator 8 OPEN button 8 7 2 1 3 4 5 2 6 ...

Страница 6: ...Side View Location of controls Right side 1 Volume control 2 Headphones socket 3 Coaxial output socket Digital Audio 4 Audio output socket 5 Video output socket 6 POWER switch 7 DC IN Socket 1 2 3 4 5 6 7 ...

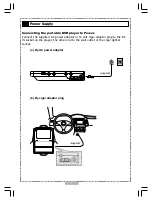
Страница 7: ... player to Power Connect the supplied AC power adaptor or 12 volt cigar adaptor plug to the DC IN socket on the player the other end to the wall outlet or the cigar lighter socket a By AC power adaptor b By cigar adaptor plug supplied supplied ...

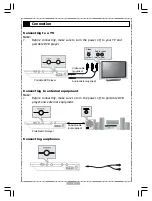
Страница 8: ...VD player Connecting to external equipment Note 1 Before connecting make sure to turn the power off to portable DVD player and external equipment Connecting earphones Video Input Audio Input yellow red Audio cable supplied Portable DVD player Coaxial cable not supplied Portable DVD player Video cable supplied white ...

Страница 9: ...ctions STEP 1 Unzip and open the carry bag STEP 2 Pack your DVD player into the carrt bag a Adjust the elastic straps and tighten it securely b Fasten the straps with the velcro STEP 3 Attach the bag to the headrest part by two steps a Snap the buckles together b Adjust the straps with the stoppers a b a b ...

Страница 10: ...ed STEP 4 Flatten this unit Note To place a disc bend the base of the player upward at 90 angle STEP 5 Connect the cigar adaptor plug to the power socket on the portable DVD player the other end to the cigar lighter socket 1800 supplied ...

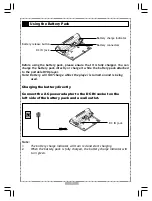
Страница 11: ... is turned on and is being used Charging the battery directly Connect the AC power adaptor to the DC IN socket on the left side of the battery pack and a wall outlet Note 1 The battery charge indicator will turn red and start charging 2 When the battery pack is fully charged the battery charge indicator will turn green Using the Battery Pack Battery release button Battery charge indicator DC IN ja...

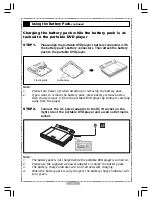
Страница 12: ...tery pack press battery release button then slowly remove it from the portable DVD player by sliding it carefully away from the player STEP 2 Connect the AC power adaptor to the DC IN socket on the right side of the portable DVD player and a wall outlet mains socket Note 1 The battery pack is not charged while the portable DVD player is turned on 2 Please use the supplied AC power adaptor to charg...

Страница 13: ...e no menus on the DVD If the disc has one or more titles the menu screen will appear on the screen NOTE Follow steps 5 and 6 if a menu is shown on the screen 5 Use to select play 6 Press PLAY SEL to start playback After operation When the portable DVD player is not in use remove the disc and slide the power switch to the off position Then close the display panel Stopping Playback and Returning to ...

Страница 14: ...g playback To resume playback press PLAY SEL The speed of advance x2 x4 x8 x16 x32 or reverse x2 x4 x8 x16 x32 can be selected by pressing the F FWD or F BWD buttons repeatedly Skipping Ahead or Back to Previous Chapters Skipping Ahead Press NEXT during playback Subsequent chapters will be shown for each press of this button Skipping Back Press PREVIOUS during playback Previous chapters will be sh...

Страница 15: ...screen NOTE Repeat playback may not work correctly with some DVDs This is not a fault with the DVD player 1 DVD Repeat Sections Between Two Specific Points A B Repeat 1 Press A B to select starting point A REPEAT A is shown on the screen 2 Press A B again to select end point B REPEAT A B is shown on the screen The player will now playback the scenes between Point A and Point B To resume normal pla...

Страница 16: ...urned on or after a disc is removed the language used will be the language which is selected as the default language in the setup menu If the default language is not recorded on the disc the portable DVD player will playback the first language programmed on the disc Subtitles Repeatedly press SUBTITLE until the required subtitle is displayed or until the subtitles are removed NOTE In some cases th...

Страница 17: ... these different angles using the ANGLE button The recorded angles vary depending on the disc Press ANGLE repeatedly during playback until the preferred viewing angle is selected NOTE ANGLE will only function on discs where different angles have been recorded If the symbol is shown there are no alternative angles for the current scene DVD 1 2 Convenient functions continued ...

Страница 18: ...h the DVD menu s contents and operation vary from disc to disc the following explains basic operation for these menus 1 Press TITLE in stop mode The DVD menu available on the disc now appears 2 Press to select the preferred item 3 Press PLAY SEL To enter other menu screens Repeat steps 2 and 3 To return to the previous menu screen Press TITLE Using the MENU Function 1 Press PLAY SEL 2 Press MENU A...

Страница 19: ... title side facing up 4 Close the DVD door The portable DVD player starts playback automatically Stopping Playback Press STOP once to stop the disc at its present position PRESTOP When the play button is pressed playback will start from this position Press STOP twice to stop playback When the play button is pressed it will resume from the beginning Rapid Advance Rapid Reverse Press F BWD or F FWD ...

Страница 20: ...elect eariler tracks Pause Playback Press PAUSE once during playback The player will pause playback To resume normal playback Press PLAY SEL 2 1 Audio CD Playback continued 2 2 Information Audio CDs Displaying the Information of the Current Track Press INFO repeatedly to display the elapsed time track number and the total number of tracks on the screen Stop Displaying the Information of the Curren...

Страница 21: ...Press PLAY SEL again During a Slide Show 1 Press NEXT to view the next picture or PREVIOUS to view the previous picture 2 Press RIGHT button or LEFT button to rotate the picture Press RIGHT button to rotate right by 90 degree Press LEFT button to rotate left by 90 degree ThumbnailMode 1 Press TITLE to enter Thumbnail mode While in Thumbnail mode there are 12 pictures per page for viewing 2 Press t...

Страница 22: ...merical keys then press PLAY SEL Press INFO the current photo number number of photos will be shown on the screen To pause slide show Press PAUSE the slide show will be paused To stop slide show Press STOP the picturea will be in the File Manager To resume slide show Press PLAY SEL again File Manager 1 Press to choose the required picture then press PLAY SEL to show the picture 2 Press NEXT to ski...

Страница 23: ...e playback Press PLAY SEL again To stop playback Press STOP The File Manager is then displayed ThumbnailMode 1 Press TITLE to enter Thumbnail mode While in Thumbnail mode there are 12 pictures per page for viewing 2 Press to select the picture in thumbnail If you want to view the selected picture in its original size press PLAY SEL When you view the picture in its original size you can press STOP ...

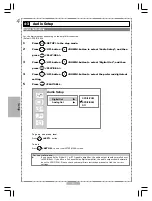
Страница 24: ... button to select Language Setup and then press PLAY SEL 3 Press UP button DOWN button to select OSD and then press PLAY SEL 4 Press UP button DOWN button to select the preferred language 5 Press PLAY SEL 4 1 Language Setup To go up one menu level Press LEFT button To exit Press SETUP to exit from SETUP MENU screen Language Setup OSD Menu Audio Subtitle English French German Italian Spanish 4 ...

Страница 25: ...ress UP button DOWN button to select Menu and then press PLAY SEL 4 Press UP button DOWN button to select the preferred language 5 Press PLAY SEL Language Setup OSD Menu Audio Subtitle English Chinese Japanese French German 4 To go up one menu level Press LEFT button To exit Press SETUP to exit from SETUP MENU screen Note If the language selected is not available on the DVD menu the default langua...

Страница 26: ...ess PLAY SEL 3 Press UP button DOWN button to select Audio and then press PLAY SEL 4 Press UP button DOWN button to select the preferred language 5 Press PLAY SEL Language Setup OSD Menu Audio Subtitle English Chinese Japanese French German Note If the language selected is not recorded on the disc the default language of the disc will be used 4 To go up one menu level Press LEFT button To exit Pre...

Страница 27: ...3 Press UP button DOWN button to select Subtitle and then press PLAY SEL 4 Press UP button DOWN button to select the preferred language 5 Press PLAY SEL Language Setup OSD Menu Audio Subtitle Note If the language selected is not recorded on the disc the default subtitle language will be used 4 To go up one menu level Press LEFT button To exit Press SETUP to exit from SETUP MENU screen Setup Englis...

Страница 28: ...ress LEFT button To exit Press SETUP to exit from SETUP MENU screen 4 3 Pan Scan Select 4 3 PS for a conventional size TV set Video material formatted using pan scan style is displayed such that a widescreen film will have the left and right edges cut off 4 3 Letter Box Select 4 3 LB for a conventional size TV set Black bands appear at top and bottom of screen letter box style when a widescreen fi...

Страница 29: ...AL if it is PAL TV or set AUTO if it is a multi TV system that supports both PAL and NTSC Default PAL 1 Press SETUP in the stop mode 2 Press UP button DOWN button to select Screen Setup and then press PLAY SEL 3 Press UP button DOWN button to select TV System and then press PLAY SEL 4 Press UP button DOWN button to select the appropriate TV system for your clearest view 5 Press PLAY SEL Screen Set...

Страница 30: ...n to select the preferred digital out setting 5 Press PLAY SEL 4 Setup Audio Setup Digital Out Analog Out SPDIF PCM SPDIF RAW Off To go up one menu level Press LEFT button To exit Press SETUP to exit from SETUP MENU screen For your reference If you have a Dolby Digital 5 1 or DTS capable amplifier the audio output should normally be set to SPDIF RAW If you have a 2 channel Dolby Digital amplifier ...

Страница 31: ...o Setup and then press PLAY SEL 3 Press UP button DOWN button to select Analog Out and then press PLAY SEL 4 Press UP button DOWN button to select the preferred analog out setting 5 Press PLAY SEL 4 Setup To go up one menu level Press LEFT button To exit Press SETUP to exit from SETUP MENU screen Audio Setup Digital Out Analog Out 2 Channel ...

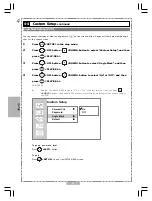
Страница 32: ...SEL 3 Press UP button DOWN button to select Parental Ctrl and then press PLAY SEL 4 Enter a 4 digit password before selecting ratings and press PLAY SEL Factory pre set password 0000 You need to enter 0000 to set the rating for the first time when purchasing your DVD from the store 5 Press UP button DOWN button to select the preferred ratings 6 Press PLAY SEL Custom Setup Parental Ctrl Password An...

Страница 33: ...P button DOWN button to select Password and then press PLAY SEL 4 Enter your old password and then press PLAY SEL Factory pre set password 0000 5 Enter your new password and then press PLAY SEL 6 Re enter your password to verify it and then press PLAY SEL Custom Setup Parental Ctrl Password Angle Mark Default To go up one menu level Press LEFT button To exit Press SETUP to exit from SETUP MENU scr...

Страница 34: ...SEL 3 Press UP button DOWN button to select Angle Mark and then press PLAY SEL 4 Press UP button DOWN button to select On or Off and then press PLAY SEL NOTE Whether the ANGLE MARK is set to On or Off with this setting when you press ANGLE button the portable DVD player will still display multi angles that are available on the DVD Custom Setup Parental Ctrl Password Angle Mark Default On Off 4 Set...

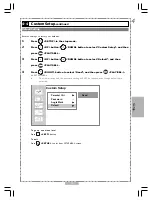
Страница 35: ... Press UP button DOWN button to select Default and then press PLAY SEL 4 Press RIGHT button to select Read and then press PLAY SEL EXCEPTION The viewer rating and the password setting will NOT be changed even though defaults are selected Custom Setup Parental Ctrl Password Angle Mark Default Read 4 Setup To go up one menu level Press LEFT button To exit Press SETUP to exit from SETUP MENU screen ...

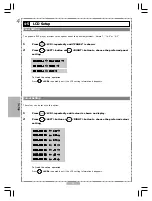
Страница 36: ...button or RIGHT button to choose the preferred colour setting To finish the setup operation Press LCD repeatedly until the LCD setting information disappears P P P P PANEL ANEL ANEL ANEL ANEL Nor Nor Nor Nor Normal mal mal mal mal P P P P PANEL ANEL ANEL ANEL ANEL 16 9 16 9 16 9 16 9 16 9 P P P P PANEL ANEL ANEL ANEL ANEL 4 3 4 3 4 3 4 3 4 3 COLOUR 3 COLOUR 3 COLOUR 3 COLOUR 3 COLOUR 3 COLOUR 2 CO...

Страница 37: ... the setup operation Press LCD repeatedly until the LCD setting information disappears Bright 3 Bright 3 Bright 3 Bright 3 Bright 3 Bright 2 Bright 2 Bright 2 Bright 2 Bright 2 Bright 1 Bright 1 Bright 1 Bright 1 Bright 1 Bright 0 Bright 0 Bright 0 Bright 0 Bright 0 Bright 1 Bright 1 Bright 1 Bright 1 Bright 1 Bright 2 Bright 2 Bright 2 Bright 2 Bright 2 Bright 3 Bright 3 Bright 3 Bright 3 Bright ...

Страница 38: ...tion or temporarily discontinue use in potentially hazardous situation Even if your headset is an open air type designed to let your hear outside sounds do not turn up the volume so high that you can not hear what is around you Failure to properly install operate and care for this product can increase the risk of electric shock or fire It can also increase the risk of monitor failure and possibly ...

Страница 39: ...noise can be harmful under constant exposure 80dB Average city traffic alarm clock buzzer at 2 feet food mixer 90dB Motorcycle heavy goods vehicle petrol lawn mower 100dB Pneumatic drill chain saw garbage truck discotec night club 120dB Rock bandconcert thunderclap Permanent loss of hearing 140dB Threshold of pain gunshot 2 feet away 180dB Rocket launching pad Goodmans Product Information Helpline...

Страница 40: ...isc inside a car under direct sunlight After Playback always remove the disc from the player and return it to the display storage case To clean discs use a dry soft cloth moving the cloth from the centre to the outside across the disc surface DO NOT use a rotary motion as this can make the disc unplayable DO NOT use Petroleum products or aggrassive cleaning agents as these will damage the disc Use...

Страница 41: ...not attempt to disassemble the player Do not put any foreign object onto the player on the disc tray Keep away from water magnet Keep the player away from flower vases tubs sinks etc If liquids are spilled into the player serious damage could occur Never bring a magnet or magnetized object near the player Stacking Place the player in a horizontal position and do not place anything heavy on it Cond...

Страница 42: ...tely distorted picture or no color The disc format is not according to the TV set used PAL NTSC in picture Picture is distorted during rapid The picture will be somewhat distorted at times this is normal advance or rapid reverse No rapid advance or rapid reverse Some discs may have sections which prohibit rapid advance or rapid reverse playback No 4 3 16 9 picture Choose the correct setup TV DISPL...

Страница 43: ...re likely to occur which will cause noise A B If the disc is brought from a cold to a warm environment moisture may form on the disc Wipe this moisture off with a soft dry lint free cloth before using the disc Improper disc storage You can damage discs if you store them in the following places Areas exposed to direct sunlight Humid or dusty areas Areas directly exposed to a heat outlet or heating ...

Страница 44: ...735 g External dimensions 212 x 158 x 41 mm W H D Signal system PAL Laser semiconductor laser wavelength 650 nm DVD VIDEO PLAYER OUTPUTS DVD VIDEO PLAYER OUTPUTS Video output 1 0 V p p 75 ohms negative sync Audio output digital audio 0 5 V p p 75 ohms Audio output analog audio 2 0 V rms 10k ohms ...

Отзывы: