background image

Operating Your Dehumidifier

SAFETY DEVICES

This appliance has two protection devices:

Resettable Thermal Link - this will automatically disconnect the power to the
appliance at a pre-set overheat temperature. After cooling down it will reset and
power on again. If this occurs, investigate what is causing the appliance to overheat.

Thermal Fuse - this disconnects the appliance permanently in case of overheating.
(It is non resettable).

CARE AND CLEANING

The dehumidifier requires regular cleaning to ensure trouble free operation:

Unplug the dehumidifier from the mains supply before cleaning and ensure that the
dehumidifier has been allowed to cool down completely before cleaning.

The common cause of overheating is deposits of dust or fluff in the appliance.
Ensure these deposits are removed regularly by unplugging the appliance and
vacuum cleaning the air vents and grills.

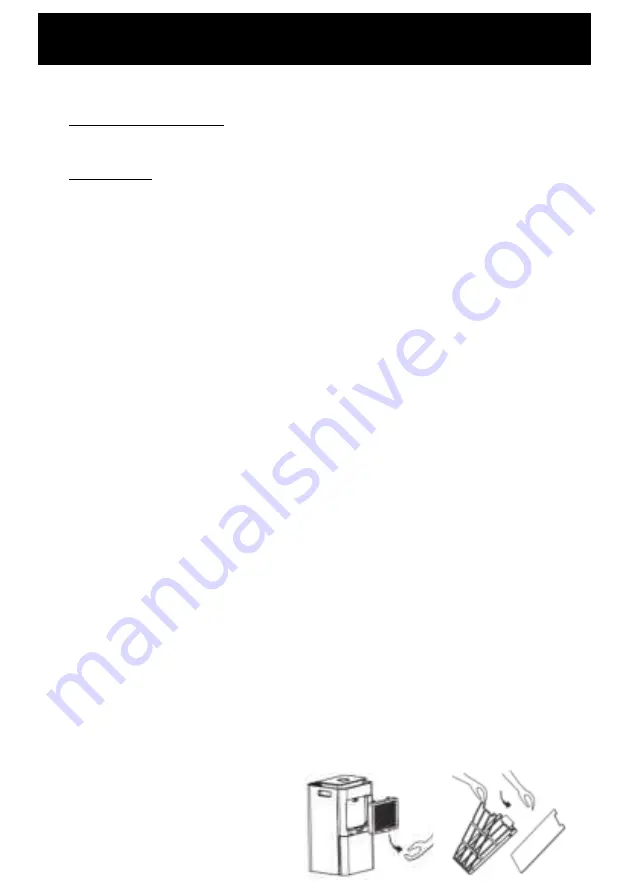
The air filter should also be cleaned regularly (every 2 weeks). To remove the filter: 

Place finger in the recess area at the base of the Air Outlet Filter and gently pull 
towards you and then down, the filter will now be released from the unit. 

To dislodge any dust from the filter you can either tap filter lightly over a dustbin or 
use a vacuum cleaner to remove all dirt. 

If the filter contains excessive debris which is hard to dislodge, you can remove the 
filter from the filter bracket and wash the filter in warm soapy water (using a 
neutral detergent), rinse well with clean water and then leave until dry. Once filter 
is dry, reinsert into the filter bracket. 

Replace filter back on to the unit and clip into place.

Use a damp cloth (not wet) to wipe the exterior of the dehumidifier to remove dust
and dirt.

Never use solutions such as petrol, thinners or polishing agents.

Ensure the dehumidifier is dry before plugging back into the mains supply.

CARE AND CLEANING CONTINUED

The water tank should be cleaned every few weeks to prevent growth of mould,
mildew, and bacteria.

Partially fill the tank with clean water and add a little mild detergent. Swish it
around and then empty the tank and rinse.

Note:

To thoroughly clean and dry the tank, remove the handle and lid to gain access

to the inside of the tank. After cleaning, drying, and reassembling the water tank,
reinsert securely into dehumidifier in order to restart operation.

Содержание GD415

Страница 1: ...Operating Instructions Model GD415 20L Dehumidifier with WiFi ...

Страница 2: ......

Страница 3: ... the unit WARNING Do not use this appliance in small rooms when they are occupied by persons not capable of leaving the room on their own unless constant supervision is provided WARNING To reduce the risk of fire keep textiles curtains or any flammable material a minimum distance of 1 metre from the air outlet General Care and Safety Guide Use only the voltage specified on the rating label of the ...

Страница 4: ...e area and is unrolled before use It is recommended that this appliance is plugged directly into the wall socket Power boards are not rated to supply power to high wattage appliances A correctly specified undamaged extension cord may be used with this appliance provided it is used in a safe manner Do not remove plug from power socket until the appliance has been switched off Do not remove plug fro...

Страница 5: ...e nearest authorised Service Centre and strictly follow the manufacturer s instruction only Appliance is filled with flammable gas R290 Before using the appliance read the manual Before installing the appliance read the installation manual Caution risk of fire WARNING Appliance shall be installed operated and stored in a room with a floor area larger than 4m2 Do not use any means to accelerate the...

Страница 6: ...ered or positioned incorrectly WARNING Never leave this dehumidifier unattended Ensure dehumidifier is on a flat stable heat resistant surface Once the dehumidifier is in a safe operating position and all switches are in the off position insert the power plug into the mains outlet and switch on CAUTION Ensure the power cord is not tight because if pulled it may partially pull the plug from the soc...

Страница 7: ...e room reaches the set humidity The dehumidifier has a humidity indicator light on the front that will change colour depending on the humidity levels in the room Blue Room humidity is lower than 50 Green Room humidity is between 50 70 Red Room humidity is above 70 Note there can be up to 3 discrepancy on colours changing Fan Speed LED Indicator Fan Speed Setting Button Defrost Mode LED Indicator W...

Страница 8: ...vant buttons and the display will illuminate for 5 seconds and then return back to sleep mode Press Sleep Mode button again to reset the LED control panel back to normal DEFROST When operating the unit the evaporator will accumulate frost which will effect the efficiency of the dehumidifier When this happens the machine will go into periodic defrost mode automatically and the indicator light will ...

Страница 9: ...G THE WATER TANK 1 To remove the water tank gently pull the water tank out of the back of the dehumidifier 2 Empty the tank 3 Once empty install the tank back into the back of the dehumidifier CONTINUOUS DRAINAGE If you would like to use the dehumidifier over a long period of time you can use the continuous drainage feature 1 Connect the drainage hose supplied into the drainage point of the dehumi...

Страница 10: ...r email address Tap Obtain verification code You will then receive an email with a verification code Download Goldair mobile APP Open the APP Store or Google Play on your mobile phone Open Search and enter Goldair Click GET and begin to download and install Once downloaded to your phone open the APP Enter the verification code from your email Create a password Then tap confirm If you haven t recei...

Страница 11: ...roducts https www goldair com au goldair app Australia Products Pairing Mode To connect to the Goldair app you must ensure that your device is in pairing mode which is where the Wifi Icon is flashing Most products will be in pairing mode after switching the device on but if it is not Put device on STAND BY mode ON at the wall but device is OFF Hold down the MODE button for around 5 seconds or unti...

Страница 12: ...ds you and then down the filter will now be released from the unit To dislodge any dust from the filter you can either tap filter lightly over a dustbin or use a vacuum cleaner to remove all dirt If the filter contains excessive debris which is hard to dislodge you can remove the filter from the filter bracket and wash the filter in warm soapy water using a neutral detergent rinse well with clean ...

Страница 13: ... correctly Remove the tank and re fit correctly Unit may have frozen Unplug the unit and allow the temperature to rise SUPPORT AND TECHNICAL ADVICE Goldair New Zealand Monday Friday 8am 5pm Phone 64 0 9 917 4000 Phone 0800 232 633 info cdb co nz Goldair Australia Monday Friday 8am 5pm Phone 61 0 3 9365 5100 Phone 1300 465 324 info cdbgoldair com au PROOF OF PURCHASE To receive warranty retain rece...

Страница 14: ...under the Australian Consumer Law You are entitled to a replacement or refund for a major failure and compensation for any other reasonably foreseeable loss or damage You are also entitled to have the goods repaired or replaced if the goods fail to be of acceptable quality and the failure does not amount to a major failure In New Zealand this warranty is additional to the conditions and guarantees...

Страница 15: ......

Страница 16: ...New Zealand PO Box 100707 North Shore Mail Centre Auckland 0745 www goldair co nz Australia PO Box 574 South Morang Victoria 3752 www goldair com au ...

Отзывы: