background image

MENU

MODE

MENU

GR/CH

10

%

MODE

MENU

GR/CH

10

%

MODE

MENU

GR/CH

10

%

MODE

MENU

GR/CH

10

%

-  37  -

-  38  -

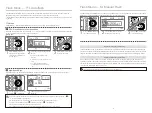
4. Wireless Flash Shooting

Wireless Flash Shooting: Radio (2.4G) Transmission

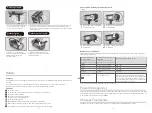
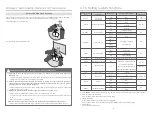
3. Setting the Communication Group

Short press the < 

GR/CH

 > Button to choose group ID from A to E.

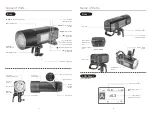
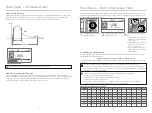
Positioning and Operation Range 

(Example of wireless flash shooting)

 Autoflash Shooting with One Slave Unit


Use master unit with wireless transmitting function as the transmitter end.


Before shooting, perform a test flash and test shooting.


The transmission distance might be shorter depending on the conditions such as positioning of slave units, the 

surrounding environment and whether conditions.

Transmission distance is about 100m

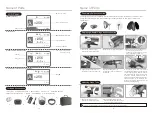
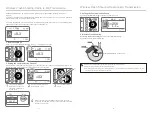
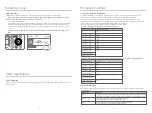
1. Wireless Settings

Press <


> Wireless Setting Button again until < 


 > is displayed on the panel.
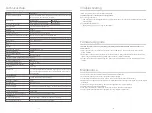
Long press the <

GR/CH

1

Button for 2 seconds so that 
channels ID is displayed on 
the LCD panel.

Turn the Select Dial to choose a 

2

channel ID from 1 to 32.

 Press the <

SET

> button to 

3

 confirm.

AD400Pro adopts Godox 2.4G wireless X system, which has good compatibility with other products of our 
company. 
As a slave unit, AD400Pro is automatically compatible with Canon E-TTL II, Nikon i-TTL, Sony, Olympus, Panasonic 
and FUJIFILM system according to the master unit. 

*

As a slave unit, AD400Pro can be controlled by the following master units: XPro series, X1T series, AD360II series,  

V860II series, V350 series,TT685 series,TT600 series, TT350 series, etc.

2. Setting the Communication Channel

If there are other wireless flash systems nearby, you can change the channel IDs to prevent signal interference. The 
channel IDs of the master unit and the slave unit(s) must be set to the same.

Wireless Flash Shooting: Radio (2.4G) Transmission

Wireless ID setting: press the MENU button to enter C.Fn-ID and 

4

choose from 01 to 99 (Note: this can only be achieved when the master 
unit also has this function). 

CH

 1

TTL

A


+0.3

10

%

CH

 1

TTL

A


+0.3

10

%

CH

32

TTL

A


+0.3

10

%

C

.

Fn

RESET

Ver

0

.

6

LCD

ID

99

CH

 1

Multi

E

OFF

1/

256

5 - 5 

Hz

Содержание WITSTRO AD400Pro

Страница 1: ...A4栋 Building A4 Xinhe Huafa Industrial Zone Fuzhou RD West Fuyong Town Baoan District Shenzhen 518103 China 电话 Tel 86 755 29609320 8062 传真 Fax 86 755 25723423 邮箱 E mail godox godox com http www godox com 深圳市神牛摄影器材有限公司 GODOX Photo Equipment Co Ltd Made In China All in One Outdoor Flash 一体式外拍闪光灯 AD400 ...

Страница 2: ...e power output power adjusts from full power 1 256 to 1 1 in 25 steps Advanced functions 1 8000s high speed sync flash multi flash high speed sync triggering etc Compatible wireless TTL system with built in Godox 2 4G wireless X system AD400Pro is compatible with Canon Nikon Sony FUJIFILM Olympus and Panasonic TTL autoflash system Wireless control with built in Godox 2 4G wireless X system to achi...

Страница 3: ...o 2 4G Transmission Wireless Settings Setting the Communication Channel Setting the Communication Group Wireless Flash Shooting C Fn Setting Custom Functions Modeling Lamp Other Applications Sync Triggering Protection Function Technical Data Troubleshooting Firmware Upgrade Maintenance Contents 23 24 27 30 30 30 30 31 31 31 32 32 33 34 36 37 40 41 41 42 43 44 44 44 25 26 Conventions used in this M...

Страница 4: ...Select Dial SET Set Button Test Button Flash Ready Indicator Wireless Selection Button Accessory Mount Tube Socket Modeling Lamp LED Light Sensor CH 1 TTL A 0 3 10 H High Speed Sync Button Bracket Locking Ring Socket for Portable Flash Head Battery Indicator Button Accessory Locking Ring Type C USB Port 3 5mm Sync Cord Jack Mounting Bracket Lithium Battery Battery Locking Ring Handle Fixed Part Ha...

Страница 5: ...luded Accessories CH 1 Multi A OFF 1 256 5 5 Hz M A 1 256 S2 OFF Multi A OFF 1 256 5 5 Hz t 1 1 10100 M A 10 1 256 S1 S2 M Manual flash Manual flash output Flash duration Multi Stroboscopic flash Number of flashes Flash frequency Radio transmission wireless shooting Firing group Channel 4 Optical transmission wireless shooting Note To avoid damage please detach the flash tube during the transporta...

Страница 6: ... on C Fn STANDBY Battery Level Indication Attach the battery pack to the flash correctly Be aware of the battery level by check the battery level indication on the LCD panel when using Note The indications are almost the same except of grids shift 3 grids 2 grids 1 grid Blank grid Low battery and charging reminder 1 red grid 3 green grids 1 red grid 2 green grids 1 red grid 1 green grid 1 red grid...

Страница 7: ...er to calculate the correct exposure for the subject and the background Press MODE Mode Selection Button and three flash modes will display on the LCD panel one by one with each pressing TTL Mode Press MODE Mode Selection Button to enter TTL mode The LCD panel will display TTL FEC Flash Exposure Compensation With FEC function this flash can adjust from 3 to 3 in 1 3rd stops It is useful in situati...

Страница 8: ...a tripod and a remote control is recommended A flash output of 1 1 and 1 2 cannot be set for stroboscopic flash Stroboscopic flash can be used with buLb If the number of flashes is displayed as the firing will continue until the shutter closes or the battery is exhausted The number of flashes will be limited as shown by the following table Maximum Stroboscopic Flashes 1 4 1 8 1 16 1 32 1 64 1 128 ...

Страница 9: ...elect Dial to choose a 2 channel ID from 1 to 32 Press the SET button to 3 confirm AD400Pro adopts Godox 2 4G wireless X system which has good compatibility with other products of our company As a slave unit AD400Pro is automatically compatible with Canon E TTL II Nikon i TTL Sony Olympus Panasonic and FUJIFILM system according to the master unit As a slave unit AD400Pro can be controlled by the f...

Страница 10: ...ed as second curtain Use UNITS in combination with ALT UNITS sets the total number of flashes ALT sets the triggering times before flash s firing 7 levels off Choose from 01 to 99 ON OFF Reset COLOR SLAVE MODEL STANDBY LIGHT UNITS ALT LCD ID BEEP RESET M Non high speed mode 3 3 OFF 01 99 ON OFF NO YES Wireless mode NO Delay flash A B A B C 1 Disturbed by the 2 4G signal in outer environment e g wi...

Страница 11: ...and PROP Short press the Modeling Lamp Button and the three mode will be displayed on the LCD panel in sequence 1 OFF the modeling lamp is off 2 Percentage 10 100 to prevent overheat 30 the fan rotates in low speed while 30 in high speed 3 PROP The modeling lamp s power changes with the flash s power The bigger power the flash has the brighter the modeling lamp is to prevent overheat 1 64 the fan ...

Страница 12: ...ures or was wetted do not use it until it is repaired by professionals Changes made to the specifications or designs may not be reflected in this manual Maintenance Firmware Upgrade Technical Data Model Wireless Slave Unit Mode Flash Mode Guide No m ISO 200 Flash Duration POWER Power Output Stroboscopic Flash Flash Exposure Compensation FEC Sync mode Delay Flash Mask Fan Beeper Modeling Lamp LED O...

Страница 13: ...terference in a residential installation This equipment generates uses and can radiate radio frequency energy and if not installed and used in accordance with the instructions may cause harmful interference to radio communications However there is no guarantee that interference will not occur in a particular installation If this equipment does cause harmful interference to radio or television rece...

Отзывы: