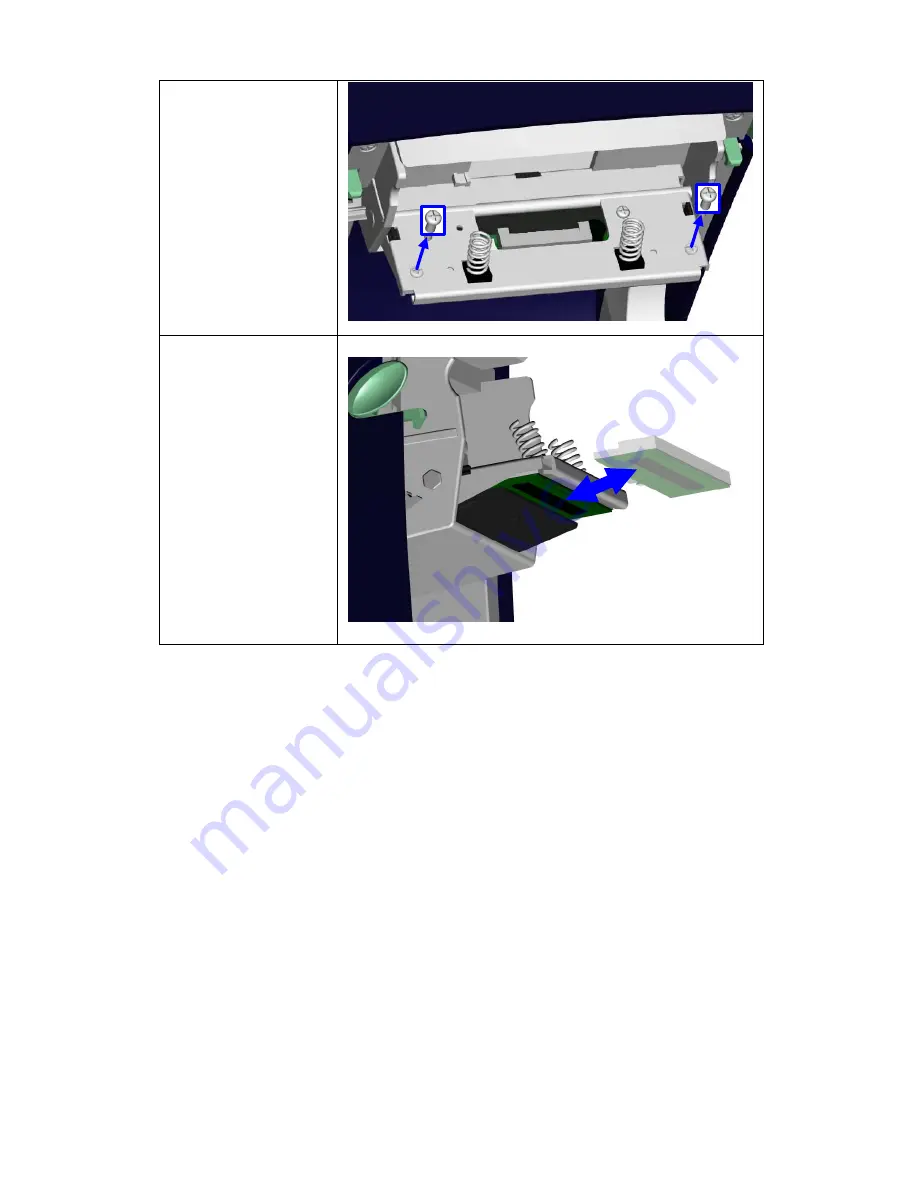
5. Remove
the
Head Screws,
6. From
the
underneath of the
Print Head Bracket,
7.
After new print head
is installed, tighten
the Print Head
Screws, plug the
re
ft to
complete the
installation.
hold the front end of
print head to remove
it and install new
print head.
Print Head
Connector, resto
the Print Head
Bracket and lock the
Print Head Li
EZ-DT-2/EZ-DT-4 User’s Manual
29
Содержание EZ-DT-2
Страница 1: ...User s Manual EZ DT 2 EZ DT 4 P N 920 012511 03 Rev A 08 2009 ...
Страница 34: ...Appendix 1 EZ DT 2 Certifications EZ DT 2 EZ DT 4 User s Manual 33 ...
Страница 35: ...EZ DT 2 EZ DT 4 User s Manual 34 ...
Страница 36: ...EZ DT 2 EZ DT 4 User s Manual 35 ...
Страница 37: ...EZ DT 2 EZ DT 4 User s Manual 36 ...
Страница 38: ...EZ DT 2 EZ DT 4 User s Manual 37 ...
Страница 39: ...2 EZ DT 4 Certifications EZ DT 2 EZ DT 4 User s Manual 38 ...
Страница 40: ...EZ DT 2 EZ DT 4 User s Manual 39 ...
Страница 41: ...EZ DT 2 EZ DT 4 User s Manual 40 ...
Страница 42: ...EZ DT 2 EZ DT 4 User s Manual 41 ...
Страница 43: ...EZ DT 2 EZ DT 4 User s Manual 42 ...
Страница 44: ...EZ DT 2 EZ DT 4 User s Manual 43 ...


