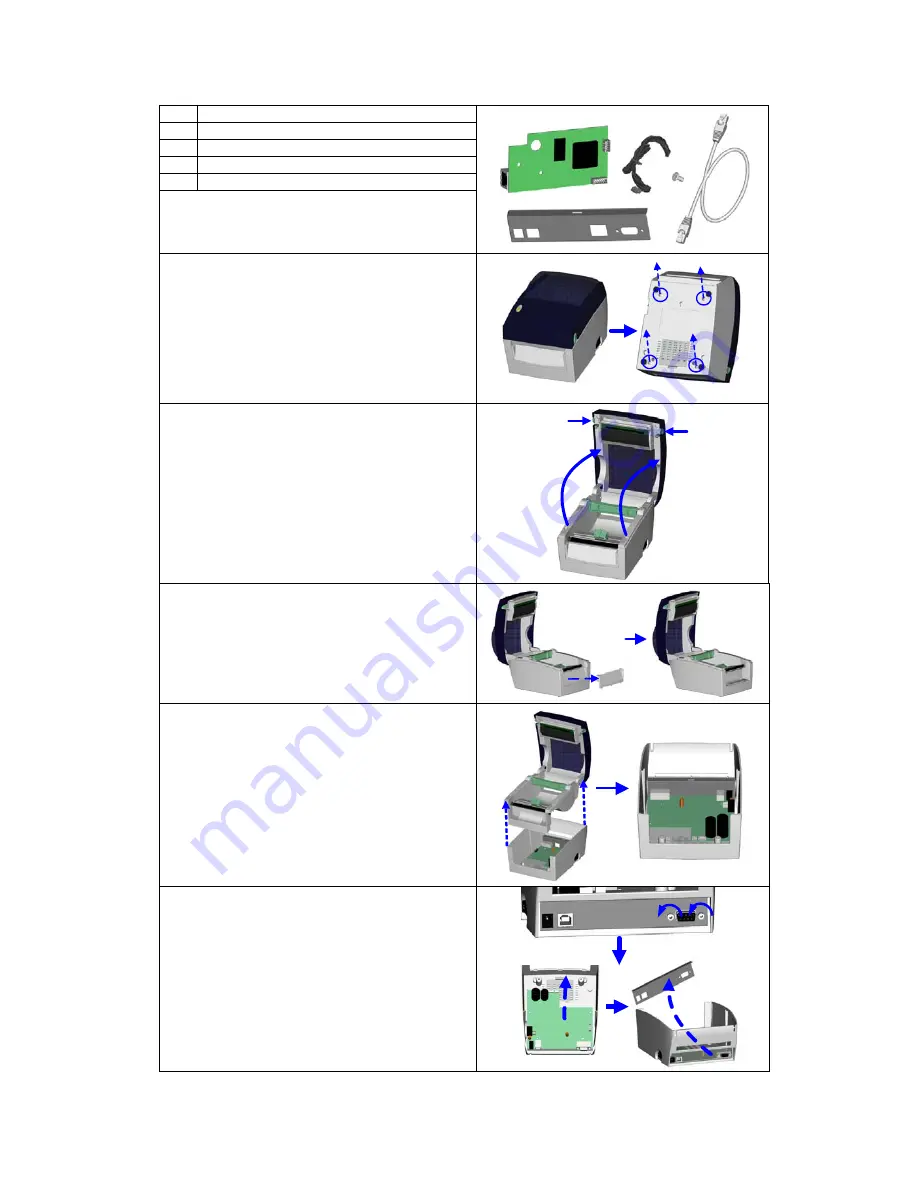
3-4. EZ-DT-4 Ethernet Module Installation
1 Ethernet
module
2
Ethernet Back Panel
3
Module Connection Wire
4 Secure
Screw*1
5
Ethernet Cable 1.8M
1
2
3
5
4
【
Note
】
Plea e make sure that anti-static precautions
dopted during the installation.
s
are a
1.
power is off and the power
cable is unplugged. Place the printer onto
a smooth surface and flip the whole printer
unit upside down.
2.
Unscrew bottom case screws as indicated
in figure.
Make sure the
3.
ver Open Button and open the
top cover.
Press the Co
1
1
2
2
4.
Remove the Front Cover Plate.
5.
Lift the middle compartment and the top
cover up.
6.
Loosen hexagonal screws on both sides of
.
Push the mainboard slightly to the direction
ndicated in figure.
the
RS-232 port.
7
that i
8.
Remove standard Back Panel from
printer.
EZ-DT-2/EZ-DT-4 User’s Manual
23
Содержание EZ-DT-2
Страница 1: ...User s Manual EZ DT 2 EZ DT 4 P N 920 012511 03 Rev A 08 2009 ...
Страница 34: ...Appendix 1 EZ DT 2 Certifications EZ DT 2 EZ DT 4 User s Manual 33 ...
Страница 35: ...EZ DT 2 EZ DT 4 User s Manual 34 ...
Страница 36: ...EZ DT 2 EZ DT 4 User s Manual 35 ...
Страница 37: ...EZ DT 2 EZ DT 4 User s Manual 36 ...
Страница 38: ...EZ DT 2 EZ DT 4 User s Manual 37 ...
Страница 39: ...2 EZ DT 4 Certifications EZ DT 2 EZ DT 4 User s Manual 38 ...
Страница 40: ...EZ DT 2 EZ DT 4 User s Manual 39 ...
Страница 41: ...EZ DT 2 EZ DT 4 User s Manual 40 ...
Страница 42: ...EZ DT 2 EZ DT 4 User s Manual 41 ...
Страница 43: ...EZ DT 2 EZ DT 4 User s Manual 42 ...
Страница 44: ...EZ DT 2 EZ DT 4 User s Manual 43 ...


