G - D E K
i n S t r u C t i o n M a n ua l
Pa G E 1 0
FlusH mountinG
Before starting, select a suitable panel for the mounting
location then examine behind the panel to determine that
there is sufficient access for routing the cable and fitting the
mounting screws. a template is included for marking the
mounting locations.
Place the supplied template against the panel or bulkhead
then mark and drill the location of the four mounting screws
and the connecting cable.
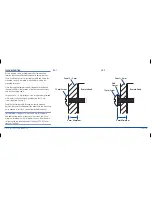
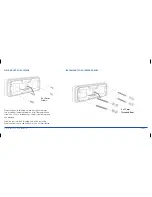
For panels of 6 – 9 mm thickness such as aluminium, plywood
or fibreglass, the unit can be mounted using the 12 mm
screws supplied. (See fig.1)
Feed the connecting cable through the centre hole and
position the remote head against the panel with the mounting
holes aligned. install the 4 screws from behind the panel.
imPortant:
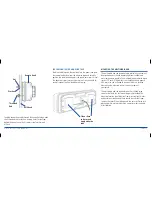
if the panel is less than 6 mm thick please
add additional washers or spacers to the screws to make a
minimum total depth of 6 mm otherwise you will not be able
to tighten the remote head against the panel. Do not over
tighten. (See fig.2)
FiG.1
FiG.2
remote Head
12 mm screw
Panel 6 – 9 mm
6 mm minimum
remote Head
12 mm screw
Panel < 6 mm
add
spacer
6 mm minimum

