


Instalación por abajo (continuación)
HOMEDEPOT.COM/GLACIERBAY
Póngase en contacto con 1-855-HDGLACIER para obtener más asistencia.
10
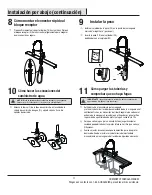
From under the sink, screw the soap dispenser (T) onto the
soap assembly (O) shank. Insert the soap pump (Q) down
in the sink. Secure the soap assembly(O) to the sink with
opmount Installation (continued)
From under the sink, screw the soap dispenser (T) onto the
soap assembly (O) shank. Insert the soap pump (Q) down
in the sink. Secure the soap assembly(O) to the sink with
opmount Installation (continued)
Installing the soap dispenser
From under the sink, screw the soap dispenser (T) onto the
soap assembly (O) shank. Insert the soap pump (Q) down
Insert the soap assembly (O) through the selected hole
in the sink. Secure the soap assembly(O) to the sink with
the spray head by unscrewing it from the hose in a
counterclockwise direction. Be sure to hold the end of
the hose down into the sink and turn the faucet to
the warm position where it mixes hot and cold water.
Flush the water lines for one minute. This flushes away
any debris that could cause damage to internal parts.
IMPORTANT: After installation is completed, turn on the
hot and cold water supplies. Check for leaks. Do not lose
opmount Installation (continued)
From under the sink, screw the soap dispenser (T) onto the
soap assembly (O) shank. Insert the soap pump (Q) down
in the sink. Secure the soap assembly(O) to the sink with
opmount Installation (continued)
From under the sink, screw the soap dispenser (T) onto the
soap assembly (O) shank. Insert the soap pump (Q) down
in the sink. Secure the soap assembly(O) to the sink with
opmount Installation (continued)
Installing the soap dispenser
From under the sink, screw the soap dispenser (T) onto the
soap assembly (O) shank. Insert the soap pump (Q) down
Insert the soap assembly (O) through the selected hole
in the sink. Secure the soap assembly(O) to the sink with
the spray head by unscrewing it from the hose in a
counterclockwise direction. Be sure to hold the end of
the hose down into the sink and turn the faucet to
the warm position where it mixes hot and cold water.
Flush the water lines for one minute. This flushes away
any debris that could cause damage to internal parts.
IMPORTANT: After installation is completed, turn on the
hot and cold water supplies. Check for leaks. Do not lose
opmount Installation (continued)
From under the sink, screw the soap dispenser (T) onto the
soap assembly (O) shank. Insert the soap pump (Q) down
in the sink. Secure the soap assembly(O) to the sink with
opmount Installation (continued)
From under the sink, screw the soap dispenser (T) onto the
soap assembly (O) shank. Insert the soap pump (Q) down
in the sink. Secure the soap assembly(O) to the sink with
opmount Installation (continued)
Installing the soap dispenser
From under the sink, screw the soap dispenser (T) onto the
soap assembly (O) shank. Insert the soap pump (Q) down
Insert the soap assembly (O) through the selected hole
in the sink. Secure the soap assembly(O) to the sink with
the spray head by unscrewing it from the hose in a
counterclockwise direction. Be sure to hold the end of
the hose down into the sink and turn the faucet to
the warm position where it mixes hot and cold water.
Flush the water lines for one minute. This flushes away
any debris that could cause damage to internal parts.
IMPORTANT: After installation is completed, turn on the
hot and cold water supplies. Check for leaks. Do not lose
opmount Installation (continued)
From under the sink, screw the soap dispenser (T) onto the
soap assembly (O) shank. Insert the soap pump (Q) down
in the sink. Secure the soap assembly(O) to the sink with
opmount Installation (continued)
From under the sink, screw the soap dispenser (T) onto the
soap assembly (O) shank. Insert the soap pump (Q) down
in the sink. Secure the soap assembly(O) to the sink with
opmount Installation (continued)
Installing the soap dispenser
From under the sink, screw the soap dispenser (T) onto the
soap assembly (O) shank. Insert the soap pump (Q) down
Insert the soap assembly (O) through the selected hole
in the sink. Secure the soap assembly(O) to the sink with
the spray head by unscrewing it from the hose in a
counterclockwise direction. Be sure to hold the end of
the hose down into the sink and turn the faucet to
the warm position where it mixes hot and cold water.
Flush the water lines for one minute. This flushes away
any debris that could cause damage to internal parts.
IMPORTANT: After installation is completed, turn on the
hot and cold water supplies. Check for leaks. Do not lose
opmount Installation (continued)
From under the sink, screw the soap dispenser (T) onto the
soap assembly (O) shank. Insert the soap pump (Q) down
in the sink. Secure the soap assembly(O) to the sink with
opmount Installation (continued)
From under the sink, screw the soap dispenser (T) onto the
soap assembly (O) shank. Insert the soap pump (Q) down
in the sink. Secure the soap assembly(O) to the sink with
opmount Installation (continued)
Installing the soap dispenser
From under the sink, screw the soap dispenser (T) onto the
soap assembly (O) shank. Insert the soap pump (Q) down
Insert the soap assembly (O) through the selected hole
in the sink. Secure the soap assembly(O) to the sink with
the spray head by unscrewing it from the hose in a
counterclockwise direction. Be sure to hold the end of
the hose down into the sink and turn the faucet to
the warm position where it mixes hot and cold water.
Flush the water lines for one minute. This flushes away
any debris that could cause damage to internal parts.
IMPORTANT: After installation is completed, turn on the
hot and cold water supplies. Check for leaks. Do not lose
opmount Installation (continued)
From under the sink, screw the soap dispenser (T) onto the
soap assembly (O) shank. Insert the soap pump (Q) down
in the sink. Secure the soap assembly(O) to the sink with
opmount Installation (continued)
From under the sink, screw the soap dispenser (T) onto the
soap assembly (O) shank. Insert the soap pump (Q) down
in the sink. Secure the soap assembly(O) to the sink with
opmount Installation (continued)
Installing the soap dispenser
From under the sink, screw the soap dispenser (T) onto the
soap assembly (O) shank. Insert the soap pump (Q) down
Insert the soap assembly (O) through the selected hole
in the sink. Secure the soap assembly(O) to the sink with
the spray head by unscrewing it from the hose in a
counterclockwise direction. Be sure to hold the end of
the hose down into the sink and turn the faucet to
the warm position where it mixes hot and cold water.
Flush the water lines for one minute. This flushes away
any debris that could cause damage to internal parts.
IMPORTANT: After installation is completed, turn on the
hot and cold water supplies. Check for leaks. Do not lose
opmount Installation (continued)
From under the sink, screw the soap dispenser (T) onto the
soap assembly (O) shank. Insert the soap pump (Q) down
in the sink. Secure the soap assembly(O) to the sink with
opmount Installation (continued)
From under the sink, screw the soap dispenser (T) onto the
soap assembly (O) shank. Insert the soap pump (Q) down
in the sink. Secure the soap assembly(O) to the sink with
opmount Installation (continued)
Installing the soap dispenser
From under the sink, screw the soap dispenser (T) onto the
soap assembly (O) shank. Insert the soap pump (Q) down
Insert the soap assembly (O) through the selected hole
in the sink. Secure the soap assembly(O) to the sink with
the spray head by unscrewing it from the hose in a
counterclockwise direction. Be sure to hold the end of
the hose down into the sink and turn the faucet to
the warm position where it mixes hot and cold water.
Flush the water lines for one minute. This flushes away
any debris that could cause damage to internal parts.
IMPORTANT: After installation is completed, turn on the
hot and cold water supplies. Check for leaks. Do not lose
opmount Installation (continued)
From under the sink, screw the soap dispenser (T) onto the
soap assembly (O) shank. Insert the soap pump (Q) down
in the sink. Secure the soap assembly(O) to the sink with
opmount Installation (continued)
From under the sink, screw the soap dispenser (T) onto the
soap assembly (O) shank. Insert the soap pump (Q) down
in the sink. Secure the soap assembly(O) to the sink with
opmount Installation (continued)
Installing the soap dispenser
From under the sink, screw the soap dispenser (T) onto the
soap assembly (O) shank. Insert the soap pump (Q) down
Insert the soap assembly (O) through the selected hole
in the sink. Secure the soap assembly(O) to the sink with
the spray head by unscrewing it from the hose in a
counterclockwise direction. Be sure to hold the end of
the hose down into the sink and turn the faucet to
the warm position where it mixes hot and cold water.
Flush the water lines for one minute. This flushes away
any debris that could cause damage to internal parts.
IMPORTANT: After installation is completed, turn on the
hot and cold water supplies. Check for leaks. Do not lose
opmount Installation (continued)
Installing the soap dispenser
From under the sink, screw the soap dispenser (T) onto the
soap assembly (O) shank. Insert the soap pump (Q) down
Insert the soap assembly (O) through the selected hole
in the sink. Secure the soap assembly(O) to the sink with
leaks
remove
the spray head by unscrewing it from the hose in a
counterclockwise direction. Be sure to hold the end of
the hose down into the sink and turn the faucet to
the warm position where it mixes hot and cold water.
Flush the water lines for one minute. This flushes away
any debris that could cause damage to internal parts.
IMPORTANT: After installation is completed, turn on the
hot and cold water supplies. Check for leaks. Do not lose
opmount Installation (continued)
opmount Installation (continued)
opmount Installation (continued)
From under the sink, screw the soap dispenser (T) onto the
soap assembly (O) shank. Insert the soap pump (Q) down
Insert the soap assembly (O) through the selected hole
in the sink. Secure the soap assembly(O) to the sink with
Flush the water lines for one minute. This flushes away
opmount Installation (continued)
opmount Installation (continued)
opmount Installation (continued)
From under the sink, screw the soap dispenser (T) onto the
soap assembly (O) shank. Insert the soap pump (Q) down
Insert the soap assembly (O) through the selected hole
in the sink. Secure the soap assembly(O) to the sink with
Flush the water lines for one minute. This flushes away
opmount Installation (continued)
opmount Installation (continued)
opmount Installation (continued)
From under the sink, screw the soap dispenser (T) onto the
soap assembly (O) shank. Insert the soap pump (Q) down
Insert the soap assembly (O) through the selected hole
in the sink. Secure the soap assembly(O) to the sink with
Flush the water lines for one minute. This flushes away
opmount Installation (continued)
opmount Installation (continued)
opmount Installation (continued)
From under the sink, screw the soap dispenser (T) onto the
soap assembly (O) shank. Insert the soap pump (Q) down
Insert the soap assembly (O) through the selected hole
in the sink. Secure the soap assembly(O) to the sink with
Flush the water lines for one minute. This flushes away
opmount Installation (continued)
opmount Installation (continued)
opmount Installation (continued)
From under the sink, screw the soap dispenser (T) onto the
soap assembly (O) shank. Insert the soap pump (Q) down
Insert the soap assembly (O) through the selected hole
in the sink. Secure the soap assembly(O) to the sink with
Flush the water lines for one minute. This flushes away
opmount Installation (continued)
opmount Installation (continued)
opmount Installation (continued)
From under the sink, screw the soap dispenser (T) onto the
soap assembly (O) shank. Insert the soap pump (Q) down
Insert the soap assembly (O) through the selected hole
in the sink. Secure the soap assembly(O) to the sink with
Flush the water lines for one minute. This flushes away
opmount Installation (continued)
opmount Installation (continued)
opmount Installation (continued)
From under the sink, screw the soap dispenser (T) onto the
soap assembly (O) shank. Insert the soap pump (Q) down
Insert the soap assembly (O) through the selected hole
in the sink. Secure the soap assembly(O) to the sink with
Flush the water lines for one minute. This flushes away
opmount Installation (continued)
opmount Installation (continued)
opmount Installation (continued)
From under the sink, screw the soap dispenser (T) onto the
soap assembly (O) shank. Insert the soap pump (Q) down
in the sink. Secure the soap assembly(O) to the sink with
opmount Installation (continued)
From under the sink, screw the soap dispenser (T) onto the
soap assembly (O) shank. Insert the soap pump (Q) down
Insert the soap assembly (O) through the selected hole
in the sink. Secure the soap assembly(O) to the sink with
Flush the water lines for one minute. This flushes away
opmount Installation (continued)
6
7
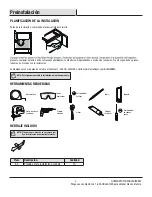
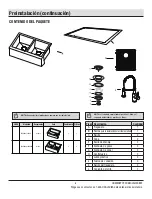
Cómo fijar el ensamblaje del grifo
Cómo instalar el ensamblaje del grifo
L
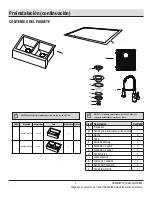
Instalación de la encimera
5
Limpiar el fondo de la encimera y la brida superior (o labio) del fregadero
con alcohol desnaturalizado.
Aplique una gota estrecha de sellador adhesivo de silicona alrededor del
costado y la parte posterior del fregadero..
Coloque y asegure con cuidado el fregadero a la encimera siguiendo las
instrucciones del fabricante..
Aplique una gota delgada de sellador de silicona donde el fregadero se une
a la encimera y el gabinete..
Eliminar inmediatamente el exceso de sellador.
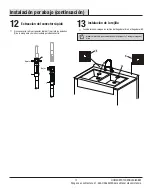
Desde abajo del lavamanos, asegura el conjunto del grifo a aquel
con la sistema FastMountTM (21). Empuja la sistema
FastMountTM (21) hacia arriba sobre las roscas hasta que toque
la parte inferior del lavamanos. Enseguida gírala con la mano
(hacia la derecha) para ajustar (Fig. 1).
Colocación de clip
recomendada
Encimera
Masilla de silicona
(no incluida)
Cierra el suministro de agua.
Taladre un agujero con un diámetro de 1.38 pulgadas. Coloca el
ensamblaje del grifo (L) en el orificio del fregadero.
PRECAUCIÓN:
Cierra siempre el suministro de agua antes de retirar un
grifo existente o reemplazar alguna parte del mismo. Abre la llave del grifo
para liberar la presión de agua y asegúrate de que el suministro de agua esté
completamente cerrado.
Installation (continued)
5
Securing the faucet assembly
6
Installing the sink
From underneath the sink, secure the faucet assembly to the
sink with the Fastmount™ system (21). Push the Fastmount™
system (21) up over the threads until it stops against the
bottom of the sink, then hand turn (clockwise) to tighten.
Apply silicone sealant (not included) around the underside and lip of the sink (A).
Carefully lower the sink (A) into the counter.
Rotate the clips. Tighten the screws on the top mount clips (AA) evenly until the
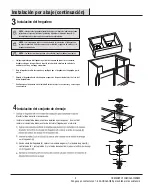
5
6
Installation (continued)
Securing the faucet assembly
Installing the sink
21
Sink
Push
up
21
1
1
Push
up
21
2
3
3
Sink
21
Sink
Continue to push up
and turn clockwise
to tighten
From underneath the sink, secure the faucet assembly to the
sink with the Fastmount
TM
system (21). Push the Fastmount
TM
system (21) up over the threads until it stops against the
bottom of the sink, then hand turn (clockwise) to tighten.
Apply silicone sealant (not included) around the underside and lip of the sink (A).
Carefully lower the sink (A) into the counter.
Rotate the clips. Tighten the screws on the top mount clips (AA) evenly until the
Push
up
Sink
Push
up
Sink
Sink
Continue to push up
and turn clockwise
to tighten
Empu-
jar
Frega-
dero
Fregadero
Continúe empujando
hacia arriba y gire
en sentido horario
Empu-
jar
Frega-
dero
Содержание FSUZAS2721A1SA1
Страница 1: ... Monday Friday V1 TAP 1 SKU Model Please refer to page 4 7 ...
Страница 15: ... Monday Friday ...


