


1 3
Hardware Installation Process
Please observe the safety information in chapter “Important Safety Information”
Do not expose the server to extreme environmental conditions. Protect it from dust,
humidity, and heat.
Step 2-1: Chassis Removal and Installation
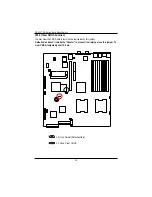
Step 1 Loosen thscrew from the top cover.
Step 2 Push down the indentation located at two sides of the chassis, and slide toward to remove the
top cover.
Step 3 Reverse Step 1, and 2 to replace the chassis cover.
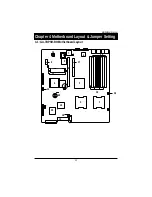
Chapter 2 System Hardware Installation
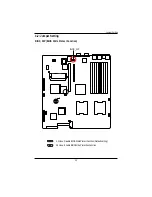
Step 2
Note: Before installing CPU, you must remove the FAN duct. For FAN duct removal, please
see Sub-section 2-7 “FAN Duct Removal and Installtion” for detail instruction.
Step 1
Screw
Содержание GS-R127H-RH
Страница 51: ...51 BIOS Setup Server Figure 4 Server ...
Страница 65: ...DriverInstallation 65 2 Setup Wizard 2 Click Next 3 License Aggremment 3 Click Yes ...
Страница 68: ...68 GS R127 RH Series Rack Mount Server 2 Setup Wizard 2 Click Next 3 License Aggremment 3 Click Yes ...
Страница 69: ...DriverInstallation 69 4 Installation Complete 4 Click Finish ...
Страница 80: ...80 GS R127 RH Series Rack Mount Server 4 Installaiton Wizard completed 4 Click Finish Installation complete ...


