31
C.8.2. Online communications with the TR4030
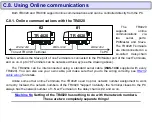
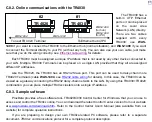
The TR4030 has a
built-in UTP Ethernet
port so it can be placed
on the Local Area
Network (LAN) directly.
There are two cables
supplied with every
TR4030: use
WAS-
1499
if you want to connect the TR4030 to the Ethernet hub (normal situation), and
WAS-1498
if you want
to connect the Terminal directly to your PC (without any hub). You can also use your own cable, just make
sure that you do the wiring correctly- see
Each TR4030 must be assigned a unique IP address that is not used by any other device connected to
your LAN. Multiple TR4030 Terminals can be placed on a single LAN provided that they all are assigned
different IP addresses.
Like the TR4020, the TR4030 has an RS232 Slave port. This port can be used to daisy-chain more
TR4020 Terminals (cable
WAS-1404
for details). In this case, the TR4030 can be
viewed as a gateway connecting the RS232 daisy-chain network to the LAN. By using this TR4020
combination you can place multiple TR40xx clusters onto a single IP-address.
C.8.3. Sample software
ProxData provides a free software tool- TR4020/4030 Control Center for Windows- that you can use to
access and control the TR40xx online. You can download the latest Control Center version from our website
at
www.proxdata.com/downloads.htm
. Refer to the
Control Center User’s Manual
(also available from our
website) for complete operation instructions.
If you are preparing to design your own TR40xx-related PC software, please refer to a separate
document-
TR40xx communications protocol
for a complete protocol description.
To next TR 4020 Terminal
WAS-1404
WAS-1404
WAS-1499
(for hub)
WAS-1498
(for PC)
#2
TR 4020
TR 4030
#1
To Ethernet hub or PC
Содержание TR4020
Страница 50: ...50 Time Main Menu Setup See also Date This Menu Item allows you to set the TR40xx s current date ...
Страница 72: ...72 Machine Number See Machine Number Programming Mode Menu Item ...
Страница 74: ...74 Time See Time Programming Mode Menu Item ...
Страница 75: ...75 Date See Date Programming Mode Menu Item ...
Страница 77: ...77 Bell duration See Bell duration Programming Mode Menu Item ...
Страница 78: ...78 Bell Table See Edit bell table Clear bell table Programming Mode Menu Items ...
Страница 79: ...79 Default Event Table See Edit default event table and Clear default event table Programming Mode Menu Items ...
Страница 80: ...80 Default shift See Default shift Programming Mode Menu Item ...
Страница 81: ...81 Lock activation duration See Lock activation duration Programming Mode Menu Item ...
Страница 82: ...82 Internal reader prefix See Prefix to match Programming Mode Menu Item ...
Страница 83: ...83 Internal reader extract from character See From character Programming Mode Menu Item ...
Страница 84: ...84 Internal reader number of characters to extract See Number of characters Programming Mode Menu Item ...
Страница 85: ...85 External scanner prefix See Prefix to match Programming Mode Menu Item ...
Страница 86: ...86 External scanner extract from character See From character Programming Mode Menu Item ...
Страница 87: ...87 External scanner number of characters to extract See Number of character Programming Mode Menu Item ...
Страница 88: ...88 External scanner start character See Start character Programming Mode Menu Item ...
Страница 89: ...89 External scanner end character See End character Programming Mode Menu Item ...
Страница 90: ...90 External scanner baudrate See Baudrate Programming Mode Menu Item ...
Страница 120: ...120 Initializing The System Reset is in progress Please wait for a while ...
Страница 131: ...131 Please wait Just wait for a while ...

