12
5 MANOVRA MANUALE
MANOUVRE MANUELLE
MANUAL OPERATION
MANIOBRA MANUAL
MANOBRA MANUAL
I
F
UK
E
P
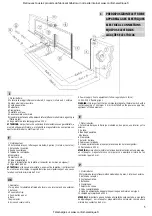
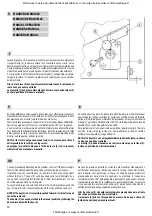
In caso di guasto o di mancanza di corrente, per la manovra manuale ruotare
il coperchietto (4), inserire la chiave (3) e ruotarla in senso orario, verso
destra, senza forzarla. La chiave (3) uscirà di alcuni millimetri spinta da una
molla. Qundi agire sulla maniglia (1) e ruotarla completamente di 180
°
verso
sinistra; a questo punto si può aprire e chiudere il cancello manualmente.
Per il ripristino in automatico ruotare la maniglia (1) nella posizione iniziale,
spingere la chiave (3) in avanti, ruotarla in senso antiorario, verso sinistra,
quindi estrarla.
N.B.: Se la chiave (3) non è spinta completamente in avanti, la stessa non
ruota e non può essere estratta.
La maniglia (1) può essere bloccata agendo come sopra sulla chiave (3)
anche in posizione di manovra manuale.
En cas de défaillance ou de coupure de courant, pour effectuer la manoeuvre
manuelle tourner le couvercle (4), enforcer la clé (3) et la tourner dans le sens
des aiguilles d’une montre (vers la droite) sans la forcer.
Comme elle est poussée par un ressort, la clé (3) sort de quelques millimètres.
Agir sur la poignée (1) et la tourner complètement de 180
°
vers la gauche.
A ce moment-là, il est possible d’ouvrir et de fermer manuellement la grille.
Pour rétabilir le fonctionnement automatique, remettre la poignée (1) à l’ètat
initial, pousser la clé (3), la tourner dans le sens inverse des aiguilles d’une
montre (vers la gauche) et donc la sortie.
NOTA: Si la clé (3) n’est pas poussée à fond, elle ne tourne pas et donc il
est impossible de la sortir de son logement.
La poignée (1) peut être bloquée à l’aide de la clé (3) (voir ci-dessus)
même lors d’une monoeuvre manuelle.
You can manually operate the gate if a problem occurs or if the power supply
fails. To manually operate the gate, carry out the following procedure:
rotate the cover (4), insert the key (3), and turn it clockwise (to the right)
without forcing it. The key (3) will be pushed out a few millimeters by a
spring. Then completely turn the handle (1) 180
°
towards the left. You can
now manually open and close the gate.
To automatically reset it, turn the handle (1) to its initial position, push the
key (3) forward, turn it counterclockwise (to the left), and then remove it.
NOTE: If the key (3) is not completely pushed forward, it will not turn and
cannot be removed.
The handle (1) can even be locked in the manual position by following the
above procedure with the key (3).
En caso de avería o de corte de energía eléctrica, para la maniobra manual
girar la tapa (4), introducir la llave (3) y girarla en sentido horario sin forzarla.
La llave (3) saldrá algunos milímetros empujada por un resorte. Accionar la
manija (1) y girarla completamente (180
°
) hacia la izquierda; ahora resulta
posible abrir y cerrar manualmente la puerta.
Para restablecer el funcionamiento automático, girarla manija (1) hacia la
posición inicial, empujar la llave (3) hacia adelante, girarla en sentido
antihorario (a izquierda) y luego extraerla.
NOTA: Si la llave (3) no es empujada totalmente hacia adelante, la misma
no gira y no puede ser extraida.
La manija (1) puede bloquearse de la misma manera que la llave (3),
incluso en posición de maniobra manual.
No caso de avaria ou de falta de corrente, para manobrar manualmente o
portão rodar a tampa (4), introduzir a chave (3) e rodar no sentido horário,
para a direita, sem a esforças. A chave (3) sairá de alguns milímetros
pressionada por uma mola. A seguir agir no manípulo (1) rodando-a
completamente de 180° para a esquerda; a este ponto pode-se abrir e fechar
manualmente o portão. Para restabelecer o automatismo rodar o manípulo
(1) na posição inicial, pressionar a chave (3) para a frente, rodando-a no
sentido anti-horário para a esquerda e retirar a chave.
N.B. Se a chave (3) não está completamente pressionada para a frente
não roda e portanto não pode ser extraída.
O manípulo (1) pode ser bloqueado do mesmo modo que a chave (3)
também na posição de manobra manual.
Retrouvez tous les produits du fabricant Gibidi sur notre site internet www.confort-electrique.fr
Téléchargé sur www.confort-electrique.fr


