User’s Manual
GT-650 Introduction
1 - 1
- 1 -AAAAAAA
Chapter 1
Introduction
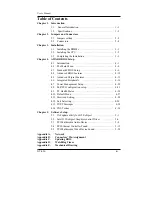
This manual describes the GT-650 single board computers. Chapter 1 provides
general information and specifications. Chapter 2 contains jumper and
connector information. Chapter 3 describes component installations. Chapter 4
describes AWARD BIOS setup information and BIOS POSTcode, and Chapter 5
for software setup procedure. Appendix A describes the network interface.
Appendix B lists the connector pin assignment. Appendix C describes the
updating the system BIOS. Appendix D for the mechanical drawing
1.2 General introduction
The GT-650 is a full featured, industrialized, single board computer with a
high-frequency Intel Tualatin, Pentium III® , and Celeron® processor that brings
advanced CPU technology and processing power to the latest PCI applications.
The INTEL 815E AGP chipset built in to the single board computer is the most
efficient and reliable way to upgrade existing ISA systems to Pentium III
technology.
The GT-650 combines many features needed for system operation into one
compact single board computer, including 2D/3D graphics accelerator, 10/100
TX Ethernet adapter, Two USB ports, Two Ultra/DMA IDE drive controllers,
Two high performance serial ports, enhanced parallel port, and the latest BIOS
features. Additional enhancements to the GT-688V include a sixteen-channel
maximum video input interface. Two dual in-line memory module (DIMM)
sockets support up to 512MB of synchronous DRAM (SDRAM) memory.
The INTEL 815E includes a highly integrated graphics accelerator. Its
architecture consists of dedicated multi-media engines executing in parallel to
deliver high performance 3D, 2D and motion compensation video capabilities.
The 3D and 2D engines are managed by a 3D / 2D pipeline processor allowing a
sustained flow of graphics data to be rendered and displayed. The 815E directly
drive a standard progressive scan monitor up to a resolution of 1280x1024.
The INTEL 815E AGP chipset in the GT-650 incorporates the latest
microprocessor technology from Intel to provide the increased bandwidth
needed to operate your system bus at speeds up to 133MHz. (The 815E AGP
chipset uses one chipset for both 66MHz, 100MHz and 133MHz system designs
in Pentium III and Celeron processors with speeds up to 1GHz.)
Содержание GT-650
Страница 1: ...GT 650 Pentium III Celeron w VGA LAN Audio w Video Capture GPIO Embedded Board User s Manual ...
Страница 59: ...User s Manual GT 650 Software Setup 5 2 Click on Yes Click on Next ...
Страница 60: ...User s Manual GT 650 Software Setup 5 3 Click Finish to restart computer ...
Страница 61: ...User s Manual GT 650 Software Setup 5 4 For Windows NT 4 0 system Click on Yes Click on Next ...
Страница 62: ...User s Manual GT 650 Software Setup 5 5 Click Finish to restart computer ...
Страница 64: ...User s Manual GT 650 Software Setup 5 7 Click Finish to restart computer ...
Страница 66: ...User s Manual GT 650 Software Setup 5 9 5 3 1 PCI Multimedia Audio Device Found Click on Next Click on Next ...
Страница 67: ...User s Manual GT 650 Software Setup 5 10 Click on Next Click on Next ...
Страница 68: ...User s Manual GT 650 Software Setup 5 11 Click Finish ...
Страница 71: ...User s Manual GT 650 Software Setup 5 14 Select Driver then click on Update Driver Click on Next ...
Страница 72: ...User s Manual GT 650 Software Setup 5 15 Click on Next Setup PATH from Browse then click on Next ...
Страница 73: ...User s Manual GT 650 Software Setup 5 16 Select correct LAN driver for OS by browser Click on Next ...
Страница 74: ...User s Manual GT 650 Software Setup 5 17 Click on Finish Click on Yes to restart computer ...
Страница 75: ...User s Manual GT 650 Software Setup 5 18 5 4 2 For Windows 2000 system Click on System ...
Страница 77: ...User s Manual GT 650 Software Setup 5 20 Select Driver then click on Update Driver Click on Next ...
Страница 78: ...User s Manual GT 650 Software Setup 5 21 Click on Next Click on Next ...
Страница 79: ...User s Manual GT 650 Software Setup 5 22 Specify the PATH by Browser Locate the INF file ...
Страница 80: ...User s Manual GT 650 Software Setup 5 23 Click on Next Click on Finish ...
Страница 81: ...User s Manual GT 650 Software Setup 5 24 Click on Close ...
Страница 83: ...User s Manual GT 650 Software Setup 5 26 Click on Add Click on Have Disk ...
Страница 84: ...User s Manual GT 650 Software Setup 5 27 Entry the Path then click OK Select RTL8139 then click OK ...
Страница 87: ...User s Manual GT 650 Software Setup 5 30 Select Driver then click on Update Driver Click on Next ...
Страница 88: ...User s Manual GT 650 Software Setup 5 31 Click on Next Click Browse to specify PATH ...
Страница 89: ...User s Manual GT 650 Software Setup 5 32 Click on Next Click OK ...
Страница 90: ...User s Manual GT 650 Software Setup 5 33 Specify the file location then click OK Click on Finish ...
Страница 91: ...User s Manual GT 650 Software Setup 5 34 Click on Close Select PCI Multimedia Device then clicks Properties ...
Страница 92: ...User s Manual GT 650 Software Setup 5 35 Select Driver then click on Update Driver Click on Next ...
Страница 93: ...User s Manual GT 650 Software Setup 5 36 Click on Next Click on Next ...
Страница 94: ...User s Manual GT 650 Software Setup 5 37 Click on Next Click on Finish ...
Страница 111: ...User s Manual GT 650 Mechanical drawing E 1 Appendix E Mechanical Drawing ...


