User’s Manual
GT-650 BIOS Setup 4 - 3
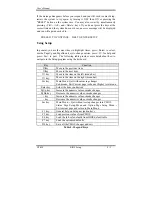
Navigating through the menu bar
Use the left and right arrow keys to choose the menu you want to be in.
To display a sub menu
, use the arrow keys to move the cursor to the sub menu
you want. Then press <Enter>. A “
Ø
” pointer marks all sub menus.
Getting Help
Press F1 to pop up a small help window that describes the appropriate keys to
use and the possible selections for the highlighted item. To exit the Help
Window press <Esc> or the F1 key again.
In Case of Problems
If, after making and saving system changes with Setup, you discover that your
computer no longer is able to boot, the AwardBIOS™ supports an override to
the CMOS settings, which resets your system to its defaults.
The best advice is to only alter settings that you thoroughly understand. To
this end, we strongly recommend that you avoid making any changes to the
chipset defaults. These defaults have been carefully chosen by both Award
and your systems manufacturer to provide the absolute maximum performance
and reliability. Even a seemingly small change to the chipset setup has the
potential for causing you to use the override.
A Final Note About Setup
Not all systems have the same Setup. While the basic look and function of
the Setup program remains the same for all systems, individual motherboard
and chipset combinations require custom configurations. For example, you
may find that your Setup main menu has a different number of entries from the
main menu displayed in this manual. These are simply features not supported
(or not user configurable) on your system.
The final appearance of the Setup program also depends on the Original
Equipment Manufacturer (OEM) who built your system. If your OEM has
decided that certain items should only be available to their technicians, those
items may very well be removed from the Setup program.
Содержание GT-650
Страница 1: ...GT 650 Pentium III Celeron w VGA LAN Audio w Video Capture GPIO Embedded Board User s Manual ...
Страница 59: ...User s Manual GT 650 Software Setup 5 2 Click on Yes Click on Next ...
Страница 60: ...User s Manual GT 650 Software Setup 5 3 Click Finish to restart computer ...
Страница 61: ...User s Manual GT 650 Software Setup 5 4 For Windows NT 4 0 system Click on Yes Click on Next ...
Страница 62: ...User s Manual GT 650 Software Setup 5 5 Click Finish to restart computer ...
Страница 64: ...User s Manual GT 650 Software Setup 5 7 Click Finish to restart computer ...
Страница 66: ...User s Manual GT 650 Software Setup 5 9 5 3 1 PCI Multimedia Audio Device Found Click on Next Click on Next ...
Страница 67: ...User s Manual GT 650 Software Setup 5 10 Click on Next Click on Next ...
Страница 68: ...User s Manual GT 650 Software Setup 5 11 Click Finish ...
Страница 71: ...User s Manual GT 650 Software Setup 5 14 Select Driver then click on Update Driver Click on Next ...
Страница 72: ...User s Manual GT 650 Software Setup 5 15 Click on Next Setup PATH from Browse then click on Next ...
Страница 73: ...User s Manual GT 650 Software Setup 5 16 Select correct LAN driver for OS by browser Click on Next ...
Страница 74: ...User s Manual GT 650 Software Setup 5 17 Click on Finish Click on Yes to restart computer ...
Страница 75: ...User s Manual GT 650 Software Setup 5 18 5 4 2 For Windows 2000 system Click on System ...
Страница 77: ...User s Manual GT 650 Software Setup 5 20 Select Driver then click on Update Driver Click on Next ...
Страница 78: ...User s Manual GT 650 Software Setup 5 21 Click on Next Click on Next ...
Страница 79: ...User s Manual GT 650 Software Setup 5 22 Specify the PATH by Browser Locate the INF file ...
Страница 80: ...User s Manual GT 650 Software Setup 5 23 Click on Next Click on Finish ...
Страница 81: ...User s Manual GT 650 Software Setup 5 24 Click on Close ...
Страница 83: ...User s Manual GT 650 Software Setup 5 26 Click on Add Click on Have Disk ...
Страница 84: ...User s Manual GT 650 Software Setup 5 27 Entry the Path then click OK Select RTL8139 then click OK ...
Страница 87: ...User s Manual GT 650 Software Setup 5 30 Select Driver then click on Update Driver Click on Next ...
Страница 88: ...User s Manual GT 650 Software Setup 5 31 Click on Next Click Browse to specify PATH ...
Страница 89: ...User s Manual GT 650 Software Setup 5 32 Click on Next Click OK ...
Страница 90: ...User s Manual GT 650 Software Setup 5 33 Specify the file location then click OK Click on Finish ...
Страница 91: ...User s Manual GT 650 Software Setup 5 34 Click on Close Select PCI Multimedia Device then clicks Properties ...
Страница 92: ...User s Manual GT 650 Software Setup 5 35 Select Driver then click on Update Driver Click on Next ...
Страница 93: ...User s Manual GT 650 Software Setup 5 36 Click on Next Click on Next ...
Страница 94: ...User s Manual GT 650 Software Setup 5 37 Click on Next Click on Finish ...
Страница 111: ...User s Manual GT 650 Mechanical drawing E 1 Appendix E Mechanical Drawing ...

