background image

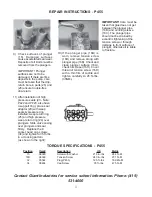
9) Check surfaces of plunger

(16). Damaged surfaces
cause accelerated seal wear.
Deposits of all kinds must be
removed from the plungers.

IMPORTANT! Plunger
surfaces are not to be
damaged. If there are lime
deposits in the pump, care
must be taken that the drip-
return bore in parts (25) and
(26) ensure trouble-free
drip-return.

10) If the plunger pipe (16B) is

worn, remove tension screw
(16D) and remove along with
plunger pipe (16B). Check and
clean plunger surface (16A),
check oil scraper (16H). Cover
thread of tension screw (16D)
with a thin film of Loctite and
tighten carefully to 26 ft.-lbs.
(35NM).

IMPORTANT! Care must be
taken that glue does not get
between the plunger pipe
(16B) and centring sleeve
(16C). The plunger pipe
should not be strained by
eccentric tightening of the
tension screw or through
damage to front surface of
plunger, otherwise it is liable
to fracture.

11) After installation of high

pressure seals (23 - Note:
P422 and P423, also have
a support ring), place seal
adaptor (20) with weep
seals & pressure ring
installed, weep return ring
(25) and high pressure
weep return ring (24) over
plungers. Slide valve casing
over plungers and seat
firmly.  Replace the 8
socket head cap screws
(34) and tighten to 35 ft.-lbs.
in a crossing pattern
(as shown to the right).

8

7

6

5

4

2

1

3

TORQUE SPECIFICATIONS - P455

Position

Item#

Description

U.S

Metric

15

08390

Screw with Washer

216 in.-lbs.

24.4 N-M

16D

08399

Tension Screw

240 in.-lbs.

27.1 N-M

32

05544

Plug (P455)

125 ft.-lbs.

169.4 N-M

34

08484

Cap Screw

35 ft.-lbs.

47.5 N-M

REPAIR INSTRUCTIONS - P455

Contact Giant Industries for service school information. Phone: (419)

531-4600

8

Содержание P435B

Страница 1: ...ce Manual Contents Installation Instructions page 2 Pump Specifications pages 3 6 Exploded View page 4 Parts List Kits page 5 Repair InstructionsTorque Specs pages 7 8 Trouble Shooting Chart page 9 Recommended Spare Parts List page 9 Dimensions page 10 WarrantyInformation back page 6 09 ...

Страница 2: ...rotation on Giant Industries Inc pumps should be made in the direction desig nated by the arrows on the pump crankcase Reverse rotation may be safely achieved by following a few guidelines available upon request from Giant Industries Inc Required horsepower for system operation can be obtained from the charts on page 3 6 Before beginning operation of your pumping system remember Check that the cra...

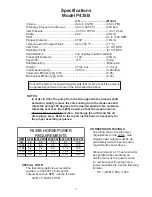
Страница 3: ...y remove the valve casing from the crankcase and rotate the pumps 180 degrees to the desired position Be certain to rotate the seal case item 20 as well so that the weep holes are down at the six o clock position Exchange the oil fill and the oil drain plugs also Refer to the repair instructions as necessary for the proper assembly sequence HORSEPOWER RATINGS The rating shown are the power require...

Страница 4: ...EXPLODED VIEW P455 4 ...

Страница 5: ...ART DESCRIPTION QTY 16D 08399 TensioningScrewing 3 16E 07023 O Ring 3 16F 07203 Backup Ring 3 16G 07258 CopperWasher 3 16H 06431 Oil Scraper 3 17 06790 CrossheadPin 3 19 05444 Oil Seal 3 20 05534 Seal Case 3 21 07266 O Ring 3 23 08477 V Sleeve 18mm 6 24 07929 PressureRing 3 25 08402 WeepReturnRing 3 26 05574 Manifold Brass 1 27A 05543 Valve Assy 6 27 05541 Valve Seat 6 28 05542 Valve Plate 6 29 07...

Страница 6: ...from the crankcase and rotate the pumps 180 degrees to the desired position Be certain to rotate the seal case item 20 as well so that the weep holes are down at the six o clock position Exchange the oil fill and the oil drain plugs also Refer to the repair instructions as necessary for the proper assembly sequence HORSEPOWER RATINGS The rating shown are the power requirements for the pump Gas eng...

Страница 7: ...lve assembly can be separated 4 Remove the o ring 31 Inspect all parts for wear and replace as necessary Apply one drop of loctite 243 to the valve plugs 32 and tighten to 125 ft lbs 5 Use a 8mm allen wrench to remove the 8 socket head cap screws 34 Carefully slide the valve casing 26 out over the plungers 6 Remove seal adaptors 20 and weep return rings 25 from the valve casing 7 Remove the pressu...

Страница 8: ...er pipe should not be strained by eccentric tightening of the tension screw or through damage to front surface of plunger otherwise it is liable to fracture 11 After installation of high pressure seals 23 Note P422 and P423 also have a support ring place seal adaptor 20 with weep seals pressure ring installed weep return ring 25 and high pressure weep return ring 24 over plungers Slide valve casin...

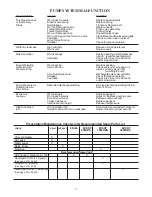
Страница 9: ...ts Cavitation Check suction lines on inlet of pump for restrictions Unloader Checkforproperoperation Water in crankcase High humidity Reduce oil change interval Worn seals Replace seals NoisyOperation Wornbearings Replace bearings Refill crankcase oil with recommendedlubricant Cavitation Check inlet lines for restrictions and orpropersizing Rough Pulsating Wornpacking Replacepacking Operationwith ...

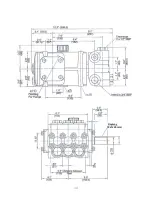
Страница 10: ...10 Keyway 8x7x45mm ...

Страница 11: ...NOTES 11 ...

Страница 12: ...onent part 5 Changes or modifications made by the customer or third party 6 The operation of pumps and or accessories exceeding the specifications set forth in the Operations Manuals provided by Giant Industries Inc Liability under this warranty is on all non wear parts and limited to the replacement or repair of those products returned freight prepaid to Giant Industries which are deemed to be de...

Отзывы: