Printer Does Not Print
49
4
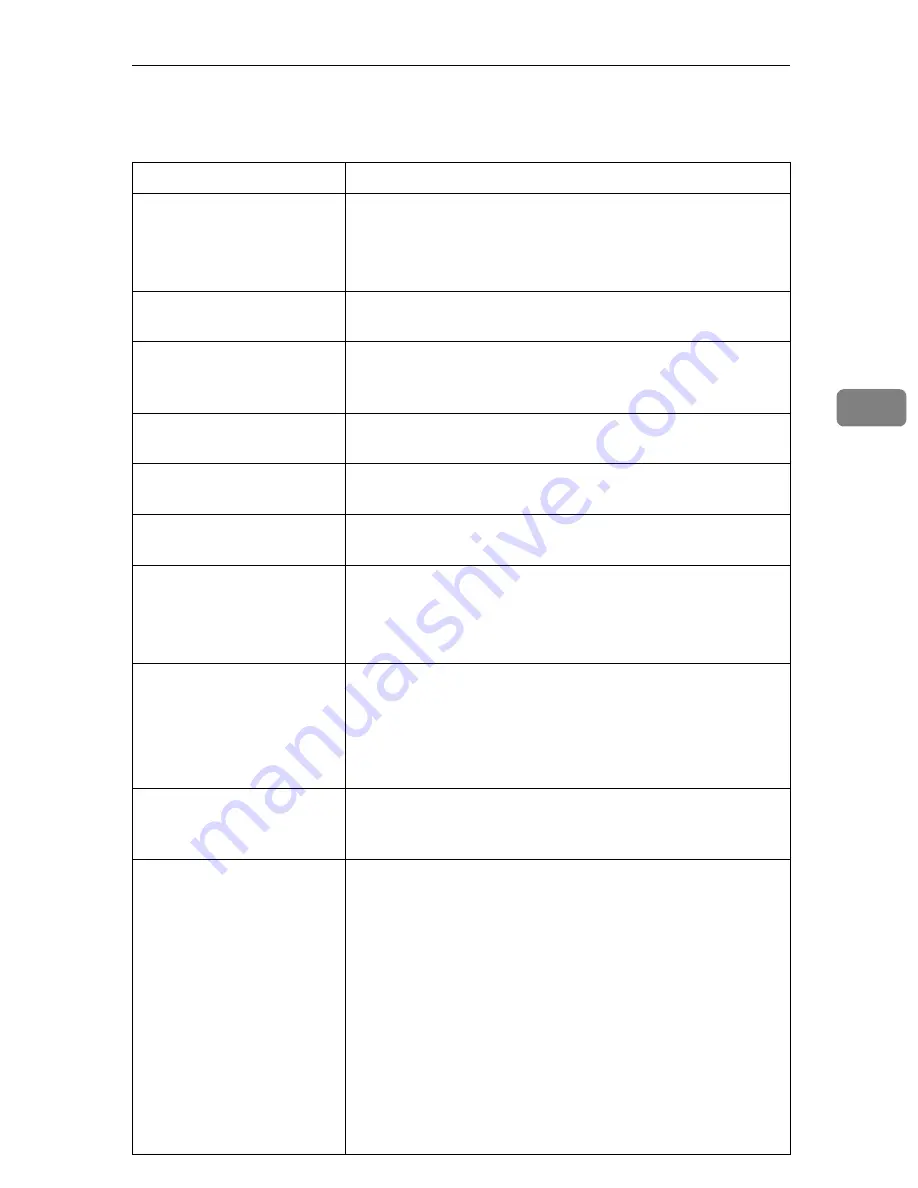
Printer Does Not Print
Possible cause
Solutions
Is the power on?
If not, confirm that the power cord is securely plugged
into the power outlet and the printer.
Turn on the printer.
⇒
the "Setup Guide" that comes with
the printer
Does the
On Line
indica-
tor stay on?
If not, press
{
On Line
}
to make it light up.
Does the
Error
indicator
stay red?
If so, check the error message on the panel display and
take the required action.
⇒
P.38
“Error & Status Messages
on the Operation Panel”
Is the paper set?
Load paper into the paper tray or on the bypass tray.
⇒
P.30
“Loading Paper”
Is the specified paper size
correct?
Set the specified paper size in any of the input trays.
Is the specified paper type
correct?
Set the specified paper type in any of the input trays.
Is the interface cable be-
tween the printer and the
computer connected se-
curely?
Connect the interface cable properly. If there are any con-
nectors or screws, confirm that they are fastened securely.
For more information about the settings, see the "Quick
Installation Guide".
Are you using a correct in-
terface cable?
The type of interface cable you should use depends on the
computer. Be sure to use the correct one.
If the cable is damaged or worn, replace it with a new one.
For more information about the settings, see the "Quick
Installation Guide".
Did you connect the inter-
face cable after turning on
the power switch?
Connect the interface cable before turning on the power
switch.
When you print using the
RICOH-SCRIPT2 printer
driver in a network, data
is received by the printer,
but is not printed.
❖
Windows 95/98
On the
[PostScript]
tab of the Printer Properties, click
[Advanced]
and then clear both
[Send CTRL+D before job]
and
[Send CTRL+D after job]
.
❖
Windows 2000
On the
[Device Settings]
tab of the Printer Properties, se-
lect
[No]
for both
[Send CTRL-D Before Each Job:]
and
[Send CTRL-D After Each Job:]
.
❖
Windows NT 4.0
Open the
[Advanced]
tab of the Printer Properties. From
[PostScript Options]
, select
[No]
for both
[Send CTRL-D Be-
fore Each job:]
and
[Send CTRL-D After Each job:]
.
Содержание C7006dw
Страница 1: ...Operating Instructions Printer Reference...
Страница 12: ...x...
Страница 32: ...Setting Up the Printer Driver and Canceling a Print Job 20 2...
Страница 48: ...Paper and Other Media 36 3...
Страница 94: ...Troubleshooting 82 4...
Страница 126: ...Using the Operation Panel 114 5...
Страница 142: ...130 UE USA G048...
Страница 144: ...S1383 UE USA G048 8627 Type for Savin SLP624s SLP624d C7006d C7006dw SAVIN CORPORATION...


