background image


Mobile Phone Connection


145

12

3. 

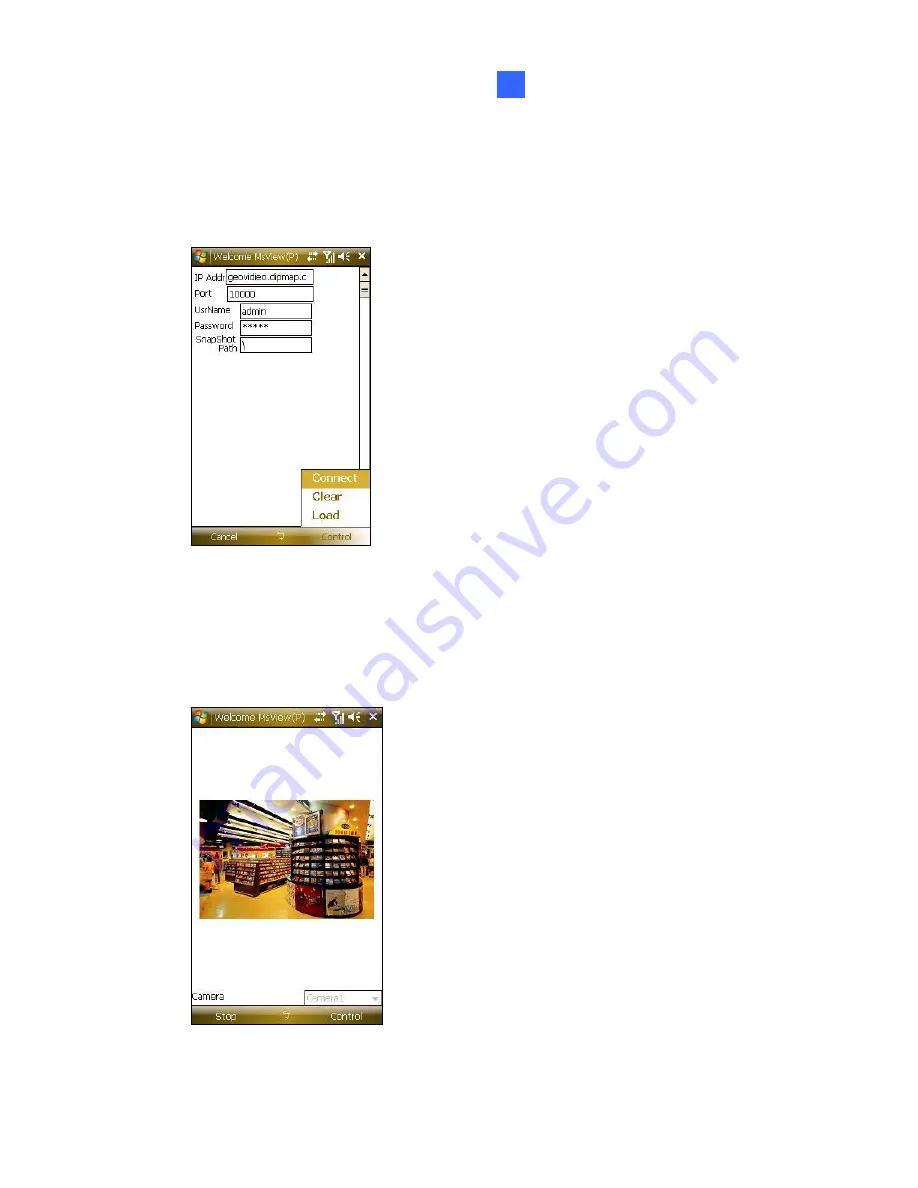
On the login screen, enter the IP address of your camera, port value 
(default value is 10000), a username and a password. Then click 

Control 

and select 

Connect


          Figure 12-13 

4. 

Once the connection is established, the live image will appear. You 
can use the scroll key on your smartphone to navigate camera 
channels.  


           Figure 12-14 

Содержание GV-BX110D

Страница 1: ...User s Manual GV IPCam H 264 1 3M Before attempting to connect or operate this product please read these instructions carefully and save this manual for future use ...

Страница 2: ... this manual is accurate GeoVision is not responsible for printing or clerical errors GeoVision Inc 9F No 246 Sec 1 Neihu Rd Neihu District Taipei Taiwan Tel 886 2 8797 8377 Fax 886 2 8797 8335 http www geovision com tw Trademarks used in this manual GeoVision the GeoVision logo and GV series products are trademarks of GeoVision Inc Windows and Windows XP are registered trademarks of Microsoft Cor...

Страница 3: ... series of models designed to meet different needs This Manual is designed for the following models and firmware versions Model Model Number Firmware Version Fixed Lens Box Camera GV BX110D Varifocal Lens V1 05 Mini Fixed Dome GV MFD110 1A1 V1 05 Bullet Camera GV BL110 V1 05 I ...

Страница 4: ...ng List 6 2 2 Options 6 2 3 Overview 7 2 4 Status LED 8 2 5 Focus Adjustment 8 2 6 Optional Installation 9 2 6 1 C Mount Lenses 9 2 6 2 Auto Iris Lenses 9 2 6 3 Infrared Illuminators 10 2 7 I O Terminal Block 11 2 7 1 Pin Assignment 11 Chapter 3 Mini Fixed Dome 12 3 1 Packing List 12 3 2 Overview 13 3 3 Lens Adjustment 14 Chapter 4 Bullet Camera 15 4 1 Packing List 15 II ...

Страница 5: ...ing Your Surveillance Images 33 6 2 Functions Featured on the Main Page 34 6 2 1 The Live View Window 35 6 2 2 The Control Panel of the Live View Window 37 6 2 3 Snapshot of Live Video 40 6 2 4 Video Recording 40 6 2 5 Picture in Picture and Picture and Picture View 41 6 2 6 Alarm Notification 43 6 2 7 Video and Audio Configuration 44 6 2 8 Remote Configuration 45 6 2 9 Camera Name Display 45 6 2 ...

Страница 6: ...nts and Alerts 66 7 3 1 E mail 67 7 3 2 FTP 69 7 3 3 Center V2 71 7 3 4 VSM 73 7 3 5 Backup Center 75 7 3 6 ViewLog Server 77 7 3 7 3GPP 78 7 4 Monitoring 79 7 5 Recording Schedule 81 7 5 1 Recording Schedule Settings 81 7 5 2 I O Monitoring Settings 82 7 6 Remote ViewLog 83 7 7 Network 84 7 7 1 LAN 84 7 7 2 Advanced TCP IP 86 7 7 3 IP Filter Settings 88 7 8 Management 89 7 8 1 Date Time Settings ...

Страница 7: ...pter 9 Advanced Applications 106 9 1 Upgrading System Firmware 106 9 1 1 Using the Web Configuration Interface 107 9 1 2 Using the IP Device Utility 108 9 2 Backing Up and Restoring Settings 110 9 3 Restoring to Factory Default Settings 112 9 4 Verifying Watermark 114 9 4 1 Accessing AVI Files 114 9 4 2 Running Watermark Proof 115 9 4 3 The Watermark Proof Window 116 Chapter 10 DVR Configurations ...

Страница 8: ...ng Back the Recordings from the IP Camera 136 12 1 5 Other Functions 137 12 2 Windows Smartphone 143 12 2 1 Installing MSView V2 V3 143 12 2 2 Activating the MSView V2 V3 Function 143 12 2 3 Connecting to the IP Camera 144 12 2 4 Playing Back the Recordings from the IP Camera 146 12 2 5 Other Functions 147 12 3 Symbian Smartphone 148 12 3 1 Installing SSView V3 148 12 3 2 Activating the SSView V3 ...

Страница 9: ...unction 152 12 4 2 Connecting to the IP Camera 152 Specifications 154 A Box Camera 154 B Mini Fixed Dome 158 C Bullet Camera 161 Appendix 164 A Supported Lenses for Box Camera 164 B Settings for Internet Explore 8 165 C RTSP Protocol Support 166 ...

Страница 10: ...the Bullet Camera Once the camera is connected to GV System GV NVR for video management or its Live View Figure 6 3 is accessed through the Web browser the recording to the memory card will be stopped and the recording will be taken control by GV System GV NVR When the connection between the camera and GV System GV NVR is interrupted the recording to the memory card will be resumed to back up the ...

Страница 11: ...ding Center V2 VSM ViewLog Server and 3GPP 4 Stop the connection to GV System GV NVR The failure to follow the above instructions may cause damages to the GV IPCAM H 264 For details on firmware upgrade see 9 1 Upgrading System Firmware in the User s Manual If firmware upgrade fails you will need to restore the camera to the default settings For this see 9 3 Restoring to Factory Default Settings in...

Страница 12: ...pixel resolution 1280 x 1024 2 way audio communication One sensor input and one alarm output Motion detection triggering actions like image upload or output trigger Privacy mask allowing the concealment of parts of the image that should not be viewable IP address filtering 3GPP ISMA PoE Power over Ethernet Day Night function Megapixel lens Mini Fixed Dome only supports one way audio and doesn t su...

Страница 13: ... digital input wet contact and relay output support Micro SD card slot Features only for Mini Fixed Dome Built in microphone Features only for Bullet Camera Two way audio communication One digital input dry contact and digital output support Micro SD card slot 4 ...

Страница 14: ... 1A1 GV IPCAM 1 3 M H 264 F 3 6 mm Bullet Camera GV BL110 GV IPCAM 1 3 M H 264 D N 1 3 System Requirement To perform the GV IPCAM H 264 operations through web browser ensure your PC is in good network connection and meet this system requirement Microsoft Internet Explorer 6 x or later Note For the users of Internet Explorer 8 it is required to configure the Security Settings Without the settings y...

Страница 15: ... IPCAM H 264 Software CD 2 2 Options Optional devices can expand your Box Camera s capabilities and versatility Contact your dealer for more information Varifocal Lens See Varifocal Lens A Box Camera Specifications later in this manual GV IR LED An infrared illuminator For installation see 2 6 3 Infrared Illuminators later in this manual For other Supported Lenses for Box Camera see Appendix A 6 ...

Страница 16: ...Default Settings 5 Micro SD Card Slot Inserts a micro SD card to store recording data The slot supports micro SD SDHC card of Class 6 or above which transfers data at 6 MB or above per second 6 LAN PoE Connects to a 10 100 Ethernet or PoE 7 Video Out Connects to a portable monitor for setting the focus and angle of Box Camera during initial installation 8 DC 12V Connector Connects to power 9 Statu...

Страница 17: ...t ON Error occurs on the system 2 5 Focus Adjustment To adjust the focus or image clarity during the initial installation of the Box Camera it is suggested to print out the diagram of radiating lines included on Software CD and hang up the diagram at the surveillance area for focus adjustment In the following examples the left diagram has a good focus with clear radiating lines the right diagram h...

Страница 18: ... you use the varifocal lens follow the steps below to install and adjust the lens 1 Plug the iris control cable to the Auto Iris Connector on the camera No 11 Figure 2 1 2 Access the Web interface of the camera to see the live view See 6 1 Accessing Your Surveillance Images 3 Adjust the camera view based on the following notes Point the camera to a bright area of the surveillance scene Avoid objec...

Страница 19: ...is option be Enable 8 Click Apply 9 Re log onto the camera 2 6 3 Infrared Illuminators If you use the infrared IR illuminator with I O function follow the steps below to install it 1 Connect the infrared illuminator to the terminal block on the camera See 2 7 The I O Terminal Block 2 Access the Web interface of the camera 3 Select Video and Motion select Video Settings select Streaming 1 and set t...

Страница 20: ...erminal block Pin Function 1 Input 2 Input 3 Output Common 4 Output N C 1 2 3 4 5 Figure 2 2 5 Output N O The Box Camera only supports the input device of Wet Contact 7V 30V For the output point please check if your output device meets the following Absolute Maximum Ratings before connecting it to the output point Breakdown Voltage 277V AC 30V DC Continuous Load Current 5A NO 3A NC Note Absolute M...

Страница 21: ...12 Chapter 3 Mini Fixed Dome 3 1 Packing List Mini Fixed Dome Security Torx Self Tapping Screw x 2 Plastic Screw Anchor x 2 GV IPCAM H 264 User s Manual GV IPCAM H 264 Software CD ...

Страница 22: ...g to Factory Default Settings 2 Lens Rotates the les right left to adjust focus 3 Focus Fixed Screw Loosens the screw to adjust the lens 4 Tilt Fixed Screw Loosens the screw to adjust tilt angle 5 Built In Microphone Provides one way audio Figure 3 2 6 Network PoE Connection Connects the Network cable for power and Ethernet connection ...

Страница 23: ... the steps below to adjust the camera s focus 1 Unscrew the camera s cover Figure 3 3 2 Loosen the focus fixed screw and rotate the lens clockwise or counterclockwise to adjust focus Loosen the tilt fixed screw and adjust the camera s tilt angle Figure 3 4 ...

Страница 24: ...daptor is supplied in the package You will have to purchase an AC 24V power adaptor for AC power supply 4 1 Packing List Bullet Camera Lens Megapixel and Built In 16 IR LEDs Self Tapping Screw x 3 Plastic Screw Anchor x 3 Camera s Angle Adjuster x 2 Sun Shield Cover Kit 1 Sun Shield Cover 2 Philips Head Screws 2 Plastic Screw Spacers and 2 Hexagon Screws included Silica Gel Bag x 2 1 is already pl...

Страница 25: ...16 4 2 Installation These instructions describe the basic installation of the Bullet Camera 1 Slide the cable clamp to the camera base Figure 4 1 2 Install the Bullet Camera to the wall Figure 4 2 ...

Страница 26: ... Bullet Camera s Angles 5 Remove the protection sticker from the camera s cover Figure 4 3 6 Loosen the camera s cover adjust lens and focus and insert a micro SD card into the SD card slot See 4 2 3 Adjusting Lens and Inserting a Micro SD Card 7 Fasten the camera s cover 8 Install the sun shield cover to the Bullet Camera See 4 2 4 Installing the Sun Shield Cover ...

Страница 27: ...low Ethernet PoE Digital In Red DC 12V AC 24V Brown Digital Out Orange DC 12V AC 24V Black GND Yellow Audio In Red Audio Out Green Figure 4 4 I O Wire Definition The I O wires on the 7 Pin Data Cable can connect to 1 sensor input and 1 alarm output Connect the I O device based on the wire definition listed below No Wire Definition 1 Red Digital In 2 Orange Digital Out 3 Yellow GND ...

Страница 28: ...ullet Camera to the supplied 3 Pin Terminal Block and then connect the 3 Pin Terminal Block to DC 12V Power Adaptor 1 Insert the black wire of the Bullet Camera to the left side pin of the 3 Pin Terminal Block and the brown wire to the right side pin Figure 4 5 2 Connect the DC 12V Power Adaptor to the 3 Pin Terminal Block Figure 4 6 ...

Страница 29: ...s body is waterproof but the PoE audio power and I O cables are not waterproof Use waterproof silicon rubber or the like to apply waterproof treatment to the cables Following is an example of waterproofing the audio cable Remember to apply waterproof treatment to PoE power and I O cables as well Figure 4 7 ...

Страница 30: ... to adjust the Bullet Camera s angles First Shaft You can adjust the camera body by 30 degrees to the right or the left 1 Unscrew the panning lock screw with the screw adjuster Figure 4 8 2 Adjust the angle of camera body to the right or the left and fasten the panning lock screw Figure 4 9 ...

Страница 31: ...0 112 5 135 157 5 or 180 degrees by using the gears inside the camera body and the camera base 1 Unscrew the tilting lock screw with the screw adjuster Figure 4 10 2 Hold the camera body and move the camera base to the right to separate the camera gears Figure 4 11 ...

Страница 32: ...Bullet Camera 23 4 3 Adjust the angle of camera body to 90 112 5 135 157 5 or 180 degrees Then move the camera base to the left to combine the gears Figure 4 12 4 Fasten the tilting lock screw ...

Страница 33: ...Third Shaft You can adjust the camera base by 360 degrees 1 Unscrew the base fixing screw with the screw adjuster Figure 4 13 2 Adjust the angle of camera base and fasten the base fixing screw Figure 4 14 ...

Страница 34: ...Inserting a Micro SD Card To adjust the camera s lens to produce a clear image and insert a micro SD card into the SD card slot follow the steps below 1 Loosen the camera s cover Camera s Cover Figure 4 15 2 Remove the silica gel bag Figure 4 16 ...

Страница 35: ...a micro SD card into the SD card slot Figure 4 18 5 Slightly push the camera module back and fasten the fixing screw 6 Replace a new silica gel bag to the camera module and fasten the camera s cover immediately Note The silica gel loses its effectiveness after you open the dry camera To prevent the lens from fogging up it is recommended to replace the silica gel bag every time when you open the ca...

Страница 36: ...n install the sun shield cover to the camera 1 Fasten the hexagon screws either on top or below the camera Figure 4 19 2 Put the sun shield cover on top of hexagon screws Make sure to aim the rear hexagon screw at the edge of the sun shield cover s aperture for optimal sun shield performance Figure 4 20 ...

Страница 37: ...28 3 Fasten the philips head screws with the plastic screw spacers Figure 4 21 ...

Страница 38: ...ork 2 Optionally connect a speaker and a microphone for two way audio communication 3 Connect power using one of the methods Using the supplied power adaptor connect to power Use the Power over Ethernet PoE function The power will be provided over the network cable 4 Check if the status LED on the front of the Box Camera or the network status LED of the Mini Fixed Dome turns on Then you can set th...

Страница 39: ...ault IP address of 192 168 0 10 The computer used to set the IP address must be under the same network assigned to the unit 1 Open your web browser and type the default IP address http 192 168 0 10 2 In both Login and Password fields type the default value admin Click Apply 3 In the left menu select Network and then LAN to begin the network settings Figure 5 1 ...

Страница 40: ...amera will get from the DHCP server or ISP Otherwise you must use the Dynamic DNS service to obtain a domain name linked to the camera s changing IP address first For details on Dynamic IP Address and PPPoE see 7 7 2 Advanced TCP IP 2 If Dynamic IP Address or PPPoE is enabled and you cannot access the camera you may have to reset it to the factory default and then perform the network settings agai...

Страница 41: ...ration page and are discussed in the following sections in this manual Date and time adjustment see 7 8 1 Date Time Setting Login and privileged passwords see 7 8 4 User Account Network gateway see 7 7 Network Camera image adjustment see 6 2 2 The Control Panel of the Live View Window Video format resolution and frame rate see 7 1 1 Video Settings ...

Страница 42: ...status only 6 1 Accessing Your Surveillance Images Once installed your GV IPCAM H 264 is accessible on a network Follow these steps to access your surveillance images 1 Start the Internet Explorer browser 2 Enter the IP address or the domain name of the camera in the Location Address field of your browser Figure 6 1 3 Enter the login name and password The default login name and password for Admini...

Страница 43: ...o your computer 6 2 Functions Featured on the Main Page This section introduces the features of the Live View window and Network Status on the main page The two features are accessible by both Administrator and Guest Main Page of Guest Mode Video and Motion Live View Streaming 1 Streaming 2 Network Status Figure 6 2 The GV IPCAM H 264 can process one video stream in two different codec and image s...

Страница 44: ...ys live video 2 Stop Stops playing video 3 Microphone Talks to the surveillance area from the local computer 4 Speaker Listens to the audio around the camera 5 Snapshot Takes a snapshot of live video See 6 2 3 Snapshot of Live Video 6 File Save Records live video to the local computer See 6 2 4 Video Recording ...

Страница 45: ...AP views 7 8 2 GPS Maps Settings 8 I O Control Starts the I O Control Panel or the Visual Automation See 6 2 11 I O Control 9 Show System Menu Brings up these functions Alarm Notify Video and Audio Configuration Remote Config Show Camera Name and Image Enhance See 6 2 6 Alarm Notification 6 2 7 Video and Audio Configuration 6 2 8 Remote Configuration 6 2 9 Camera Name Display and 6 2 10 Image Enha...

Страница 46: ...anel Figure 6 4 Information Displays the version of the camera local time of the local computer host time of the camera and the number of users logging in the camera Video Displays the current video codec resolution and data rate Audio Displays the audio data rates when the microphone and speaker devices are enabled I O Control Provides a real time graphic display of the input and output status Yo...

Страница 47: ...or this function to work you have to configure the Alarm Notify settings first See 6 2 6 Alarm Notification GPS For details 7 8 2 GPS Map Settings Download Allows you to install the programs from the hard drive Camera Adjustment Allows you to adjust the image quality settings Figure 6 5 ...

Страница 48: ...ou can also select 50 Hz or 60 Hz manually If these don t match faint light and dark bars may appear in your images Check the power utility to determine which frequency is used Image Orientation Changes the image orientation on the Live View window Shutter Speed Determines how long the image sensor is exposed to light The range of shutter speed is from 1 5 to 1 4000 sec In low light conditions fas...

Страница 49: ...stamps on the image 3 Click the Save button to save the image in the local computer 6 2 4 Video Recording You can record live video for a certain period of time to your local computer 1 Click the File Save button No 6 Figure 6 3 The Save As dialog box appears 2 Specify Save in type the File name and move the Time Period slider to specify the time length of the video clip from 1 to 5 minutes 3 Clic...

Страница 50: ... and PAP Right click the live view to have the options of PIP and PAP Picture in Picture View With the Picture in Picture PIP view you can crop the video to get a close up view or zoom in on the video Inset window Navigation box Figure 6 6 1 Select PIP An inset window appears 2 Click the insert window A navigation box appears 3 Move the navigation box around in the inset window to have a close up ...

Страница 51: ...st a navigation box size move the cursor to any of the box corners and enlarge or diminish the box 4 To move a navigation box to another area on the image drag it to that area 5 To change the frame color of the navigation box or hide the box right click the image select Mega Pixel Setting and click one of these options Display Focus Area of PAP Mode Displays or hides the navigation boxes on the im...

Страница 52: ...nction click the Show System Menu button No 9 Figure 6 3 and select Alarm Notify This dialog box appears Figure 6 9 Motion Notify Once motion is detected the captured images are displayed on the control panel of the Live View window I O Alarm Notify Once the input device is triggered the captured images are displayed on the control panel of the Live View window Pop up live video Captured images vi...

Страница 53: ...on and input triggered detection Auto Snapshot The snapshot of live video is taken every 5 seconds on motion and input triggered detection File Path Assigns a file path to save the snapshots 6 2 7 Video and Audio Configuration You can enable the microphone and speaker for two way audio communication and adjust the audio volume To change audio configuration click the Show System Menu button No 9 Fi...

Страница 54: ... the firmware over the Internet For details see Chapter 9 Advanced Applications 6 2 9 Camera Name Display To display the streaming name on the image click the Show System Menu button No 9 Figure 6 3 and select Show Camera Name 6 2 10 Image Enhancement To enhance the image quality of live video click the Show System Menu button No 9 Figure 6 3 and select Image Enhance This dialog box appears Figure...

Страница 55: ...t to be triggered Figure 6 12 To display the I O control window click the I O Control button No 8 Figure 6 3 The Alarm List is displayed in three levels The first level indicates date the second indicates time and the third indicates alarm ID Clicking the Reset button will clear the list To trigger an output device highlight an output and then click the Output button ...

Страница 56: ...e Visual Automation is set ahead by the Administrator For details see 7 1 6 Visual Automation Figure 6 13 To access this feature click the I O Control button No 9 Figure 6 3 and select Visual Automation To change the style of the set areas click the green I O button on the top left corner You will have these options Show All Displays all set areas Rect Float Embosses all set areas Set Color Change...

Страница 57: ...48 6 2 13 Network Status To view the network status in the left menu click Network and select Status Figure 6 14 ...

Страница 58: ...strator can access the system configuration through the network Eight categories of configurations are involved in the system configuration Video and Motion I O Control Events and Alerts Monitoring Recording Schedule Remote ViewLog Network and Management Figure 7 1 ...

Страница 59: ...erts 7 3 1 Email 7 3 2 FTP 7 3 3 Center V2 7 3 4 VSM 7 3 5 Backup Center Box and Bullet Camera Only 7 3 6 ViewLog Box and Bullet Camera Only 7 3 7 3GPP 7 4 Monitoring Box and Bullet Camera Only 7 5 Recording Schedule 7 5 1 Camera 7 5 2 I O Monitor Box and Bullet Camera Only 7 6 Remote Viewlog Box and Bullet Camera Only 7 7 Network 7 7 1 LAN 7 7 2 Advanced TCP IP 7 7 3 IP Filtering 7 8 Management 7...

Страница 60: ...ing 2 Video Setting Options Streaming 1 Streaming 2 Watermark Setting Audio in Source Mechanical Iris Adjustment Special View Setting Yes No option But these settings will be automatically applied to Streaming 2 once they are enabled at Streaming 1 Video Resolution 1280 x 1024 Yes No TV Out Yes No This section includes the video image settings and how the images can be managed by using Motion Dete...

Страница 61: ...52 7 1 1 Video Settings Figure 7 2 ...

Страница 62: ...1 Most 3GPP mobile phone supports video streaming with MPEG4 video Due to the limitation of the bandwidth for 3GPP only 176 x 144 and 360 x 240 video resolutions will be supported for mobile phone setting To change 3GPP port settings see 7 3 7 3GPP Bandwidth Management When using H 264 or MPEG4 it is possible to control the bitrate which in turn allows the amount of bandwidth usage to be controlle...

Страница 63: ...n an event occurs Overlaid with camera name Includes streaming names on live and recorded videos Overlaid with date stamps Includes date stamps on live and recorded videos Overlaid with time stamps Includes time stamps on live and recorded videos Overlaid with digital input description Includes the name of the selected input on live and recorded videos Watermark Setting Enable this option to water...

Страница 64: ...or Color images manually IR Check Function The option is designed to determine if the surveillance area is illuminated by the infrared light from an infrared illuminator or by sunlight By the checking mechanism the built in IR cut filter can then work correctly with the D N function At night the IR cut filter turns on to filter the infrared light and the image is switched to monochrome to produce ...

Страница 65: ...it is suggested to use the Triggered by Input function to avoid the wrong judgment of lighting and the incorrect action of the IR cut filter See 2 6 3 Infrared Illuminators Auto Iris The option is designed for auto iris lens DC drive Enable or disable the auto iris function ...

Страница 66: ...sensitivity by moving the slider There are three values The higher the value the more sensitive the camera is to motion 3 Drag an area on the image Click Add when you are prompted to confirm the setting 4 To create several areas with different sensitivity values repeat Steps 2 and 3 5 Click Save to save the above settings 6 If you want to trigger the alarm output when motion is detected select Out...

Страница 67: ... This feature is ideal for locations with displays keyboard sequences e g passwords and for anywhere else you don t want sensitive information visible Figure 7 4 1 Select the Enable option 2 Drag the area s where you want to block out on the image Click Add when you are prompted to confirm the setting 3 Click the Save button to save all the settings ...

Страница 68: ... be saved in the recordings Figure 7 5 1 Select the Enable option 2 Click any place on the image This dialog box appears Figure 7 6 3 Type the desired text and click OK The text is overlaid on the image 4 Click on the text and drag it to any place on the image 5 Click Set Font to modify the font style of the text 6 Click Save to apply the settings or click Load Undo to revert to a previous setting...

Страница 69: ...s include the triggered output device and e mail alert To have the tampering alarm first set up these alarm approaches properly To trigger the output device when a tampering event occurs enable the output setting and select Tampering Alarm See 7 2 2 Output Settings To trigger the e mail alert when a tampering event occurs enable the e mail setting and select Tampering Alarm See 7 3 1 E Mail Figure...

Страница 70: ...d for scene changes before an alarm is generated 5 In the Duration of Alarm field specify the duration of the alarm after which the triggered output device will be turned off 6 To trigger an alarm when the scene turns dark e g the lens of camera has been covered select Alarm for Dark Images 7 Click Apply to save all the settings 8 Start monitoring to enable the function To have output alarm it is ...

Страница 71: ...gure 7 8 1 Select the Enable option 2 Drag an area on the image of the electronic device This dialog box appears Figure 7 9 3 Assign the connected module and output device In the Note field type a note to help you manage the device Click OK to save the settings 4 To change the frame color of the set area click the Set Color button 5 To emboss the set area select Float Up or keep it flat by selecti...

Страница 72: ... Cable 7 2 1 Input Settings To activate the sensor input select Enable Figure 7 10 Normal State You can set the input state to trigger actions by selecting Open Circuit N O or Grounded Circuit N C Latch Mode Enable this option to have a momentary output alarm Trigger digital output relay When this option is enabled the output will be triggered once the input is activated Record Enable this option ...

Страница 73: ...mera only supports the dry contact input device 2 The functions of triggering the output starting the recording when the input is triggered and sending video to Center V2 only work after you start Input monitoring manually or by schedule To configure the input monitoring see 7 4 Monitoring ...

Страница 74: ...se or N C Pulse For Toggle output type the output continues to be triggered until a new input trigger ends the output For Pulse output type the output is triggered for the amount of time you specify in the Trigger Pulse Mode for x Seconds field Alarm Settings You can choose to automatically trigger the digital output under these conditions tampering alarm disk write error Rec Error and hard disk f...

Страница 75: ...itoring Station Center V2 or VSM by video or text alerts To have above trigger actions you must set the following functions in advance Motion Detection See 7 1 2 Motion Detection Optional Input Setting See 7 2 1 Input Setting For e mail and FTP alerts it is required to start monitoring See 7 4 Monitoring Note The Motion Detection function is an optional setting since it is activated by default ...

Страница 76: ...ress of the SMTP Server Server Port Modify the port number of the SMTP Server Or keep the default value 25 From email address Type the sender s e mail address Send to Type the e mail address s you want to send alerts to Alerts Interval Time Specify the interval between e mail alerts The interval is between 0 and 60 minutes The option is useful for the frequent event occurrence by which any event t...

Страница 77: ...ord to log in the SMTP server E Mail Alarm Settings You can choose to automatically send an e mail alert under these conditions tampering alarm disk write error Rec Error hard disk full HD Full and motion detection For the related settings to send e mail alerts see 7 1 2 Motion Detection 7 2 1 Input Setting and 7 4 Monitoring ...

Страница 78: ...TP function Server URL IP Address Type the URL address or IP address of the FTP Server Server Port Type the port number of the FTP Server Or keep the default value 21 User Name Type a valid username to log into the FTP Server Password Type a valid password to log into the FTP Server Remote Directory Type the name of the storage folder on the FTP Server ...

Страница 79: ...rver Continuously send images upon trigger events input A sequence of snapshots is uploaded to the FTP Server when the input is triggered Act as FTP Server Enable FTP access to the GV IP Cam The camera acts as a FTP server enabling users to download AVI files Use alternative port The default port is set to 21 To access the internal FTP server through a web browser enter the IP address or the domai...

Страница 80: ... After a motion or an I O triggered event the central monitoring station Center V2 can get notified by live videos and text alerts For the live monitoring through Center V2 you must already have a subscriber account on Center V2 Figure 7 14 ...

Страница 81: ...ld display Connected and connected time These options you can also find on this Center V2 setting page Cease motion detection messages from Stops notifying Center V2 of motion triggered events Cease input trigger messages from for Box Camera Only Stops notifying Center V2 of input triggered events Enable schedule mode Starts the monitoring through Center V2 based on the schedule you set in the Sel...

Страница 82: ...xt alerts For the monitoring through VSM you must already have a subscriber account on VSM Figure 7 15 To enable the VSM connection 1 Activate Link Enable the monitoring through VSM 2 Host Name or IP Address Type the host name or IP address of VSM 3 Port Number Match the port to the Port 2 value on VSM Or keep the default value 5609 ...

Страница 83: ...n messages from Stops notifying VSM of motion triggered events Cease input trigger messages from for Box Camera Only Stops notifying VSM of input triggered events Enable schedule mode Starts the monitoring through VSM based on the schedule you set in the Select Schedule Time section Refer to 7 5 Recording Schedule for the same settings For related settings to activate the monitoring through VSM se...

Страница 84: ...function is only available for Box Camera and Bullet Camera The connection to the GV Backup Center allows you to back up another copy of recordings and system log to the GV Backup Center while the camera is saving these data to the memory card Figure 7 16 ...

Страница 85: ... Select Schedule Time section Refer to 7 5 Recording Schedule for the same settings 8 Click Apply The Connection Status should display Connected and connected time If the GV Backup Center has a failover server providing the uninterrupted backup services in case of the primary GV Backup Center failure you can configure the connection to the failover server 1 Automatic Failover Support Enable the au...

Страница 86: ...for remote playback function This server allows you to remotely access the recorded files saved at the GV IPCAM H 264 and play back video with the player ViewLog Select Enable to activate the built in server Keep the default port 5552 or modify it if necessary For details on the remote playback see 8 2 2 Playback Using Remote ViewLog Figure 7 17 ...

Страница 87: ... the default value 8554 or modify it if necessary RTP UDP Port Keep the default range from 17300 to 17319 or modify it if necessary The number of ports for use is limited to 20 Max Connection Set the maximum number of connections to the GV IPCAM H 264 The maximum value is 20 For details on remote monitoring with mobile phones see Chapter 13 Mobile Phone Connection ...

Страница 88: ...elect all Manually starts both motion detection and I O monitoring Camera Manually starts recording Select the desired recording mode for recording Input for Box Camera Only Manually starts I O monitoring When the sensor input is triggered its associated camera and output will be activated for recording and alerting For this setting see 7 2 1 Input Setting Schedule The system starts motion detecti...

Страница 89: ...80 Camera Status Icon On standby Enabled for motion detection and input trigger ...

Страница 90: ...rding Figure 7 20 Span 1 Span 3 Set a different recording mode for each time frame during the day Each day can be divided into 3 time frames represented by Span 1 to Span 3 Weekend Enable this option to start monitoring all day on the weekend and select the recording mode to be used Define whether your weekend includes Saturday and Sunday or Only Sunday Special Day Set the recording mode on a spec...

Страница 91: ...ach day can be divided into 3 time frames represented by Span 1 to Span 3 Weekend Enable this option to start I O monitoring all day on the weekend and define whether your weekend includes Saturday and Sunday or Only Sunday Special Day Enable I O monitoring on a specified day Note In Recording Schedule and I O Monitoring Schedule if the settings for Special Day conflict with those for Span 1 3 or ...

Страница 92: ...lay back the files recorded at the GV IPCAM H 264 over TCP IP network For the first time user you need to install the Remote ViewLog program from the Software DVD For remote access to the camera the ViewLog Server built in the unit must be enabled See 7 3 6 ViewLog Server For details on connecting to the camera for playback see 8 2 2 Playback over Network ...

Страница 93: ...ork section includes some basic but important network configurations that enable the camera to be connected to a TCP IP network 7 7 1 LAN According to your network environment select among Static IP DHCP and PPPoE Figure 7 22 ...

Страница 94: ...ion parameters section PPPoE The network environment is xDSL connection Type the Username and Password provided by ISP to establish the connection If you use the xDSL connection with dynamic IP addresses first use the DDNS function to obtain a domain name linking to the camera s changing IP address Configure connection parameters Type the camera s IP address Subnet Mask Router Gateway Primary DNS ...

Страница 95: ...re 7 23 Dynamic DNS Server Settings DDNS Dynamic Domain Name System provides a convenient way of accessing the camera when using a dynamic IP DDNS assigns a domain name to the camera so that the Administrator does not need to go through the trouble of checking if the IP address assigned by DHCP Server or ISP in xDSL connection has changed ...

Страница 96: ...e service from the DDNS 6 Click Apply HTTP Port Settings The HTTP port enables connecting the camera to the web For security integration the Administrator can hide the server from the general HTTP port by changing the default HTTP port of 80 to a different port number within the range of 1024 through 65535 GV IPCAM Streaming Port Settings The VSS port enables connecting the camera to the GV System...

Страница 97: ...ure 7 24 To enable the IP Filter function 1 Enable IP Filtering Enable the IP Filter function 2 Filtered IP Type one IP address or a range of IP addresses you want to restrict the access 3 Action to take Select the action of Allow or Deny to be taken for the IP address es you have specified 4 Click Apply ...

Страница 98: ...t section includes the settings of data and time and user account You can also view the firmware version and execute certain system operations 7 8 1 Date Time Settings The date and time settings are used for date and time stamps on the image Figure 7 25 ...

Страница 99: ...y default the camera uses the timeserver of time windows com to automatically update its internal clock every 24 hours You can also change the host name or IP setting to the timeserver of interest Synchronized with your computer or modify manually Manually changes the camera s date and time Or synchronize the camera s date and time with those of the local computer Overlaid Date and Time Settings S...

Страница 100: ...see the location of your camera on maps 1 It is required to sign up for a Google Maps API key before using the Google Maps Click Link to the Google Maps API Figure 7 26 2 Enter the registered Maps API Key the longitude and latitude of your camera and location name Click Apply to enable this function 3 Open the control panel of the Live View window Figure 7 27 ...

Страница 101: ... 5 Right click the warning message and select Allow Blocked Content The map will be displayed The icon indicates the location of your camera At the upper right corner you have options to view different map formats such as Satellite and Hybrid Figure 7 29 ...

Страница 102: ...orage Settings If Enable recycling is selected when the space of the storage device is lower than the specified space the system will overwrite the oldest recorded files If Enable recycling is not selected the system will stop recording when the specified space is reached Keep days 1 255 Specify the number of days to keep the files from 1 day to 255 days When both Keep days and Enable recycling ar...

Страница 103: ...shed and the partition information will be cleaned 3 Remove the memory card from the camera Note 1 If Enable Recycle is selected the available space of the storage device must be higher than the space you specified at the Stop recording or recycle disk when free space of disk is smaller than x option Otherwise no video will be recoded 2 The recording data may be lost if you remove the USB mass sto...

Страница 104: ...and password of Administrator and Guest The default Administrator login name and password are admin the default Guest login name and password are guest To allow a Guest user log in without entering name and password select Disable authentication for guest account Figure 7 31 ...

Страница 105: ...96 7 8 5 Log Information The log information contains dump data that is used by service personnel for analyzing problems Figure 7 32 ...

Страница 106: ... a memory card is required to insert to the camera 1 For the first time user of the System Log first click Create to create a log database access file on the memory card Figure 7 33 Note If you have created the System Log on the memory card clicking Create again will clean your System Log 2 Select the log type System Event Monitoring Event I O Event or Login Logout from the left menu of the Web in...

Страница 107: ...98 4 Click Query The filtering results may look like the figure below Figure 7 34 ...

Страница 108: ...r the camera Firmware Update This field displays the firmware version of the camera System Settings Clicking the Load Default button will make the camera restore factory default settings Note After applying the default function you need to configure the camera s network setting again Reboot Clicking the Reboot button will make the camera perform software reset ...

Страница 109: ...d a memory card 7 8 3 Storage Settings 2 If you like to set up the pre recording post recording or audio recording see 7 1 1 Video Settings 3 If you like to set up the schedule for video recording or I O monitoring see 7 5 Recording Schedule 4 If you like to configure the areas and sensitivity values for motion detection see 7 1 2 Motion Detection 5 If you want the recording to be triggered by inp...

Страница 110: ...emory Card You can play back the files recorded at the GV IPCAM H 264 by connecting the memory card to GV System through a memory card reader However GV System is run on Windows system while the files recorded at the GV IPCAM H 264 is of Linux file system To enable Windows to recognize the files you need to install the program Ext2 Installable File System included on the Software CD 1 Insert the S...

Страница 111: ...og 4 Click the Advanced button select Reload Database and click Video Server Compact DVR This dialog box appears Figure 8 2 5 Click Add to assign the hard drive 6 Click OK to load the data to the ViewLog for playback ...

Страница 112: ... 3 6 ViewLog Server 2 For the first time user run the Remote ViewLog program from the Software CD Next time whenever you like to use this function access this option from the camera s Web interface 3 When this dialog box appears type the camera s IP address login ID and password Keep the default port 5552 or modify it if necessary Figure 8 3 4 In the Host Type field select GV IP Device 5 Click Con...

Страница 113: ...ollowing instructions describe how to retrieve the recorded files from the GV IPCAM H 264 over network If you like to use the memory card for playback first follow the instructions in 8 2 1 Playback Using the Memory Card to load the recorded files to ViewLog and then follow Steps 4 5 below to play back DST events 1 The camera must allow the remote access with ViewLog Server activated See 7 3 6 Vie...

Страница 114: ...Video Event list select desired events and click the Play button to start Note 1 The playback function is only compatible with the GV System of version 8 3 or later 2 The AVI file recorded during the DST period is named with the prefix GvDST e g GvDST20081022xxxxxxxxx avi to differentiate from the regular AVI file named with the prefix Event e g Event20081022xxxxxxxxx avi ...

Страница 115: ...While the firmware is being updated A the power supply must not be interrupted and B do not unplug the Ethernet cable if the cable is the source of power supply Power over Ethernet or PoE supported 2 Do not turn the power off within 10 minutes after the firmware is updated 3 If you use the IP Device Utility for firmware upgrade the computer used to upgrade firmware must be under the same network o...

Страница 116: ...ndow click the Show System Menu button No 9 Figure 6 3 select Remote Config and then click the Firmware Upgrade tab This dialog box appears Figure 9 1 2 Click the Browser button to locate the firmware file img saved at your local computer 3 Click the Firmware Upgrade button to start the upgrade ...

Страница 117: ...t the Software CD select IP Device Utility and follow the onscreen instructions to install the program 2 Double click the IP Device Utility icon created on your desktop This dialog box appears Figure 9 2 3 Click the Search button to locate available cameras on the same LAN Or click the New button and assign the IP address to locate the camera over the Internet Or highlight one camera in the list a...

Страница 118: ...re 9 3 5 Click the Firmware Upgrade tab This dialog box appears Figure 9 4 6 Click the Browse button to locate the firmware file img saved at your local computer 7 If you like to upgrade all the cameras in the list select Upgrade all devices 8 Type Password and click Upgrade to start the upgrade ...

Страница 119: ...import it to another camera To back up the settings 1 Run IP Device Utility and locate the desired camera See Steps 1 3 in 9 1 2 Using the IP Device Utility 2 Double click the camera in the list Figure 9 3 appears 3 Click the Export Settings button This dialog box appears Figure 9 5 4 Click the Browse button to assign a file path 5 Type Password and click the Export Settings button to save the bac...

Страница 120: ...s 111 9 To restore the settings 1 In Figure 9 3 click the Import Settings tab This dialog box appears Figure 9 6 2 Click the Browse button to locate the backup file dat 3 Click the Update Settings button to start restoring ...

Страница 121: ...is may take about 10 seconds 5 Soon after the status LED turns off it turns red again and a clicking sound appears Then you can release the Default button and the process of loading default values is complete Mini Fixed Dome 1 Unplug the network cable to start 2 Unscrew the camera s cover 3 Press and hold the Default button No 1 Figure 3 1 while plugging the network cable 4 Wait until the network ...

Страница 122: ... Screw and slightly pull out the camera module See Figure 4 14 4 Press and hold the Default button for 60 seconds while plugging the power cable Figure 9 7 5 Release the Default button and the process of loading default values is complete 6 Slightly push the camera module back and fasten the Fixing Screw 7 Replace a new Silica Gel Bag and fasten the camera s cover immediately ...

Страница 123: ...g before you present it in court 9 4 1 Accessing AVI Files To verify watermark first you have to access the recorded AVI files by one of these methods 1 Use the File Save function on the Live View window Figure 7 1 to start recording on the local computer 2 Use the Act as FTP Server function to download AVI files from the GV IPCAM H 264 See 7 3 2 FTP 3 Use the files recorded on the memory card Sin...

Страница 124: ... select Open and locate the recording avi The selected recording is then listed on the window Alternatively you can drag the recording directly from the storage folder to the window 4 If the recording is unmodified a check mark will appear in the Pass column On the contrary if the recording is modified or does not contain watermark during recording a check mark would appear in the Failed column To...

Страница 125: ... Goes to the previous frame of the file 5 Next Frame Goes to the next frame of the file 6 Previous Watermarked Frame Goes to the previous frame that contains watermark 7 Next Watermarked Frame Goes to the next frame that contains watermark 8 Original vs Extracted The Extracted icon should be identical with the Original icon If not it indicates the recording has been tampered 9 File List Displays t...

Страница 126: ...d Dome GV System version 8 3 3 or later is required For Bullet Camera GV System version 8 4 or later is required The maximum number of connections to the GV IPCAM H 264 is 10 When one GV System connects to one GV IPCAM H 264 it takes up to 2 connections When the user connects to one GV IPCAM H 264 via browser it takes up to 2 connections When the user operates the Camera Audio Control on Center V2...

Страница 127: ...click IP Camera Install This dialog box appears Figure 10 2 2 Select Install IP Camera select the number of the IP cameras you want to link to and click Configure This dialog box appears Figure 10 3 To automatically set up the IP camera click Scan Camera to detect any GV IP devices on the LAN To manually set up the IP camera click Add Camera The following steps are the example of manual setup 118 ...

Страница 128: ...Figure 10 4 4 Type the IP address username and password of the IP camera Modify the default HTTP port if necessary Select GeoVision from the Brand drop down list and select GV IPCAM H 264 1 3M VGA from the Device drop down list This dialog box appears Figure 10 5 119 ...

Страница 129: ...f single or dual streaming Codec Type If you select Dual Stream the preview codec and recording codec can be set differently 6 Click Apply The IP camera is added to the connection list 7 Click the listed camera and select Display position to map the IP camera to a channel on the GV System Figure 10 6 8 The Status column now should display Connected Click OK 120 ...

Страница 130: ...sired camera for live preview Preview dual stream record channel The option is only available when the dual stream is selected i e the cameras for live view and recording are configured differently see Figure 10 5 Select this option for recording preview Audio Setting Monitor Sensitivity Adjust the sensitivity of the audio that will be detected The higher the value the more sensitive the system is...

Страница 131: ...because it requires a lot of bandwidth Record frame rate control Set the recording frame rate to meet your storage requirements Maximum recording frame rate This option is available when the recording codec of the IP camera is set to JEPG Select the frame rate from 1 to 30 fps Record key frame only This option is available when the recording codec of the IP camera is set to MPEG4 or H 264 You can ...

Страница 132: ...s For the GOP setting see 7 1 1 Video Settings Prerecording with GOP Enable video recording before an event occurs The GV System can prerecord video for up to 120 frames which is totally as much as 4 MB in buffer size To enable this function the three requirements must be met D1 or CIF resolution the number of frames in GOP set to 60 or less than 60 frames MPEG4 or H 264 codec GV GIS Setting Recei...

Страница 133: ...button You need to create a group before creating a host 3 Select GV IP Camera GV IP Speed Dome from the Device drop down list Type the host name IP address user name and password of the camera Modify the default VSS port 10000 if necessary Figure 10 8 4 Click Save to establish connection For details on the Multi View functions see Multi View MPEG 4 Encoder Viewer Viewing Live Video Using WebCam D...

Страница 134: ...n System 1 Go to Windows Start menu point to Programs select GV folder and click E Map Editor 2 To create an E Map click the Add Map button on the toolbar A New Map file appears 3 Double click the New Map file and click the Load Map button on the toolbar to import a graphic file 4 To create a host click the Add Host button on the toolbar and select Add IPCam 5 Right click the created New Host in t...

Страница 135: ...re the E Map file on the DVR 1 To enable the remote access to the DVR click the Network button select WebCam Server to display the Server Setup dialog box and click OK to start the WebCam server 2 At the local computer open the web browser and type the address of the DVR The Single View page appears 3 Select Emap A valid user name and password are required for login For the first time user you wil...

Страница 136: ... to enable connecting to the GV IPCAM H 264 in the central monitoring stations Center V2 VSM and Dispatch Server 11 1 Center V2 The Center V2 can monitor and manage the camera and I O devices connected to the GV IPCAM H 264 IP Camera IP Camera TCP IP Center V2 Video Data Text Data Figure 11 1 127 ...

Страница 137: ...Accept connection from GV Compact DVR Video Server IP Cam Keep default port 5551 or modify it to match the Center V2 port on the IP camera Figure 11 2 To define how to display the received video on motion detection and input trigger from the IP camera click the Preference Setting button and select System Configure This dialog box appears Figure 11 3 128 ...

Страница 138: ...of the camera view remaining on the monitoring window when an I O device is triggered To keep the camera view remaining on the monitoring window even after the alarm is finished click the right arrow button and uncheck Latch Trigger Then the camera view will keep remaining on the monitoring window for the specified time For example the alarm is triggered for 5 minutes and you set 10 minutes which ...

Страница 139: ...propriate port connecting to the IP camera click Configure on the window menu and select System Configure to display this dialog box In the Connective Port field keep the default port 5609 or modify it to match the VSM port on the IP camera Figure 11 5 For further information on how to mange the received video from the IP camera see GV CMS Series User s manual 130 ...

Страница 140: ...h Server The Dispatch Server can manage the camera and I O devices connected to the GV IPCAM H 264 and distribute them to the Center V2 IP Camera IP Camera TCP IP Video Data Center V2 Center V2 Dispatch Server Text Data Figure 11 6 131 ...

Страница 141: ...n the toolbar and select Allow GV IP devices to login as subscriber from port Keep the default port as 5551 or modify it to match the Center V2 port on the IP camera Figure 11 7 For further information on how to mange the received video from the IP camera see GV CMS Series User s manual 132 ...

Страница 142: ...ViewLog Server Video Settings GViewV2 Supported MSView V2 Windows Mobile 5 0 and 2003 for Smartphone TCP IP Port 10000 RPB Port 5552 ViewLog Server Video Settings 3GPP MSViewV2 SSViewV3 Supported MSView V3 Windows Mobile 6 0 6 1 Standard and Professional TCP IP Port 10000 RPB Port 5552 ViewLog Server Video Settings 3GPP MSViewV2 SSViewV3 Supported SSView V3 Nokia S60 2nd Edition and 3rd Edition fo...

Страница 143: ...detects the big screen panel of the mobile phone images from the GV IPCAM H 264 will be horizontally rotated for a better view Resolution is set to be CIF by default 12 1 1 Installing GView V2 GView V2 should be installed on a PDA device with Microsoft Windows Mobile operating system 1 Download and install Microsoft PDA Viewer V2 from http www geovision com tw english 5_3 asp to the computer 2 Fol...

Страница 144: ... the connection type in the Connection Template field on the Video Settings page See Connection Template in 7 1 1 Video Settings for details 12 1 3 Connecting to the IP Camera Once GView V2 is installed on your PDA you can use it to monitor your GV IPCAM H 264 Make sure your PDA has wireless LAN adapter properly in place with access to the Internet 1 Execute GView V2 on your PDA Figure 12 1 ...

Страница 145: ...password Then click OK 4 Once the connection is established the live image will appear 12 1 4 Playing Back the Recordings from the IP Camera To play back the recordings from the GV IPCAM H 264 follow these steps 1 Enable the ViewLog Server on the camera Keep the connection port to be 5552 or modify it if necessary See 7 3 6 ViewLog Server for details 2 Execute GView V2 in your PDA ...

Страница 146: ... username and a password Then click OK to connect 5 Select the desired video recording from the event list for playback 12 1 5 Other Functions In addition to live view and playback GView V2 offers these functions viewing controlling I O devices PTZ control adjusting image quality and starting stopping recording On the live view screen click the buttons on the toolbar to have the desired functions ...

Страница 147: ...nctions Click it to move the camera to the preset positions This is only available when the camera supports PTZ functions Click it to adjust the image quality Click it to access the connected I O devices Click it to start or stop recording Click it to display the camera status The supervisor is given the highest priority to control the PTZ camera and won t be restrained by 60 second time limit Whe...

Страница 148: ... button The I O module button appears on the toolbar Figure 12 5 The numbers on the toolbar indicate the connected module Click the desired number to access its I O devices The I O control buttons appear on the toolbar Figure 12 6 Button Description I Click it to view the log of input triggers O Click it to display and force the connected output devices ...

Страница 149: ... on the Alarm list Click the I button to view the list of trigger events Figure 12 7 Forcing Outputs To force any connected output devices click the O button to and click the desired number The numbers on the toolbar indicate the connected output devices Figure 12 8 ...

Страница 150: ...ra use the drop down list to select the desired camera and click the button on the live view screen Figure 13 4 Figure 12 9 Button Description Click it to return to the previous page Use these buttons to move the PTZ camera to the left up down and right Click it to return to home ...

Страница 151: ...ive view screen Figure 13 4 Figure 12 10 This screen displays the status of camera activity Three messages indicate the current camera status Message Description Normal The camera is turned on and not recording Inactive The camera is turned off Recording The camera is recording ...

Страница 152: ...ons to complete the installation The default installation directory is C SmartPhone Viewer V2 or C SmartPhone Viewer V3 3 Through the synchronization program such as ActiveSync install MsviewV2 exe or MsviewV3 exe from the installation directory to your smartphone Consult your smartphone user s manual for how to install a program to the smartphone 12 2 2 Activating the MSView V2 V3 Function To all...

Страница 153: ... 2 3 Connecting to the IP Camera The following operations may vary slightly for different modules 1 Execute MSViewV2 exe or MSViewV3 exe on your smartphone Figure 12 11 2 Click Type and then Live Figure 12 12 ...

Страница 154: ...of your camera port value default value is 10000 a username and a password Then click Control and select Connect Figure 12 13 4 Once the connection is established the live image will appear You can use the scroll key on your smartphone to navigate camera channels Figure 12 14 ...

Страница 155: ...2 Execute MSView V2 or MSView V3 in your smartphone 3 Select Type and then Rpb Figure 13 12 The login screen appears If you want to search the recordings within a specific period of time for playback select Rpb with time Figure 12 15 4 Enter the IP address of your camera port value default value is 5552 a username and a password Then click Select and click GV Video Server to start the connection 5...

Страница 156: ...ion 147 12 12 2 5 Other Functions In addition to live view MSView V2 or MSView V3 offers these functions zooming in out a camera view rotating images and controlling outputs Select the Control option to have these features ...

Страница 157: ...the on screen instructions to complete the installation The default installation directory is C Symbain SmartPhone Viewer V3 3 Through the synchronization program such as Nokia PC Suite install SSviewV3 exe from the installation directory to your smartphone Consult your smartphone user s manual for how to install a program to the smartphone 12 3 2 Activating the SSView V3 Function To allow remote ...

Страница 158: ...w on your smartphone 2 When the message SSView V3 appears select Options and select Live Connect The login screen appears Figure 12 16 3 Enter the IP address of your camera port value default value is 10000 a username and a password Then click Options and select Connect 4 Once the connection is established the live image will appear Figure 12 17 ...

Страница 159: ...e device to select the desired camera for connection 12 3 5 Playing Back the Recordings from the IP Camera To play back the recordings from the GV IPCAM H 264 follow these steps 1 Enable ViewLog Server on the camera Keep the connection port to be 5552 or modify it if necessary See 7 3 6 ViewLog Server for details 2 Execute SSView on your smartphone ...

Страница 160: ...e Figure 12 18 4 Enter the IP address of your camera port value default value is 5552 a username and a password Then click Options and select Video Server 5 Select the desired video recording from the event list for playback 12 3 6 Other Functions In addition to live view SSView offers these functions changing camera channels zooming in a camera view rotating images and controlling outputs Select ...

Страница 161: ...orted to be the connection type in the Connection Template field on the Video Setting page and then enable the 3GPP Server on the camera See 7 1 1 Video Settings and 7 3 7 3GPP for details 12 4 2 Connecting to the IP Camera 1 Open the Internet browser in the mobile phone and enter the IP address of your camera a user name and a password Then click Apply to connect Figure 12 19 2 After the connecti...

Страница 162: ...Mobile Phone Connection 153 12 3 Select the desired channel Its live image will appear Figure 12 21 Note Currently the 3GPP application does not support remote playback and I O control ...

Страница 163: ... 1 5 sec 30 IRE F 1 4 AGC On slow shutter Off Minimum Illumination IR ON 0 Lux 1 60 sec 50 IRE F 1 4 AGC On slow shutter Off Shutter Speed 1 5 1 4000 sec Balanced Speed Priority Quality Priority White Balance Automatic Manual 2800K 8500K Fixed Focal Lens Megapixel Yes IR Support Yes Iris Fixed Iris Focal Length 4 0 mm 5 Aperture F 1 5 5 Mount CS Image Format 1 3 Total Length 23 65 mm Depth 80 4 5 ...

Страница 164: ... H 264 MPEG4 MJPEG Video Streaming Dual Streams from two of H 264 MPEG4 and MJPEG Main Streaming 1280 x 1024 SXGA 640 x 480 VGA 320 x 240 CIF 176 x 144 Video Resolution Sub Streaming 640 x 480 VGA 320 x 240 CIF 176 x 144 Frame Rate 15 fps at 1280 x 1024 SXGA 30 fps at 640 x 480 VGA Image Setting Brightness Contrast Sharpness Gamma White Balance Flicker less Image Orientation Audio Codec G 711 Digi...

Страница 165: ...0 14 in Digital I O 5 pin terminal block pitch 3 5 mm 0 14 in Auto Iris DC drive Local Storage Micro SD SDHC memory card slot Connectors TV Out BNC connector LED Indicator 1 LED with two colors General Operating Temperature 0 C 50 C 32 F 122 F Humidity 10 to 90 no condensation Power Source 12V DC PoE Power Consumption 7 2 W max 600mA at 12V DC Regulatory CE FCC C Tick RoHS compliant Dimension L X ...

Страница 166: ...mware upgrade through Web Browser or Utility Access from Web Browser Camera live view video recording change video quality bandwidth control image snapshot digital I O control audio Picture in Picture Picture and Picture Privacy Mask Visual Automation Tampering Alarm Application Network Storage GV NVR GV System 3G Mobile Phone Built in player for 3GPP ISMA Live Viewing IE Mobile Phone CMS Server s...

Страница 167: ... Focal f 3 6 mm Angle of View 100 2 D 77 H 54 V Operation Video Codec H 264 MJPEG MPEG4 Video Streaming Dual Streams from two of H 264 MPEG4 and MJPEG Main Streaming 1280 x 1024 SXGA 640 x 480 VGA 320 x 240 CIF 176 x 144 Video Resolution Sub Streaming 640 x 480 VGA 320 x 240 CIF 176 x 144 Frame Rate 30 fps at 640 x 480 VGA 15 fps at 1280 x 1024 SXGA Image Setting Auto Exposure Auto White Balance B...

Страница 168: ...ype End Span and Mid Span PoE Power Output Per Port 48V DC 350 mA Max 15 4 watts Mechanical Camera Angle Adjustment Tilt 0 90 Pan 45 45 Ethernet RJ 45 Connector Microphone Built in General Operating Temperature 0 C 50 C 32 F 122 F Humidity 10 90 no condensation Power Source PoE Power Consumption 5 8 W Certificate CE FCC RoHS compliant Dimensions ø 106 x 54 4 mm 4 2 x 2 1 in Weight 212 g 0 47 lb 15...

Страница 169: ...ra live view video recording change video quality zoom in out bandwidth control image snapshot audio Picture in Picture Picture and Picture Privacy Mask Visual Automation Applications Network Storage GV NVR GV System 3G Mobile Phone Built in player for 3GPP ISMA Live Viewing IE Mobile Phone CMS Server support GV Control Center GV Center V2 GV VSM 160 ...

Страница 170: ...alanced Speed Priority Quality Priority White Balance Automatic Manual 2800K 8500K Lens Aperture F 1 3 5 W Lens Focal f 3 6 9 mm Depth 93 W 38 T 5 Height 73 W 30 4 T 5 Angle of View Vertical 56 6 W 23 T 5 Operation Video Codec H 264 MPEG4 MJPEG Video Streaming Dual Streams from two of H 264 MPEG4 and MJPEG Main Streaming 1280 x 1024 SXGA 640 x 480 VGA 320 x 240 CIF 176 x 144 Video Resolution Sub S...

Страница 171: ... ISMA RTSP Mechanical Lens Mounting ø 14 mm Power Terminal Block 3 pins Ethernet RJ 45 Audio 1 In RCA female for microphone 1 Out RCA female for speaker Digital I O I O Wires Auto Iris DC Drive Local Storage Micro SD SDHC memory card slot Connectors TV Out None General Operating Temperature 0 C 50 C 32 F 122 F Humidity 10 to 90 no condensation Power Source 12V DC 24V AC PoE Power Consumption 12 W ...

Страница 172: ...d configuration Maintenance Firmware upgrade through Web Browser or Utility Access from Web Browser Camera live view video recording change video quality bandwidth control image snapshot digital I O control audio Picture in Picture Picture and Picture Privacy Mask Visual Automation Tampering Alarm Application Network Storage GV NVR GV System 3G Mobile Phone Built in player for 3GPP ISMA Live Viewi...

Страница 173: ...x A Supported Lenses for Box Camera Provider Model No RV0409D IR RV0515D IR Fujian Forecam Optics RV0820D IR EVD03618F IR EVD04218F IR EVD06018F IR EVD08018F IR EVD12018F IR EVETAR EVD16018F IR Pentax TS3VP213ED M ...

Страница 174: ... use Internet Explorer 8 it is required to complete the following setting 1 Set the Security to Medium high default 2 Enable Allow previously unused ActiveX controls to run without prompt 3 Disable Only allow approved domains to use ActiveX without prompt ...

Страница 175: ...V IPCAM H 264 can support RTSP protocol for video streaming For the RTSP command enter rtsp IP of the GV IPCAM H 264 8554 CH No sdp For example rtsp 192 168 3 111 8554 CH001 sdp Note the RTSP streaming provides source video images only ...

Отзывы: