Genius ColorPage-Vivid 4 USB Scanner
8
1.
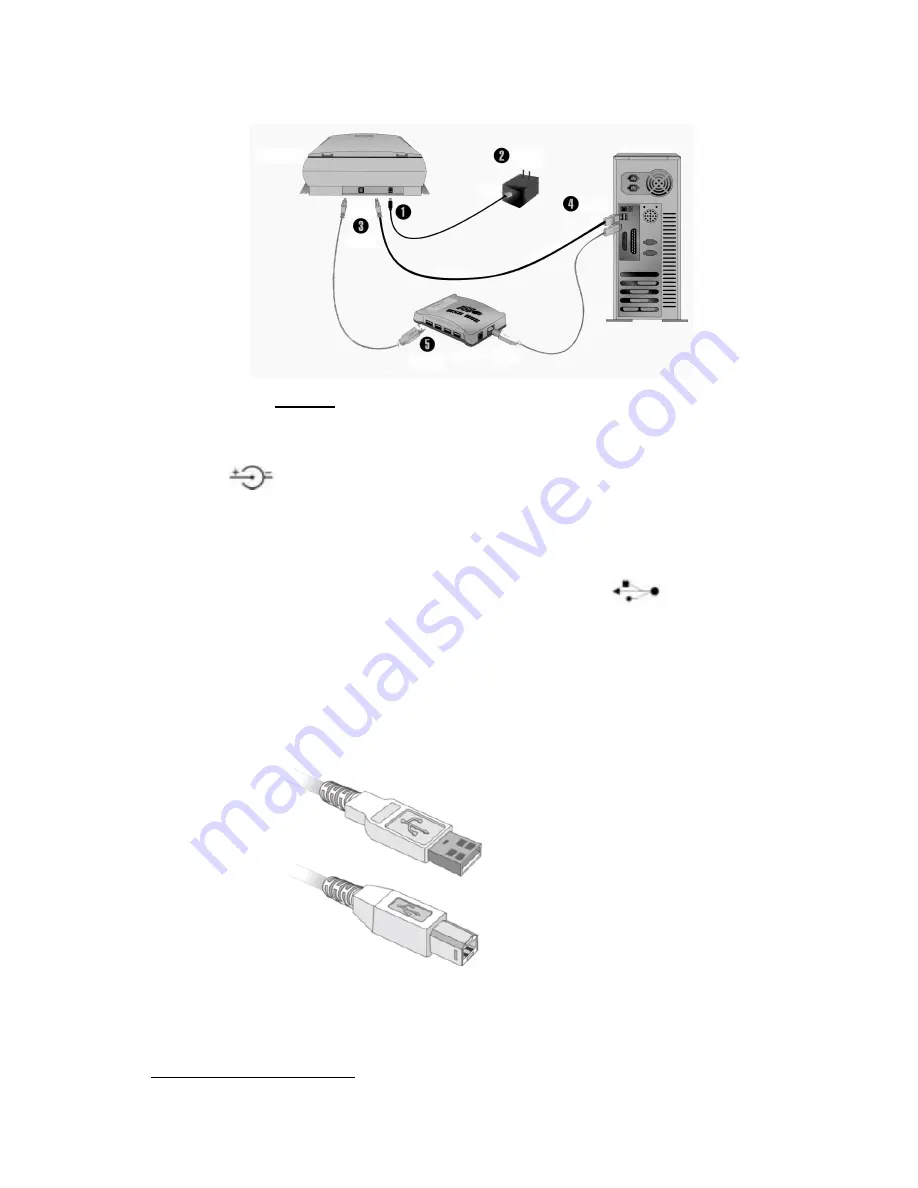
Please take a moment to study Figure 4.
Figure 4. Installing the ColorPage-Vivid 4 USB Scanner
2.
Plug the power adapter into the scanner’s power receptor which can be identified by the
symbol
on its top (see Figure 4, Step1).
3.
Plug the other end of the power adapter into a standard AC power outlet (see Figure 4, Step
2).
4.
Plug the square end (Type B connector) of the included USB cable to the USB port at the rear
of the scanner (see Figure 4, Step 3). You can find a USB sign
beside the USB
connector at the rear of the scanner.
5. Plug Plug the rectangular end (Type A connector) of the USB cable to the USB port on the
back of your computer (see Figure 4, Step 4).
Note:
If there is another USB device connected to the computer, connect the scanner to
an available USB port.
6.
If you plan to connect your scanner to a USB hub
1
, make sure that the hub is connected to the
USB port in your computer. Next, connect the scanner to the USB hub (see Figure 4, Step 5).
Note:
If you do not have a USB port available, you might need to buy a USB port.
1
The USB hub is not included with the scanner.
Type A Connector
Type B Connector
Содержание ColorPage-Vivid 4
Страница 8: ...Genius ColorPage Vivid 4 USB Scanner 6 Chapter I Installing Genius ColorPage Vivid 4 USB Scanner...
Страница 14: ...Genius ColorPage Vivid 4 USB Scanner 12 4 Once completed restart Windows...
Страница 15: ...Genius ColorPage Vivid 4 USB Scanner 13 Chapter II Usage and Maintenance...
Страница 20: ...Genius ColorPage Vivid 4 USB Scanner 18 Figure 9 Genius TWAIN Interface...
Страница 21: ...Genius ColorPage Vivid 4 USB Scanner 19 Chapter III How to Use Quick Function Buttons...


