background image


35

5.2.2.10 SPEED 

DISPLAY 

MODE 


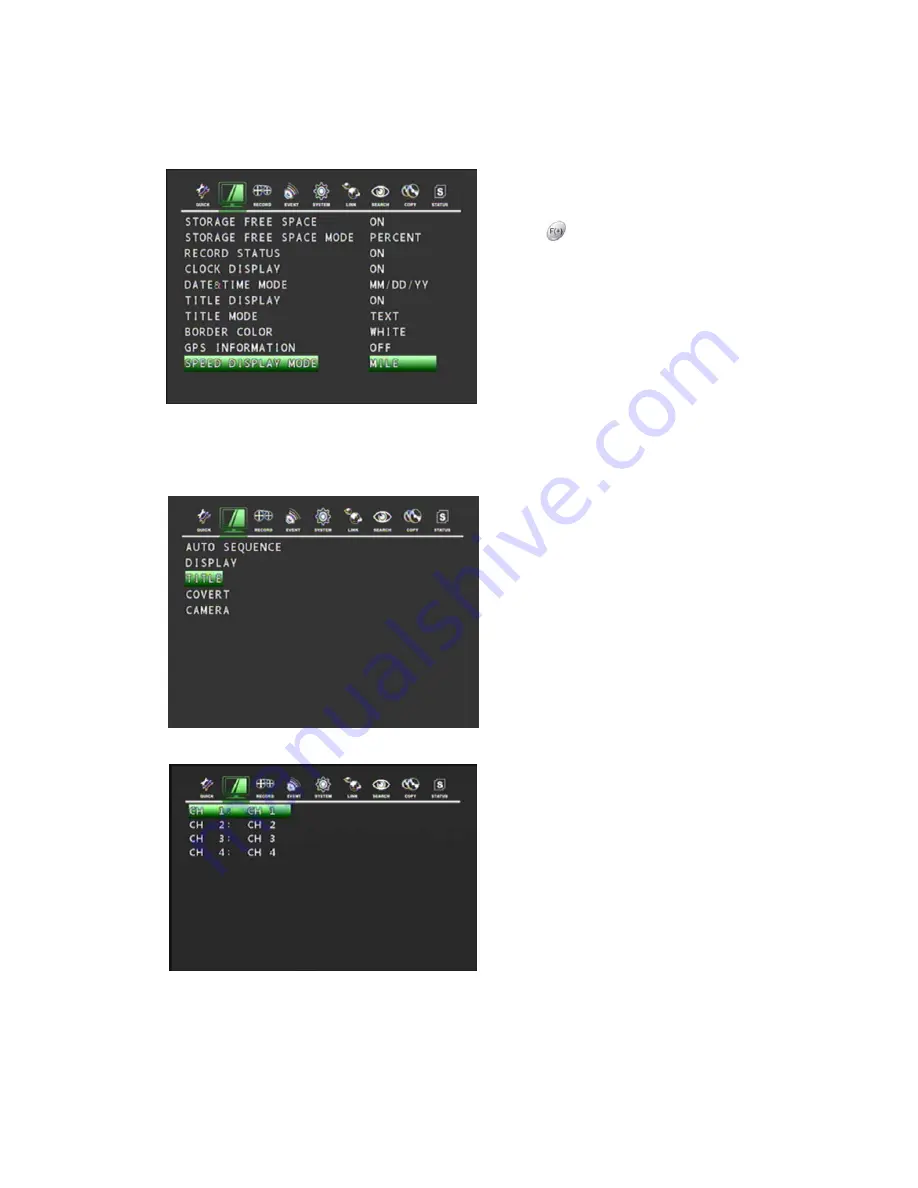
In the DISPLAY menu, 
Move the cursor using the 

 buttons to 

select SPEED DISPLAY MODE. 
Use the 

 button to choose either MILE or 

KILOMETRE. 
 
This will display the distance covered by the 
vehicle on the live screen in either Kilometres 
or Miles. 


5.2.3 TITLE 

 
In the SCREEN menu, 
Move the cursor to TITLE using the 

,


buttons. 
 
Press the ENTER button when the cursor is 
on TITLE and the following screen appears.   
Use the 

,


buttons to see the next page. 


Press the enter button to edit the channel title. 


Содержание MDVR4SD

Страница 1: ...1 H 264 4Channel Mobile DVR User Manual V1 0 MODEL MDVR4SD www geniecctv com...

Страница 2: ...tial damages including damages for loss of profits loss of business loss of use or data interruption of business and the like even if Genie CCTV Ltd has been advised of the possibility of such damages...

Страница 3: ...contains the following contents 1 One DVR 2 One AC Adaptor 3 One Power Cable 4 One Remote Controller 5 DVR Viewer Program CD 6 Instruction Manual on CD 7 Two AAA batteries 8 Rack Mount Ears and Screw...

Страница 4: ...rature WARNING CAUTION accompanying the product Disposal of Old Electrical Electronic Equipment Applicable in the European Union and other European countries with separate collection systems This symb...

Страница 5: ...ribed stored in a retrieval system or translated into any language in any form by any means without prior written permission of Maker Maker makes no warranties for damages resulting from corrupted or...

Страница 6: ...ideo Recorders are intended for surveillance use and should never be used in a manner that invades other people s privacy or contravenes international or domestic privacy acts and their regulations Pl...

Страница 7: ...ately turn the Digital Video Recorder s power off or unplug the power cord from the power outlet Contact a qualified service personnel authorised by the equipment distributor or the Maker Do not attem...

Страница 8: ...ions may cause an electrical short circuit which may lead to fire or electrical shock Do not handle the device or power cord with wet hands Handling it with wet hands may lead to electrical shock When...

Страница 9: ...t and cold temperatures may cause condensation water droplets to form on its external and internal surfaces You can avoid this by placing the equipment in an airtight re sealable plastic bag and letti...

Страница 10: ...ME 26 5 1 4 IMAGE QUALITY 27 5 1 5 EVENT 27 5 1 6 PRE RECORD TIME 28 5 1 7 POST RECORD TIME 28 5 1 8 PREVIEW QUALITY 28 5 1 9 AUDIO RECORD 29 5 1 10 SAVE 29 5 2 SCREEN 29 5 2 1 AUTO SEQUENCE 30 5 2 2...

Страница 11: ...2 CLOCK 48 5 5 2 1 DATE TIME 49 5 5 2 2 TIME ADJUST 49 5 5 3 VIDEO STANDARD 50 5 5 4 LANGUAGE 50 5 5 5 ADVANCED SETUP 50 5 5 5 1 PASSWORD CHECK 51 5 5 5 2 SET PASSWORD 51 5 5 5 3 USER AUTHORITY 52 5 5...

Страница 12: ...LESS 69 5 6 8 1 WIRELESS MODE 69 5 6 8 2 MOBILE SERVER 70 5 7 SEARCH 70 5 7 1 CALENDER SEARCH 70 5 7 2 SEARCH COPY 72 5 7 3 TIME SEARCH 72 5 7 4 EVENT SEARCH 73 5 7 5 BLOCK SEARCH 74 5 7 6 FILE SEARCH...

Страница 13: ...o Recorder Model MDVR4SD The manual details how the user should install and operate the DVR along with the features and specifications Please read this manual carefully and follow the installation pro...

Страница 14: ...Emergency Recording in Full Frame Rate on Every Channel Digital Watermark Support Smooth Reverse Playback Ease of Operation Remote Controller Front Buttons and Network Viewer Supported Copy Media USB...

Страница 15: ...nce Full Screen and Quad AUDIO Compression ADPCM Audio Input Line 1CH RCA Input Level 0 5 1 4Vp p 20k Audio Output Line 3 5mm Stereo Mini Jack RECORDING Compression H 264 720 H 480 V 720 H 240 V 360 H...

Страница 16: ...MS for Mobile DVR SD Viewer Transmission Rate Max 100ips CIF Full Motion Transmission Search Supports Multi Client 16 Clients Accessible SYSTEM MONITORING RECOVERY System Logging Power Failure Checkab...

Страница 17: ...y Output 2 Pins Terminal Block NO Common RS 485 for External Control PTZ 2 Pins Box Connector Terminal Block Ethernet RJ 45 10 100Mbps USB 2 0 1 Port Front ELECTRICAL Power Source Input DC 9V 35V Outp...

Страница 18: ...iver for the IR remote controller Do not block the receiver as a clear line of sight is required for proper operation Panic REC PressthisbuttonforFullFrameRecording 1 2D1RealTime REC Startsmanualrecor...

Страница 19: ...Connectors for Connecting the Audio Input Audio Video Out 3 5 Jack Connector for Connecting the Audio Video Output VGA Output D Sub 15 pin Connector for Connecting to a VGA Monitor Power Out 12V Outp...

Страница 20: ...Zoom in and out SPOT ESC Enter the spot mode Return to the previous mode ENTER HOME Enter Go home Position in PTZ mode Move the cursor left in the setup menu MENU Move the cursor up to the next line i...

Страница 21: ...he copy menu PTZ Auto focus PTZ Enter the PTZ mode SLOW Press this button to slow down playback speed PLAY PAUSE Press this button to begin playback If pressed again during the playback a still pictur...

Страница 22: ...status display b Double click in the menu screen select item or icon 2 SCROLL WHEEL Scroll up or down to change the value of the selected item 3 RIGHT MOUSE BUTTON a Single click in the main window e...

Страница 23: ...D Card in the DVR it shows NO HDD 2 CHANNEL STATUS The status of each channel is displayed in colour codes z White non recording z Yellow continuous manual recording z Red event recording z Green sche...

Страница 24: ...ation where in you are with the DVR unit MDVR4SD PRO Only Below are the icons with specific events Front Door Rear Door Turn Right Turn Left Braking Warning Light Emergency Shock High Speed Excessive...

Страница 25: ...DVR All changes made in quick setup are affected equally to all channels This includes the image size record speed image quality event options pre and post recording time and audio record settings Mor...

Страница 26: ...wn below by pressing the button 5 1 3 RECORD FRAME Users can select the desired frame rate for normal recording using the button from 4 8 16 25 50 or 100 frames per second NTSC PAL 720 X 480 D1 720 X...

Страница 27: ...MOTION V LOSS ALARM GPS and OFF Combinations of the above are also available ALL Select all events V LOSS If video loss occurs the DVR will start recording MOTION If motion is detected by the DVR the...

Страница 28: ...r post recording using the button on the remote When video loss alarm or motion is detected the DVR will store post recorded data during the selected period The post recording time can be set from 0 s...

Страница 29: ...o save the Menu Configuration 5 2 SCREEN Screen setup defines various screen related options Any changes affect the main video Users can select the SCREEN Menu by pressing the Enter button on the remo...

Страница 30: ...each channel in sequence The value is from 1 second to 60 seconds and the default is 3 seconds To exit the AUTO SEQUENCE menu press the ESC button 5 2 2 DISPLAY In the SCREEN menu Move the cursor to...

Страница 31: ...e DISPLAY menu Move the cursor using the buttons to select the HDD FREE SPACE MODE Use the button to choose PERCENT or GIGABYTE The default is PERCENT ON Remaining capacity of the SD Memory will be di...

Страница 32: ...he cursor using the buttons to select CLOCK DISPLAY Use the button to choose ON or OFF The default is ON 5 2 2 5 DATE TIME MODE In the DISPLAY menu Move the cursor using the buttons to select DATE TIM...

Страница 33: ...e default is TEXT ON Each channel title will be displayed on the screen A bitmap is a type of graphics file on a computer You can make characters with bitmaps on the setup window of network client vie...

Страница 34: ...In the DISPLAY menu Move the cursor using the buttons to select GPS INFOMATION Use the button to choose ON or OFF The default is OFF WHITE The colour of the border line will be displayed on the multi...

Страница 35: ...ILOMETRE This will display the distance covered by the vehicle on the live screen in either Kilometres or Miles 5 2 3 TITLE In the SCREEN menu Move the cursor to TITLE using the buttons Press the ENTE...

Страница 36: ...m using the buttons Use the button to choose ON or OFF CHANNEL TITLE MODE These are TEXT or BITMAP TEXT Using the CHARACTER TABLE BITMAP It is possible to download new characters using the client soft...

Страница 37: ...e remote control 5 3 1 RECORD SETUP This menu allows configuration of a weekly recording schedule In the schedule you must use the predefined programs 0 9 in order to set up the recording properly You...

Страница 38: ...uttons to move the cursor to the desired item Select the desired value for each selected item using the button After all settings are done exit using the ESC key or the right double click the mouse Wh...

Страница 39: ...M using buttons and then select the desired value using the button The value is from 5 to 10 To exit this REPEAT RECORD menu press the ESC button Users have to turn off recording to see the Image Qual...

Страница 40: ...ursor using the buttons and set up the value using the button To exit the HOLIDAY menu press the ESC button 5 3 7 RECORD LIMIT Users can select the RECORD LIMIT either ON or OFF using the button on th...

Страница 41: ...put and relay output options 5 4 1 MOTION DETECTION In the EVENT menu Move the cursor to MOTION DETECTION using the buttons Press the ENTER button when the cursor is on MOTION DETECTION and the screen...

Страница 42: ...area Select the motion detection area using the buttons and then press the ENTER button to save the area 5 4 1 4 TEST MOTION In the MOTION DETECTION menu Move the cursor to TEST MOTION using the butto...

Страница 43: ...SCREEN HOLD Keep the current screen even if an event occurs EVENT FULL Display the full screen of the channel where the event occurs EVENT MULTI Display the multi screen when the event occurs EVENT F_...

Страница 44: ...the ENTER button when the cursor is on the SENSOR INPUT and the following 2 page screen appears Select the desired channel using the buttons Select the type of sensor which is connected with DVR using...

Страница 45: ...ight z POWER The relay operates when power is off lost z USER User can operate the relay output manually by pressing the FUNCTION button with button and button NC Normally Closed NO press the button w...

Страница 46: ...SHOLD X Threshold values are automatically varied when there is any event but the default value is 1 Y THRESHOLD Y Threshold values are automatically varied whenever any event occurs but the default v...

Страница 47: ...NU screen Press the ENTER button when the cursor is on the SYSTEM icon and the following items appear 5 5 1 STORAGE In the SYSTEM menu Move the cursor to STORAGE using the buttons Press the ENTER butt...

Страница 48: ...u Move the cursor to STORAGE INITIALISE using the buttons Press the ENTER button when the cursor is on the STORAGE INITIALISE and the following screen appears If you want to initialise the SD CARD mov...

Страница 49: ...y an internet server There are 10 internet servers available to supply GMT to the DVR Move the cursor using the buttons and then set the IP address of SELECT TIME SERVER using the button Set the corre...

Страница 50: ...GUAGE using the buttons Select the desired language using the buttons 5 5 5 ADVANCED SETUP In the SYSTEM SETUP menu Move the cursor to ADVANCED SETUP using the buttons Press the ENTER button when the...

Страница 51: ...igits marked _ _ _ _ _ _ _ _ besides NEW PASSWORD using the CAMERA NUMBER INPUT buttons And then re type the eight numbers of the NEW PASSWORD in the eight spaces marked _ _ _ _ _ _ _ _ beside RE TYPE...

Страница 52: ...ADVANCED SETUP menu Move the cursor to DVR MENU SETUP using the buttons Press the ENTER button when the cursor is on DVR MENU SETUP and the following screen appears 5 5 5 4 1 MENU INITIALISE In the DV...

Страница 53: ...e cursor to LOAD MENU FROM FILE using the buttons and press the ENTER button 5 5 5 4 3 SAVE MENU TO FILE In the DVR MENU SETUP menu Insert a USB memory stick to copy the current DVR Menu file to the U...

Страница 54: ...and press the ENTER button If not move the cursor to NO and press the ENTER button Use the buttons to move the cursor To exit the FIRMWARE UPGRADE screen press the ESC button NOTE It s only possible t...

Страница 55: ...rcentage The whole process should take approximately two minutes When the upgrade is finished the DVR will display COMPLETED RESTART DVR Powering the DVR OFF and ON will then apply the firmware upgrad...

Страница 56: ...t network and also enables the unit to be viewed via the Media Viewer software 2 Using Mobile Communication Terminal The DVR can also be accessed using a mobile communication terminal not supplied Thi...

Страница 57: ...the buttons Select OFF using the button Select DHCP if the router which the unit is connecting to is set up for DHCP operation 5 6 1 1 1 IP ADDRESS In the NETWORK menu Move the cursor to IP ADDRESS u...

Страница 58: ...value using the buttons 5 6 1 3 GATEWAY In the NETWORK menu Move the cursor to GATEWAY using the buttons Select the desired position using the buttons and set the data value using the buttons 5 6 1 4...

Страница 59: ...to DHCP using the buttons Select ON using the buttons Move the cursor to DYNAMIC IP SERVER using the buttons Input the dynamic server IP address using the buttons to change the value and the buttons t...

Страница 60: ...to move the cursor 5 6 2 RS485 In the LINK menu Move the cursor to the RS485 using the buttons Press the ENTER button when the cursor is on RS485 and the following screen appears 5 6 2 1 SYSTEM ID Us...

Страница 61: ...n speed The available speeds are from 1200 to 115200bps The default speed is 115200 5 6 2 3 DATA BIT Select the data bit default bit rate is 8 5 6 2 4 PARITY BIT Select the parity bit Available option...

Страница 62: ...of PTZ cameras the DVR also supports a variety of protocols The following is a list of supported manufacturers and their models Manufacturer Model Samsung Techwin SPD Samsung Techwin SRX 100B Canon VC...

Страница 63: ...d channel using buttons Use the buttons to select the correct model of installed PTZ camera Select the communication speed Available speeds are from 1200 to 115200 The default is 9600 Press the button...

Страница 64: ...ct ON using the buttons to send e mail when an event occurs 5 6 4 2 SMTP SETUP In the E MAIL menu Move the cursor to SMTP SETUP using the buttons to input the e mail sever address to be used by DVR Pr...

Страница 65: ...define an e mail server Enter the e mail server s address For example mail domainname com Press the ESC button to return to previous menu 5 6 4 2 2 SMTP PORT Define the port which the DVR will communi...

Страница 66: ...address Move the cursor to the DVR email address using the buttons Press the ENTER button and the following screen appears Select the characters using the buttons and press the ENTER button 5 6 4 4 U...

Страница 67: ...t the e mail address to send the notifications to and then press the ENTER button to define the e mail address 5 6 5 DVR NAME In the E MAIL menu Move the cursor to DVR NAME using the buttons Press the...

Страница 68: ...E screen press the ESC button 5 6 6 DVR LOCATION In the E MAIL menu Move the cursor to DVR LOCATION using the buttons Press the ENTER button and the following screen appears Select the characters usin...

Страница 69: ...User can change the values from 0Mb to 10Mb using the button of the remote To exit press the ESC button 5 6 8 WIRELESS Move the cursor to WIRELESS using the buttons to set up a wireless condition 5 6...

Страница 70: ...cess the SEARCH menu move the cursor to the SEARCH icon using the in the MENU screen Press the ENTER button when the cursor is on the SEARCH icon and the following menu appears Users can select and se...

Страница 71: ...without data will be in white Select the desired date and then press the ENTER button To change the month or the year highlight the month or the year and then adjust the value by pressing the and butt...

Страница 72: ...gate through different screens to pinpoint the exact time and duration of the video Press the SEARCH button to access the search screen Highlight SEARCH COPY and then press the ENTER button to access...

Страница 73: ...ENT SEARCH Move the cursor to EVENT SEARCH using the in the MENU screen Press the ENTER button when the cursor is on it and the following screen appears Event search provides an overview of the all ev...

Страница 74: ...k search reads the logical block addressing LBA of the hard disk drives where the recorded data are associated chronologically with the actual location of the files In other words even if the hard dri...

Страница 75: ...al hard disk drive into the USB port Press the SEARCH button to access the search screen 5 7 7 BOOKMARK SEARCH Move the cursor to the BOOKMARK SEARCH icon using the in the MENU screen Press the ENTER...

Страница 76: ...an be viewed and archived to a computer The following are what the DVR keeps in its log file Power on off Power loss DVR restart Changes in the menu DVR initialisation SD initialisation Network connec...

Страница 77: ...o the recorded file When the data is played back the user will be prompted for the password 5 8 2 COPY STATUS In the COPY menu Move the cursor to COPY STATUS using the buttons Press the ENTER button t...

Страница 78: ...MEDIA FORMAT and then press the ENTER button The message FORMATTING will be displayed while formatting 5 9 STATUS SCREEN Move the Cursor to the DVR STATUS icon using on the remote press the Enter butt...

Страница 79: ...al drive 6 SOFTWARE VERSION Displays current software version of the DVR 7 HARDWARE VERSION Displays current hardware version of the DVR 5 9 2 NETWORK STATUS Move the cursor to the Network Status usin...

Страница 80: ...utton to see the following screen The screen gives the information about the recording bitrate all 4 channels 5 10EXIT At the MENU screen Move the cursor to the EXIT icon using the buttons Press the E...

Отзывы: