Gemini MM-3000 Скачать руководство пользователя страница 4

MM-3000

INTRODUCTION

Congratulations on your purchase of  Gemini MM-3000 19” 5 channel

stereo mixer. This-state-of-the-art mixer features the latest technological

advances and is backed by a 1 year warranty, excluding the cross fader.

The cross fader is backed by a separate 90 day warranty.

Prior to use we suggest that you carefully read all the instructions.

FEATURES

- 19” 5 Stereo channel mixer

- 8 line, 2 convertible phono/line, RCA inputs

- Balanced XLR and RCA Master Outputs

- Record and  Zone RCA outputs

- 3 band EQ per channel

- Rotary cue volume, w/CUE/PGMfader

- XLR Mic input with EQ and Talkover switch

- Assignable Railglide Crossfader

PRECAUTIONS

1. All instructions should be read before using this equipment.
2. To reduce the risk of electrical shock, do not open the unit.

Please refer all servicing needs to a 

Gemini

-qualified service

technician.

3. Do not expose this unit to direct sunlight or a heat source such

as a radiator or stove.
4. This unit should be cleaned only with a damp cloth. Avoid sol-

vents or other cleaning detergents.
5. When moving this equipment it should be placed in its original

carton and packaging. This will reduce the risk of damage during

transit.
6.

DO NOT EXPOSE THIS UNIT TO RAIN OR MOISTURE

.

7. 

DO NOT USE SPRAY CLEANERS OR LUBRICANTS ON

CONTROLS, SURFACES OR SWITCHES

.

I

N THE

USA ~ 

IF YOU EXPERIENCE PROBLEMS WITH THIS UNIT CALL

G

EMINI

C

USTOMER

S

ERVICE AT

: 1 (732) 346-0061. 

DO NOT ATTEMPT TO

RETURN THIS EQUIPMENT TO YOUR DEALER

.

CONNECTIONS

Ensure that the 

POWER SWITCH

is in the 

OFF

position prior to making any connections. 

POWER CORD

This unit comes with a 

POWER CORD

. Plug in to the rear panel

POWER CORD

socket before plugging it in to a proper

power source.

The

MM-3000

has  balanced stereo outputs located on the rear panel:

The 

MASTER RCA OUTPUT

connects the mixer to your main amplifier using standard audio cables

with RCA-type connectors.

The 

RECORD RCA OUTPUT

The 

RECORD

output jacks can be used to connect the mixer to the

record input of your recording unit, thus enabling you to record your

mix with 

RCA

cables.

The 

ZONE OUTPUT

allows you to control a seperate output like the

monitor for the

DJ BOOTH

or a seperate speaker zone.
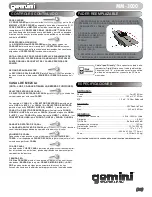
GROUNDING SCREW

When using (a) turntable(s), you will need to ground the 

RCA

cable(s)

by screwing in the grounding fork(s) to the 

GROUNDING SCREW

lo-

cated on the rear panel of the 

MM-3000

mixer.

21

1

2

3

4

CONVERTIBLE PH/LINE INPUTS

The 

MM-3000

has 

2 CONVERTIBLE PHONO/LINE (PH/LN) RCA INPUTS

These small switches which are located to the right of the 

RCA

inputs for

channels 2 and 3 allow you to choose between a 

PHONO

(Turntable) input

or a 

LINE

level (Mp3, CD, Tape player etc..).and require the proper switch-

ing.

When switched to the 

PH

position you may use any Turntable with a mag-

netic cartridge, remember to connect your ground wire (see 

GROUNDING

SCREW

) or there may be a system hum

And when the switch is in the 

LN

position you may connect any line level

device as described before (Mp3, CD, Tape etc).

NOTE: CONNECTING A LINE LEVEL DEVICE TO A PH INPUT MAY CAUSE THAT MIXER

CHANNEL TO OVERLOAD AND OR DISTORT.

Now you may plug the 

RCA

’s from your playable medium into each input

to be connected to thier respective 

CHANNELS (CH)

.

Then when all of your connections have been made turn on the mixer by

pressing the 

POWER SWITCH

.

MIC (MICROPHONE) INPUT

The main 

MIC

or Microphone input is located at the top left hand corner of

the front of the 

MM-3000

and will accept any  balanced and unbalanced

XLR as well a standard 1/4” connector. You can control the gain and even

set the low’s and the high’s for the mic (See 

CONTROLS

) below.

NOTE: THERE ARE ALSO TWO AUX MIC INPUTS ON THE REAR PANEL (SEE MIXER CHAN-

NEL BELOW)

HEADPHONE OUTPUT

The 

HEADPHONE OUTPUT

located at the bottom right hand corner of the

MM-3000

will accept any headphone with a standard 1/4” connector and or

adaptor and will allow you to 

CUE

your music program before you play it,

you can adjust the volume and 

PGM

mix of the 

HEADPHONE

(see 

CON-

TROLS

) below.

MICROPHONE CONTROL

Under the microphone input jack are the microphone controls, which con-

sist of:

MICROPHONE VOLUME

Which allows you to adjust the volume of the microphone signal.

MICROPHONE EQ

Which allows you to control the low frequency and the high frequency of

the microphone signal.

TALKOVER SWITCH

When in the ON position the 

TALKOVER SWITCH

brings  the music pro-

gram down 20 dB to allowing you to speak over the music.

CUE/PGM FADER

The 

CUE/PGM ROTARY KNOB

determines the mix between the chosen

CHANNEL CUE BUTTON

(s) and the 

MIAN OUTPUT

mix.

CUE VOLUME ROTARY KNOB

The 

CUE VOLUME ROTARY KNOB

adjusts your 

HEADPHONE MONI-

TOR OUTPUT’S

volume.

HEADPHONE MONITOR OUTPUT

The 

HEADPHONE MONITOR OUTPUT

will accept any standard 1/4”

connector and can be used for 

CUE MONITORING

as described above.

VU METER 

The 

MM-3000

has a  

VU METER

that allows you to monitor the decible lev-

els of  the 

LEFT

and 

RIGHT MASTER

output. 

5

21

CONTROLS

6

7

18

8

9

10

25

24

23

17

18

20

Attach a 

PHONO

(Turntable) ground line to the silver 

GROUND THUMB

SCREW

that is situated at the bottom middle of the rear panel.

Содержание MM-3000

Страница 1: ...MM 3000 Mixer PROFESSIONELLER 5 KANAL STEREO MIXER MEZCLADORESTEREODE5CANALESPROFESIONAL MIXER STEREO 5 VOIES PROFESSIONNEL OPERATIONS MANUAL BEDIENUNGSHANDBUCH MANUAL DEL OPERADOR MANUEL D INSTRUCTIONS ...

Страница 2: ...ty purpose of the polarized plug If this product is equipped with a three wire grounding type plug a plug having a third grounding pin it will only fit into a grounding type power outlet This is a safety feature If you are unable to insert the plug into the outlet contact your elec trician to replace your obsolete outlet Do not defeat the safety purpose of the grounding type plug POWER CORD PROTEC...

Страница 3: ...REAR PANEL 7 8 20 21 9 12 13 16 17 18 1 2 3 4 5 6 24 25 7 7 23 22 10 11 14 19 15 TOP PANEL MIXER CHANNEL NOTE ALL CHANNELS HAVE THE SAME FEATURES MM 3000 ...

Страница 4: ... LINE PH LN RCA INPUTS These small switches which are located to the right of the RCA inputs for channels 2 and 3 allow you to choose between a PHONO Turntable input or a LINE level Mp3 CD Tape player etc and require the proper switch ing When switched to the PH position you may use any Turntable with a mag netic cartridge remember to connect your ground wire see GROUNDING SCREW or there may be a ...

Страница 5: ...me or any combination of the five 3 BAND EQUALIZER The 3 BAND EQUALIZER adjust the tone of each CHANNEL by giving you a choice 3 frequencies BANDS to adjust from LOW MIDRANGE MID and HIGH s you can use the adjustment knobs to higher or lower the 3 seprate frequencies till the sound of the music pro gram is approppriate for your listening enviroment CONTROLS CONTINUED 10 14 11 15 19 Ipod Friendly C...

Страница 6: ...beauftragen Sie einen Elektriker um diese veraltete Steckdose auszutauschen SCHUTZ DES STROMKABELS Stromkabel sollten so verlegt werden dass man nicht auf sie treten kann noch dass sie von darauf stehenden oder gegen sie stoßenden Gegenständen gequetscht werden Achten Sie besonders auf Kanten Sicherung Stecker und Buchsen AUSSENANTENNENERDUNG Wenn Sie eine Außenantenne oder ein Radio Fernsehkabels...

Страница 7: ...7 8 20 21 9 12 13 16 17 18 1 2 3 4 5 6 24 25 7 7 23 22 10 11 14 19 15 RÜCKSEITE OBERSEITE MIXER Kanal WICHTIG Alle Kanä le sind iden tisch ausgestattet MM 3000 ...

Страница 8: ...n der Lautstärke auch die Höhen und Bässe regeln siehe REGLER unten KOPFHÖRER AUSGANG An den KOPFHÖRER AUSGANG in der unteren rechten Ecke des MM 3000 können Sie jeden Kopfhörer mit 6 3 mm Klinkenstecker oder Adapter anschließen Sie können Ihre Musik damit vorhören bevor Sie es spielen Regeln Sie auf Wunsch die Lautstärke und den PGM Mix des KOPFHÖRERS siehe REGLER unten MIKROFON REGLER Unterhalb ...

Страница 9: ...den CROSSFADER des MM 3000 bei Bedarf austauschen Optional ist der RG 45 RAILGLIDE DUAL RAIL CROSSFADER bei Ihrem Gemini Händler erhältlich der mit zwei internen Gleitschienen aus rost freiem Stahl für weiche und akkurate Fahrten optimiert ist CROSSFADER ZUWEISUNGSSCHALTER Mit dem CROSSFADER ZUWEISUNGSSCHALTER legen Sie fest welche KANÄLE dem CROSSFADER zugewiesen werden Sie können jeden Kanal aus...

Страница 10: ... unidad lleva una clavija con tres pivotes el tercero corres ponde a la toma de tierra sólo entrará en un tipo de enchufe Se trata de una medida de seguridad Si el enchufe y la clavija no son compatibles un electricista deberá cambiar el enchufe En ningún caso deberá forzarse PROTECCIÓN DEL CABLE DE CORRIENTE Los cables de corriente deben pro tegerse para que nadie los pise ni corran el riesgo de ...

Страница 11: ...7 8 20 21 9 12 13 16 17 18 1 2 3 4 5 6 24 25 7 7 23 22 10 11 14 19 15 MM 3000 VISTA FRONTAL NOTA TODOS LOS CANALES TIENEN LAS MISMAS FUNCIONES CANAL de MEZCLA VISTA TRASERA ...

Страница 12: ...ack están los controles de micrófono que consisten en VOLUMEN DE MICRO Permite ajuster el nivel de volumen del micro EQ Permite controlar el nivel de bajas y altas frecuencias del micrófono TALKOVER Cuando está en posición ON el INTERRUPTOR TALKOVER baja el volu men de la música en 20 dB dando prioridad de palabra CUE PGM FADER El CUE PGM ROTATIVO determina la mezcla entre el CUE DE CANAL s y la S...

Страница 13: ...ra En el MM 3000 el CROSS FADER es asignable entre todos los canales 5 El CROSS FADER en el MM 3000 es también removible por si necesita reemplazarse El CROSSFADER RG 45 RAILGLIDE DUAL RAIL que tiene dos guias internas de acero inoxidable y permite un desplaza miento aún más suave y preciso puede ser adquirido en su distribuidor habitual de GEMINI CROSSFADER ASIGNACION La ASIGNACION del CROSSFADER...

Страница 14: ...rer la fiche dans la prise électrique contactez un électricien afin de remplacer votre prise électrique qui est obsolète Il est important de respecter cette mesure de sécurité INSTALLATION DU CORDON D ALIMENTATION Les cordons d alimentation doivent être déroulés et rangés proprement afin d éviter de se prendre les pieds dedans en particulier les cordons reliés aux prises électriques ANTENNE EXTERI...

Страница 15: ...7 8 20 21 9 12 13 16 17 18 1 2 3 4 5 6 24 25 7 7 23 22 10 11 14 19 15 MM 3000 FACE ARRIERE FACE AVANT VOIE CONSOLE NOTE TOUTES LES VOIES POSSEDENT CES FONCTIONS ...

Страница 16: ...le gain et l égalisation du micro grâce aux réglages dédiés Voir Chapitre REGLAGES Vous trouverez en face ar rière 2 connecteurs Jack 6 35mm Mic 2 Mic 3 SORTIE CASQUE La sortie casque HEADPHONE OUTPUT est située en bas à droite de la face avant de la MM 3000 et accepte tout type de casque possédant un con necteur Jack 6 35mm Cette sortie permet de pré écouter une source avant de la diffuser Vous p...

Страница 17: ...açable par l utilisateur Le RG 45 RAILGLIDE DUAL RAIL CROSS FADER est équipé de rails en acier inoxydable procurant un toucher souple précis Cette pièce est disponible auprès de tout revendeur agréé GEMINI ASSIGNATION DU CROSSFADER Le commutateur CROSSFADER ASSIGN permet d assigner les VOIES CHANNELS au crossfader Le CROSSFADER permet de mixer les voies assignées entres elles Chaque voie peut être...

Страница 18: ...harges to Gemini UK and Gemini UK will pay to return the unit to you if it is considered under warranty IN GERMANY Die allgemeinen gesetzlichen Gewährleistungen bleiben von den Herstellergarantien unberührt Der Garantieanspruch erlischt bei Eingriffen durch den Käufer oder durch Dritte sowie bei unsachgemässer Behandlung Gewährleistungsansprüche sind auss chließlich gegenüber Ihrem Fachhändler gel...

Страница 19: ...ion of GCI Technologies Corp It is recommended that all maintenance and service on this product is performed by GCI Technologies Corp or its authorized agents GCI Technologies Corp will not accept liability for loss or damage caused by maintenance or repair performed by unauthorized personnel Worldwide Headquarters 1 Mayfield Ave Edison NJ 08837 USA Tel 732 346 0061 Fax 732 346 0065 France GCI tec...

Отзывы: