background image

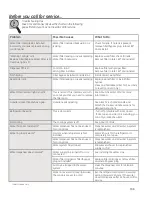
Problem

Possible Causes

What to Do

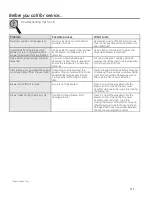
Water spurting from dispenser*

Newly installed filter cartridge

Run water from the dispenser for 5  
minutes (about 2 gallons)

No water or ice cube production*

Supply line or shutoff valve is clogged Call a plumber
Water filter is clogged

Replace filter cartridge or remove filter and 
install bypass plug

Filter cartridge not properly installed

Remove and reinstall filter cartridge,  
being certain that it locks in place. 

Ice maker is turned off

Check that the ice maker is turned on. See 

About the Automatic Ice Maker.

Water is leaking from dispenser*

Air may be present in the water line 

system, causing water to drip after 
being dispensed

Dispense water for at least 5 minutes to 
remove air from system

AUTO FILL

 under fill/no fill*

Not all containers work with  

AUTOFILL

Try different container

Error message

See page. 12
Clean sensor. See page. 12.

AUTO FILL

 overfills*

Not all containers work with  

AUTO FILL

Try different container

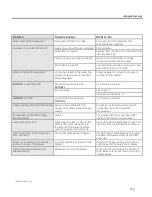
Freezer cooling, fresh food not cooling Normal, when refrigerator first 

plugged in or after extended power 
outage

Wait 24 hours for temperature in both 
compartments to reach selected  
temperatures.

Ice dispenser opens after closing 
freezer drawer *

Normal

The ice dispenser door may open after 
closing freezer door to allow access 

Low brewing flow rate

There may have been a dent at the 

bottom of K-Cup causing the pin 

to pierce the filter allowing coffee 

grounds clogging the bottom pin

Avoid using damaged/dented K-cups, and 

clean the lower needle before next brew

Low brewing flow rate / water drips 

from inner door

Top needle of the brewer clogged

Unclog the top needle holes using a paper 

clip and rinse brewer. Rinse brewer after 

every use.

Brewer is not detected or hot water 

leaking from top of the brewer

Incorrect assembly of brewer in the 

bracket

Make sure the Keurig Logo is in the front. 

Push brewer all the way in the brackets

Coffee dispensed with splash or 

bubble bursting

Blocked vent hole in the brewer

Make sure the vent hole at the bottom of 

the brewer is clear from food or any other 

contamination

*Select Models Only

GEAppliances.com

110

Содержание PFE28P

Страница 1: ...modelos Manual del Propietario e Instrucciones de Instalaci n Los modelos que comienzan con las letras DFE PFE GFE DFE PFH y GNE son Modelos con Profundidad Est ndar SD Los modelos que comienzan con l...

Страница 2: ...our items Freezer ice maker Ice bin An ice maker in both compartments gives you more ice whenever you need it Available on Non Dispense models also available as a kit for some models QuickSpace shelf...

Страница 3: ...ter is toward the interior of the refrigerator Close the cover making sure the indent snaps into position Drop down tray tray open Ice bucket Latch About the features Select Models Only Push in and pu...

Страница 4: ...ystem on press either the Fridge or Freezer Control Style B C Press and hold Fridge and Ice Maker simultaneously for 3 seconds to turn the cooling system off To turn cooling system on press either the...

Страница 5: ...open Reset Filter Hold for 3 seconds after replacing filter Lock Controls Press and hold 3 seconds to lock out ice and water dis penser and all feature and temperature buttons Freezer temp control Ad...

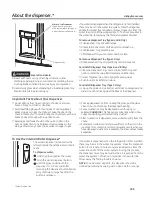
Страница 6: ...ter notch to clean To remove Dispenser Tray Type C Only Grasp Dispenser Tray and pull firmly until it comes out To reinstall Dispenser Tray Type A and B Only Place the Dispenser Tray cover on top of c...

Страница 7: ...y liquid or cleaners directly on sensors AUTOFILL works best with household water pressure of 60 to 100 psi Ice in container may affect fill volume If issues are experienced use less ice About Autofil...

Страница 8: ...icular installation If this equipment does cause harmful interference to radio or television reception which can be determined by turning the equipment off and on the user is encouraged to try to corr...

Страница 9: ...d fully seated within the cartridge holder Close the filter door 3 Run two gallons of water through the cold water dispenser about 5 minutes to remove air from the system A newly installed filter cart...

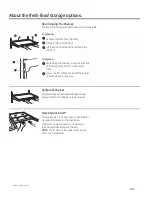
Страница 10: ...shelf locks into place Spillproof Shelves Spillproof shelves have special edges to help prevent spills from dripping to lower shelves Shelves in the refrigerator compartment are adjustable Quick Space...

Страница 11: ...e carried from refrigerator to work area To remove Lift bin straight up then pull out To replace or relocate Slide in the bin just above the molded door supports and push down The bin will lock in pla...

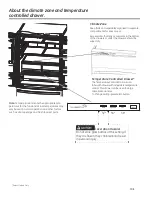
Страница 12: ...ss water that may accumulate in the bottom of the drawers or under the drawers should be wiped dry D Select Models Only 32 34 36 Note Temperatures indicate the appropriate tem peratures for the food a...

Страница 13: ...own to seat on slide Push the drawer in to closed position How to Remove and Replace the Adjustable Deli Produce Drawer To remove Pull the drawer out to the stop position Raise the front side of the d...

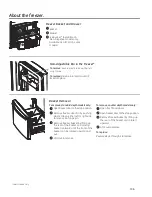
Страница 14: ...door to the stop position Remove freezer door bin by pushing plastic tab on either left or right side to release bin hinge pin Remove freezer basket by lifting up the rear of the basket and moving bas...

Страница 15: ...pressure you may hear the ice maker cycle multiple times when making one batch of ice Feeler Arm Ice maker Display Type See Page 7 Model How to turn the ice maker on off Control Style A PFE28P PYE22P...

Страница 16: ...front of the refrigerator Pull the refrigerator straight out and return it to position by pushing it straight in Moving the refrigerator in a side direction may result in damage to the floor covering...

Страница 17: ...bout the Water Filter for more information Handle is loose handle has a gap Handle needs adjusting See Attach Fresh Food Handle and Attach the Freezer Handle sections for detailed instructions Refrige...

Страница 18: ...ner Freezer cooling fresh food not cooling Normal when refrigerator first plugged in or after extended power outage Wait 24 hours for temperature in both compartments to reach selected temperatures Ic...

Страница 19: ...After brewing my powdered beverage is not fully cleared from the used pod Depending on size selected the powder may not dissolve fully Some powdered beverages develop into clumps when left sitting fo...

Страница 20: ...cold water for at least 5 minutes to remove air from the water line and flush the filter To fill the ice bucket to the maximum capacity I should dispense 12 and 18 hours after installation TRUE Dispe...

Страница 21: ...the refrigerator Leveling legs are used to make initial fresh food door adjustment Check for leaks after all water connections are made TRUE While purging the air from the water system check all water...

Отзывы: