background image

15

Wall

Must Be
Flat

Must Be
Flat

Must Be
Level

Must Be Level

31-1/8

30

Smooth Cut

25

Installation Instructions

Alternate Construction

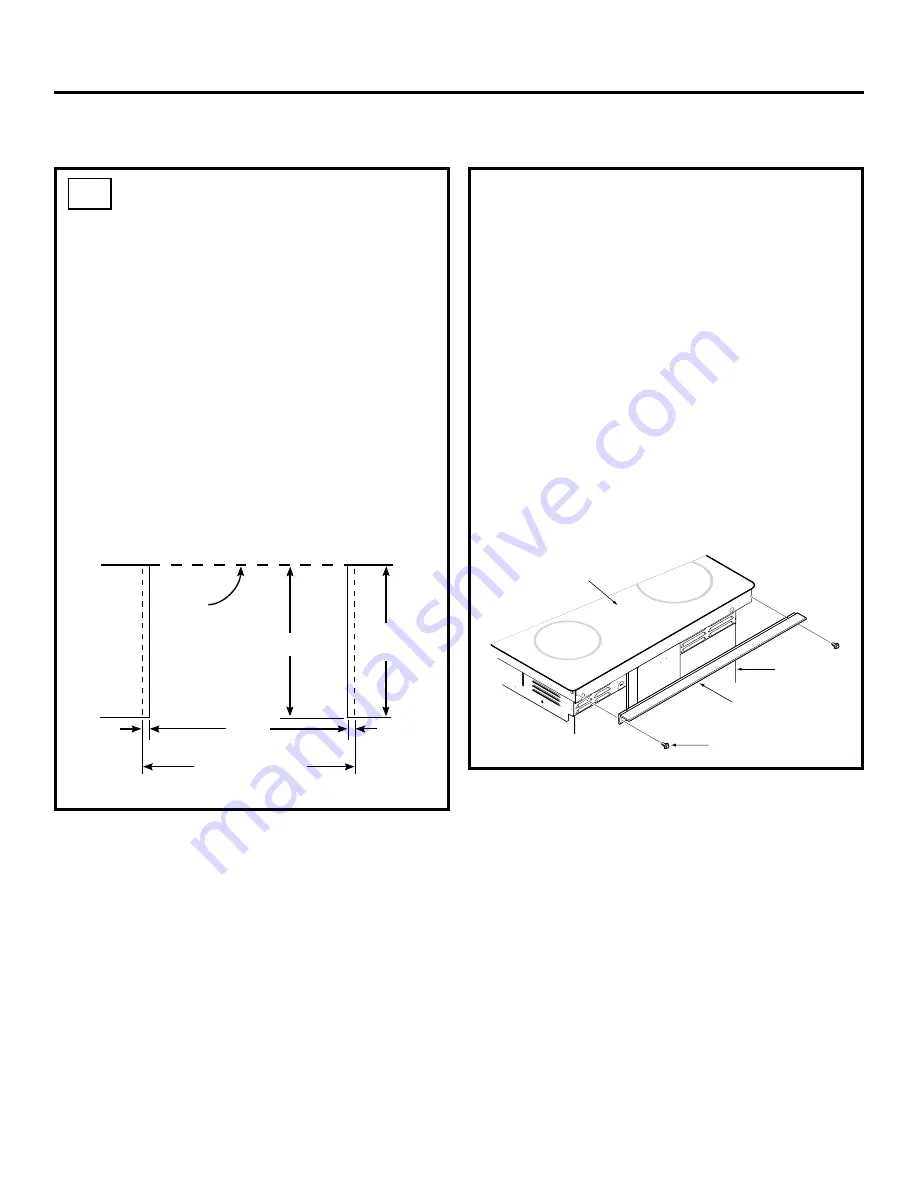
OPTIONAL MAINTOP FILLER
OR BACKGUARD KIT

If counter opening extends to the wall, it will
require Maintop Filler Kit (supplied with the
range) or Backguard Kit (JXS36XX or
JXS39SS) to close the gap.

NOTE: 

If the countertop is greater than 25

,

it will show a gap between the backguard
and wall or between filler kit and the wall.

If the countertop is less than 25

, a gap will

occur between the countertop front and the
control panel ends (see section 11G on
page 12).

If you are using the optional backguard kit,
refer to the backguard kit instructions for
installation details.

AA

If you use the filler kit, place the metal filler
piece supplied with the range to the back
of the range as shown in the figure below.
Start the 2 screws into the upper holes at the
outside rear of the range above the louvers
and through the slots in the trim, holding the
filler piece centered on the maintop frame
and pushing upward to close the gap
between the bottom of the glass and the
filler trim.

When the trim is set in the proper position,
tighten the 2 mounting screws. The top of the
trim should be located below the top surface
of the glass to prevent pots, pans and skillets
from damaging the painted parts.

Refer to the Standard Installation of the
Range beginning on page 6.

(Continued on following page)

Cooktop

Range

Maintop
Filler

(2) #8 Screws

Содержание Profile JS968

Страница 1: ...ctor s use IMPORTANT Observe all governing codes and ordinances Note to Installer Be sure to leave these instructions with the consumer Note to Consumer Keep these instructions for future reference Proper installation is the responsibility of the installer and product failure due to improper installation is NOT covered under warranty NOTE This appliance must be properly grounded PARTS INCLUDED Ant...

Страница 2: ...st 5 beyond the front of the cabinets Cabinets installed above a cooktop must be no deeper than 13 Be sure your appliance is properly installed and grounded by a qualified technician WARNING To reduce the risk of tipping the appliance must be secured by properly installing the Anti Tip bracket packed with the appliance If you pull the range out and away from the wall for any reason make sure the A...

Страница 3: ...untertop and range cooktop may occur Forcing the cooktop to fit may cause excessive gaps and could break the glass and void the warranty Continued on following page Installation Instructions Pre Installation Checklist Move range indoors in front of cabinet opening Do not use hand trucks when moving the unpackaged range Cooktop glass may be broken Protect the kitchen floor Flatten and place a piece...

Страница 4: ...y the door on its handle This could cause dents or scratches Place hands on both sides of the door and close the oven door to the removal position This is half way between the broil stop and fully closed Lift door up and out until the hinge arms clear the slots Hinge Clears Slot Hinge Unlocked Position Hinge Slot Hinge Arm Hinge Unlocked Position Hinge Slot Hinge Arm DO NOT LIFT THE DOOR BY THE HA...

Страница 5: ...If cabinets are placed less than 30 above the range see Alternate Construction section AF on page 16 NOTE Product meets UL requirements for 0 clearance to back and side walls Wall coverings counters and cabinets around range must withstand heat up to 194 F generated by the range ...

Страница 6: ...e and voiding the warranty Center the 30 wide opening over the adjacent cabinets and mark with a straight edge Using a straight edge mark the back line at 23 3 16 from the front edge of the counter Be careful not to damage the adjacent cabinets while cutting the countertop Use a hand or saber saw to make straight smooth cuts Remove countertop raised edge if incorporated See illustration on page 5 ...

Страница 7: ...ance must be supplied with the proper voltage and frequency and connected to an individual properly grounded branch circuit protected by a circuit breaker or fuse having amperage as specified on the rating plate The rating plate is located above the storage drawer on the oven frame We recommend you have the electrical wiring and hookup of your range connected by a qualified electrician After insta...

Страница 8: ...ugh the strain relief and tighten Allow enough slack to easily attach the cord terminals to the terminal block If tabs are present at the end of the winged strain relief they can be removed for better fit NOTE Do not install the power cord without a strain relief The strain relief bracket should be installed before reinstalling the rear range wiring cover Terminal block Strain relief Power cord Br...

Страница 9: ...he supply circuit must be connected to the neutral terminal located in the lower center of the terminal block The power leads must be connected to the lower left and the lower right terminals of the terminal block The 4th grounding lead must be connected to the frame of the range with the ground plate and the ground screw A Remove the 3 lower terminal screws from the terminal block Remove the grou...

Страница 10: ...et Conduit B Skip to Step 8 and proceed with the installation 7 4 WIRE CONDUIT INSTALLATION A Loosen the three lower terminal screws from the terminal block Remove the ground screw and ground plate and retain them Cut and discard the ground strap DO NOT DISCARD ANY SCREWS Insert the ground bare wire tip between the range frame and the ground plate removed earlier and secure it in place with the gr...

Страница 11: ...oles in each Install the sleeve anchors into the predrilled concrete holes and install the lag and wall screws through the Anti Tip bracket Make sure the screws are securely tightened To Front Edge of Countertop Bracket Wall Plate Screw Must Enter Wood or Metal 25 REPLACE THE WIRE COVER 8 Replace the wire cover on the back of the range by replacing the 2 screws removed earlier Wire Cover NOTE When...

Страница 12: ... in the front two leveling legs similar to E until the glass overhang touches the countertop Carefully push the range into the opening until the countertop fully engages the control panel The back glass overhang should cover the cutout opening Countertop Make sure the edge of the countertop fits flush against the end of the Front Control Panel SLIDE RANGE INTO OPENING cont Plug the range cord into...

Страница 13: ... Bottom Edge of Slot Hinge Arm Hinge Notch Notch of Hinge Securely Fitted into Bottom of Hinge Slot Hinge in Locked Position Place the drawer rail on the guides Push the drawer in until it stops Lift the front of the drawer and push in until the stops clear the guides Lower the front of the drawer and push in until it closes Stop SPECIAL INSTRUCTIONS IF YOU ARE HAVING PROBLEMS WHILE REPLACING THE ...

Страница 14: ...ediately Recheck the range wiring connections If change is made to connections retest again If no change is required have building wiring checked for proper connections and voltage It is recommended that the clock be changed if the red lines appear Push down and turn any one of the four surface knobs to MED setting to observe that the element glows within 15 seconds Turn the knob off when glow is ...

Страница 15: ...ard kit refer to the backguard kit instructions for installation details AA If you use the filler kit place the metal filler piece supplied with the range to the back of the range as shown in the figure below Start the 2 screws into the upper holes at the outside rear of the range above the louvers and through the slots in the trim holding the filler piece centered on the maintop frame and pushing...

Страница 16: ... from the front of the countertop Be aware that the screws provided are long and may penetrate through the back of the island cabinets In this event use shorter screws not provided or the screws provided should be used in the floor see Section D for Wood Concrete Floor Installation Do not use Backguard Kit JXS36XX or JXS39SS AD FOR CABINET OPENINGS APPROXIMATELY 30 3 8 If range is installed in cab...

Страница 17: ...17 NOTES ...

Страница 18: ...18 NOTES ...

Страница 19: ...19 NOTES ...

Страница 20: ...20 NOTES ...

Отзывы: