manualshive.com logo in svg
background image

GE

Digital Solutions

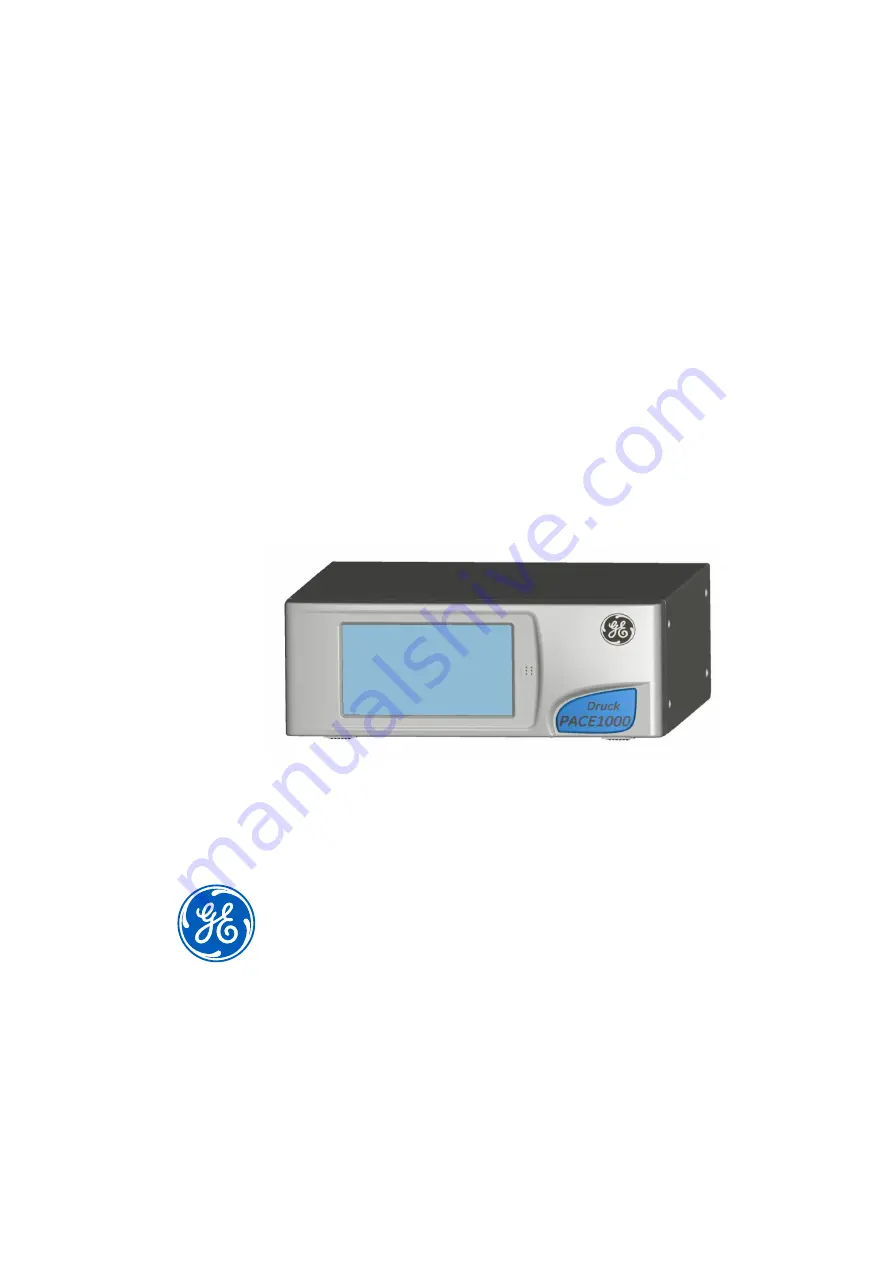
Pressure Automated Calibration Equipment

Safety Instructions and User Guide - K0467 Revision A

PACE Pressure Indicators


© 2010 General Electric Company. All Rights Reserved. Specifications are subject to change 
without notice. GE is a registered trademark of General Electric Company. Other company or 
product names mentioned in this document may be trademarks or registered trademarks of their 
respective companies, which are not affiliated with GE.

English

EN

Español

ES

Français

FR

Português

PT

Deutsch

DE

Русский

RU

Italiano

IT

中文

ZH

Содержание Druck PACE1000

Страница 1: ...All Rights Reserved Specifications are subject to change without notice GE is a registered trademark of General Electric Company Other company or product names mentioned in this document may be tradem...

Страница 2: ...y connector 2 Electrical rating 3 Pressure port 4 Pressure port 5 Maximum working pressure 6 Pressure full scale range 7 Power supply adaptor see packaging list 5 6 3 4 A B C 7 22V to 26V 22V to 26V X...

Страница 3: ...equipment 1 3 Toxic Materials There are no known toxic materials used in construction of this equipment 1 4 Maintenance The equipment must be maintained using the procedures in this publication Furth...

Страница 4: ...TO THE REAR PANEL This equipment meets the requirements of all relevant European safety directives The equipment carries the CE mark This symbol on the equipment indicates that the user should read t...

Страница 5: ...tanding instrument positioned on a horizontal surface Panel mounted using the panel mount option kit Ref K0470 User manual Section 2 5 Rack mounted in a standard 19 inch rack using the rack mount opti...

Страница 6: ...SED FEMALE THREAD TYPE IS PARALLEL THREAD TO ISO228 1 DIN ISO228 1 JIS B0202 G1 8 TAPERED THREADS NOT ALLOWED For examples of adaptors see Page 8 Connection Input ISO228 1 G 1 8 parallel threads DIN I...

Страница 7: ...full scale or MWP stated on the rear panel of the instrument To protect the instrument from over pressure a suitable protection device such as a relief valve or bursting disc must be fitted to prevent...

Страница 8: ...r to the data sheet for the range of adaptors ISO 228 G1 8 ISO 228 G1 8 bonded seal bonded seal Recommended method Alternative method below 100 bar IO SNUBBER 1 IO ADAPT 9 16AUTOC ISO 228 Male to 9 16...

Страница 9: ...ressure at a controlled rate when venting to atmosphere Carefully de pressurize all pipes to atmospheric pressure before disconnecting and connecting to the unit under test Observe absolute cleanlines...

Страница 10: ...lean refer to specification given in the data sheet 4 Connect the Unit Under Test UUT to the appropriate connection port 5 Fill and bleed the UUT and connecting pipes 4 Mounting kits 4 1 Rack mount op...

Страница 11: ...trument into the rack 7 Locate the instrument on the spigots 8 Secure the instrument in the equipment rack with two of the screws and washers supplied 9 Remove the two spigots and replace with the rem...

Страница 12: ...into the panel 6 Secure the instrument in the panel with four screws and washers 2 5 Electrical connections WARNING THE GROUND LEAD OF THE INSTRUMENT MUST BE CONNECTED TO THE AC SUPPLY PROTECTIVE SAFE...

Страница 13: ...e the instrument shows the default display on the touch screen The touch screen divides into a number of mimic keys 5 2 Requirements for rack mounted and panel mounted instruments 1 Install an accessi...

Страница 14: ...int to point link The pin connections for the 9 pin D type RS232 connector and the relationship between the instrument and the RS232 control signals together with device interconnection interface is s...

Страница 15: ...Ref Data sheet 6 4 Single Unit Installation Figure 8 1 Connect an IEEE 488 connector cable assembly to the rear panel of the instrument 2 Connect the other end of the connector cable assembly to the I...

Страница 16: ...ion 2 Connector from controller computer Ref Illustration 3 Connector to rear panel of second instrument Ref Illustration 4 Connect the IEEE 488 connector on the controller computer and the other conn...

Страница 17: ...D NRFD NOT READY FOR DATA NDAC NO DATA ACCEPTED 5 9 10 11 17 EOI END OF IDENTIFY IFC INTERFACE CLEAR SRQ SERVICE REQUEST ATN ATTENTION REN REMOTE ENABLE 1 2 3 4 13 DIO1 DIO2 DIO3 DIO4 DIO5 14 15 16 DI...

Страница 18: ...on either a RGA or RMA Product i e PACE1000 Serial number Details of defect work to be undertaken Calibration traceability requirements Operating conditions Safety Precautions You must inform GE if t...

Страница 19: ...pression PACE 2010 General Electric Company Tous droits r serv s Sp cifications sujettes modifications sans pr avis GE est une marque d pos e de General Electric Company Les autres noms de soci t ou d...

Страница 20: ...teur d alimentation 2 Caract ristique lectrique 3 Orifice de pression 4 Orifice de pression 5 Pression de service maximum 6 Pleine chelle de pression plage 5 6 3 4 A B C 7 22V to 26V 22V to 26V XXXX X...

Страница 21: ...pas de pression sup rieure la pression de service maximum pour cet appareil 1 3 Mat riaux toxiques Aucun mat riau toxique n entre dans la fabrication de cet appareil 1 4 Entretien L appareil doit tre...

Страница 22: ...ne utilisation en atmosph res explosibles Cet appareil satisfait aux exigences de toutes les directives europ ennes de s curit en vigueur Cet appareil porte le marquage CE Ce symbole sur l appareil si...

Страница 23: ...7 R vision A LE FIL DE MISE LA TERRE DE L INSTRUMENT DOIT TRE CONNECT LA MISE LA TERRE DE S CURIT DE L ALIMENTATION CA ISOLEZ L ALIMENTATION LECTRIQUE AVANT DE R ALISER TOUT RACCORDEMENT LECTRIQUE SUR...

Страница 24: ...de du kit de montage sur panneau en option cf K0470 Manuel d utilisation section 2 5 mont sur un rack standard de 19 pouces l aide du kit de montage en rack en option cf K0470 Manuel d utilisation sec...

Страница 25: ...LLE EST UN FILETAGE PARALL LE SELON LA NORME ISO228 1 DIN ISO228 1 JIS B0202 G1 8 LE FILETAGE CONIQUE N EST PAS AUTORIS Pour des exemples d adaptateurs cf page 8 Raccord Entr e Filetage parall le ISO2...

Страница 26: ...nneau arri re de l instrument Pour prot ger l instrument contre les surpressions un dispositif de protection appropri comme une soupape de surpression ou un disque de rupture doit tre install afin d v...

Страница 27: ...t 3 5 Adaptateurs Reportez vous la fiche technique pour d couvrir la gamme d adaptateurs ISO 228 G1 8 ISO 228 G1 8 joint coll joint coll M thode recommand e Autre m thode au dessous de 100 bar IO SNUB...

Страница 28: ...s proc dez une vacuation dans l atmosph re D pressurisez avec pr caution tous les tuyaux la pression atmosph rique avant de les d brancher et de les brancher l appareil tester Suivez les r gles de pro...

Страница 29: ...propre Reportez vous aux sp cifications indiqu es dans la fiche technique 4 Raccordez l appareil tester l orifice appropri 5 Remplissez et purgez l appareil tester et les tuyaux de raccordement 4 Kits...

Страница 30: ...le glisser dans le rack 7 Positionnez l instrument sur les ergots 8 Fixez l instrument l int rieur du rack l aide des deux vis et rondelles fournies 9 Retirez les deux ergots et remplacez les par les...

Страница 31: ...ixez l instrument sur le panneau l aide des quatre vis et rondelles 2 5 Raccordements lectriques AVERTISSEMENT LE FIL DE MISE LA TERRE DE L INSTRUMENT DOIT TRE CONNECT LA MISE LA TERRE DE S CURIT DE L...

Страница 32: ...l cran par d faut sur l cran tactile Ce dernier comporte diff rentes touches 5 2 Conditions li es aux instruments mont s en rack ou sur panneau 1 Installez un interrupteur d alimentation accessible qu...

Страница 33: ...oint Le tableau 1 1 pr sente les connexions des broches du connecteur RS232 de type D 9 broches et la relation entre l instrument et les signaux de contr le RS232 ainsi que l interface d interconnexio...

Страница 34: ...ne unit Figure 8 1 Raccordez un connecteur faisceau de c bles IEEE 488 au panneau arri re de l instrument 2 Raccordez l autre extr mit du connecteur ou du faisceau de c bles au connecteur IEEE 488 du...

Страница 35: ...venant du contr leur de l ordinateur voir illustration 3 Connecteur au panneau arri re du deuxi me instrument voir illustration 4 Raccordez le connecteur IEEE 488 du contr leur de l ordinateur et l au...

Страница 36: ...N PD LPXP 6 7 8 9 211e 6 9 6 15 121 35 7 3285 6 211e 6 1 8 81 211e 37e 5 9 10 11 17 2 1 17 7 21 5 17 5 654 0 1 6 59 71 77 17 21 5 1 7 9 7 21 67 1 1 2 3 4 13 DIO1 DIO2 DIO3 DIO4 DIO5 14 15 16 DIO6 DIO7...

Страница 37: ...figurer sur l autorisation RGA ou RMA Produit PACE1000 Num ro de s rie Pr cisions concernant le d faut travail effectuer Exigences de tra abilit de l talonnage Conditions de fonctionnement Consignes d...

Страница 38: ...K0467 R vision A 19 FR Fran ais...

Страница 39: ...General Electric Company Alle Rechte vorbehalten Technische Angaben k nnen ohne Vorank ndigung ge ndert werden GE ist eine eingetragene Marke der General Electric Company Andere Unternehmen oder Produ...

Страница 40: ...Sensor 1 Netzanschluss 2 Elektrische Leistungsdaten 3 Druckanschluss 4 Druckanschluss 5 Maximaler Arbeitsdruck 6 Druckendwert Bereich 7 Netzadapter siehe Packliste 5 6 3 4 A B C 7 22V to 26V 22V to 26...

Страница 41: ...ersteigt 1 3 Giftige Stoffe Bei der Herstellung des Ger ts werden keine giftigen Stoffe verwendet 1 4 Wartung Die Wartung des Ger ts muss entsprechend den in diesem Dokument angegebenen Verfahren erfo...

Страница 42: ...EKTRISCHE ANSCHL SSE AN DER R CKWAND VORNEHMEN Dieses Ger t erf llt die Anforderungen der entsprechenden europ ischen Sicherheitsrichtlinien Das Ger t ist mit dem CE Zeichen versehen Dieses Symbol auf...

Страница 43: ...ingebaut mit dem optionalen Tafelmontagesatz siehe K0470 Bedienungsanleitung Abschnitt 2 5 In ein 19 Zoll Standardgestell eingebaut mit dem optionalen Gestellmontagesatz siehe K0470 Bedienungsanleitun...

Страница 44: ...EWINDE SIND PARALLELGEWINDE NACH ISO 228 1 DIN ISO228 1 JIS B0202 G1 8 ZU VERWENDEN KEGELGEWINDE SIND NICHT ZUL SSIG Beispiele f r Adapter siehe Seite 8 Anschluss Eingang G 1 8 Parallelgewinde nach IS...

Страница 45: ...er R ckwand des Ger ts angegebenen maximalen Arbeitsdruck nicht bersteigen Um das Ger t vor berdruck zu sch tzen muss eine geeignete Schutzvorrichtung wie ein Begrenzungsventil oder eine Berstscheibe...

Страница 46: ...1 8 ISO 228 G1 8 Verbunddichtung Verbunddichtung Empfohlene Methode Alternative Methode unter 100 bar IO SNUBBER 1 IO ADAPT 9 16AUTOC ISO 228 Au engewinde zu 9 16 Autoklav IO DIFFUSER 1 IO ADAPT G1 4...

Страница 47: ...ie den Druck beim Ablassen in die Umgebung kontrolliert ab Bringen Sie vorsichtig alle Leitungen auf den Luftdruck bevor Sie sie vom Pr fling trennen oder daran anschlie en Achten Sie beim Einsatz die...

Страница 48: ...uber sein siehe Spezifikation im Datenblatt 4 Schlie en Sie den Pr fling UUT an den entsprechenden Anschluss an 5 F llen und entl ften Sie den Pr fling und die Anschlussleitungen 4 Montages tze 4 1 Op...

Страница 49: ...7 Platzieren Sie das Ger t auf den Zapfen 8 Fixieren Sie das Ger t im Gestell mit zwei Schrauben und den mitgelieferten Unterlegscheiben 9 Entfernen Sie die beiden Zapfen und bringen Sie stattdessen...

Страница 50: ...inbauen 6 Fixieren Sie das Ger t in der Tafel mit vier Schrauben und Unterlegscheiben 2 5 Elektrische Anschl sse WARNUNG DER ERDLEITER DES GER TS MUSS AN DIE SCHUTZERDUNG DER WECHSELSTROMVERSORGUNG AN...

Страница 51: ...altsequenz zeigt das Ger t den Standardbildschirm auf dem Touchscreen an Der Touchscreen ist in eine Reihe von Symbolen unterteilt 5 2 Anforderungen f r in einem Gestell oder einer Tafel montierte Ger...

Страница 52: ...t zu Punkt Verbindung Die Kontaktbelegung f r den 9 poligen D Stecker der Anschluss der RS232 Schnitstelle und die Beziehung zwischen dem Ger t und den RS232 Steuersignalen sind gemeinsam mit den bert...

Страница 53: ...t 6 4 Installation eines einzelnen Ger ts Abbildung 8 1 Schlie en Sie eine IEEE 488 Stecker Kabelbaugruppe an der R ckwand des Ger ts an 2 Schlie en Sie das andere Ende der Stecker Kabelbaugruppe an d...

Страница 54: ...Regler Computer siehe Abbildung 3 Stecker zur R ckwand des zweiten Ger ts siehe Abbildung 4 Schlie en Sie den IEEE 488 Anschluss am Regler Computer und den anderen Stecker am n chsten Instrument an 5...

Страница 55: ...EN WURDEN ANGENOMMEN 5 9 10 11 17 EOI END OR IDENTIFY BEENDEN ODER IDENTIFIZIEREN IFC INTERFACE CLEAR SCHNITTSTELLE BEREIT SRQ SERVICE REQUEST SERVICEANFORDERUNG ATN ATTENTION ACHTUNG REN REMOTE ENABL...

Страница 56: ...rung einer RGA oder RMA folgende Informationen an Produkt z B PACE1000 Seriennummer Angaben zum Fehler zu den erforderlichen Arbeiten Anforderungen zur R ckverfolgbarkeit der Kalibrierung Betriebsbedi...

Страница 57: ...tore di pressione PACE 2010 General Electric Company Tutti i diritti riservati Specifiche soggette a modifiche senza preavviso GE un marchio registrato di General Electric Company Altre denominazioni...

Страница 58: ...e 2 Prestazioni elettriche nominali 3 Porta pressione 4 Porta pressione 5 Pressione massima di esercizio 6 Pressione fondo scala range 7 Adattatore elettrico vedere la bolla di spedizione 5 6 3 4 A B...

Страница 59: ...giori della massima pressione di esercizio 1 3 Materiali tossici L apparecchiatura non contiene materiali noti per essere tossici 1 4 Manutenzione La manutenzione dell apparecchiatura deve svolgersi s...

Страница 60: ...LSIASI COLLEGAMENTO ELETTRICO AL PANNELLO POSTERIORE ISOLARE L ALIMENTAZIONE Questa apparecchiatura risponde ai requisiti di sicurezza imposti da tutte le direttive europee applicabili in materia L ap...

Страница 61: ...rficie orizzontale Montato su pannello usando l apposito kit opzionale vedere K0470 Manuale utente Sezione 2 5 Montato in un rack standard da 19 pollici utilizzando l apposito kit di montaggio vedere...

Страница 62: ...TURA PARALLELA CONFORME A ISO228 1 DIN ISO228 1 JIS B0202 G1 8 LE FILETTATURE CONICHE NON SONO CONSENTITE Per esempi di adattatori vedere pagina 8 Collegamento Ingresso Filettature parallele ISO228 1...

Страница 63: ...cizio MWP indicata sul pannello posteriore dello strumento Per proteggere lo strumento dalla sovrappressione occorre installare un opportuno dispositivo di protezione come una valvola limitatrice o un...

Страница 64: ...i adattatori consultare la scheda tecnica ISO 228 G1 8 ISO 228 G1 8 guarnizione di tenuta guarnizione di tenuta Metodo raccomandato Metodo alternativo sotto i 100 bar IO SNUBBER 1 IO ADAPT 9 16AUTOC I...

Страница 65: ...a nell atmosfera Depressurizzare tutti i tubi con estrema cautela fino al raggiungimento della pressione atmosferica prima di scollegare e collegare l unit in prova Durante l utilizzo dello strumento...

Страница 66: ...heda tecnica 4 Collegare l unit in prova UUT alla porta di collegamento appropriata 5 Riempire e scaricare l UUT e i tubi di collegamento 4 Kit di montaggio 4 1 Opzione montaggio su rack Figura 5 Assi...

Страница 67: ...erni 8 Fissare lo strumento nel rack con due delle viti e delle rondelle in dotazione 9 Togliere i due perni e sostituirli con le due viti e le due rondelle rimanenti in dotazione 4 2 Opzione montaggi...

Страница 68: ...sul pannello con quattro viti e rondelle 2 5 Collegamenti elettrici AVVERTENZA IL CAVO DI TERRA DELLO STRUMENTO DEVE ESSERE COLLEGATO ALLA PROTEZIONE DI TERRA DI SICUREZZA DELL ALIMENTAZIONE C A PRIM...

Страница 69: ...ata predefinita del display sul touch screen Il touch screen si divide in numerosi tasti riportanti l icona delle varie funzioni disponibili 5 2 Requisiti per gli strumenti montati su rack e pannello...

Страница 70: ...ione point to point I collegamenti dei pin per il connettore RS232 di tipo D a 9 pin e la relazione tra lo strumento e i segnali di comando RS232 insieme all interfaccia di interconnessione dei dispos...

Страница 71: ...vedere Scheda tecnica 6 4 Installazione di unit singola Figura 8 1 Collegare un gruppo connettore cavo IEEE 488 al pannello posteriore dello strumento 2 Collegare l altra estremit del gruppo connetto...

Страница 72: ...dere figura 2 Connettore del controllore computer vedere figura 3 Connettore sul pannello posteriore del secondo strumento vedere figura 4 Collegare il connettore IEEE 488 al controllore computer e l...

Страница 73: ...NRFD NON PRONTO PER DATI NDAC NESSUN DATO ACCETTATO 5 9 10 11 17 EOI FINE IDENTIFICAZIONE IFC CANCELLA INTERFACCIA SRQ RICHIESTA ASSISTENZA ATN ATTENZIONE REN ABILITA REMOTO 1 2 3 4 13 DIO1 DIO2 DIO3...

Страница 74: ...e quanto segue Prodotto ad es PACE1000 N di serie Dettagli relativi al difetto riparazioni da effettuare Requisiti di tracciabilit calibrazione Condizioni di esercizio Precauzioni di sicurezza Informa...

Страница 75: ...010 General Electric Company Reservados todos los derechos Las especificaciones pueden cambiar sin previo aviso GE es una marca registrada de General Electric Company Los nombres de otras empresas o p...

Страница 76: ...el ctrica 2 Especificaciones el ctricas 3 Puerto de presi n 4 Puerto de presi n 5 Presi n m xima de trabajo 6 Fondodeescaladepresi n rango 7 Adaptador de alimentaci n el ctrica ver la lista de embalaj...

Страница 77: ...po 1 3 Materiales t xicos En la construcci n de este equipo no se utilizan materiales t xicos conocidos 1 4 Mantenimiento El mantenimiento del equipo se debe realizar de acuerdo con los procedimientos...

Страница 78: ...NEXIONES EL CTRICAS AL PANEL POSTERIOR Este equipo cumple los requisitos de las directivas europeas de seguridad pertinentes El equipo posee el marcado CE Este s mbolo en el equipo indica que el usuar...

Страница 79: ...orizontal Montado en panel usando el kit opcional de montaje en panel consulte la K0470 Manual del usuario secci n 2 5 Montado en un rack est ndar de 19 pulgadas usando el kit opcional de montaje en r...

Страница 80: ...AS TIPO DE ROSCA HEMBRA EQUIVALE A ROSCA PARALELA ISO228 1 DIN ISO228 1 JIS B0202 G1 8 NO SE ADMITEN ROSCAS AFILADAS Para consultar ejemplos de adaptadores vea la p gina 8 Interna Entrada Roscas paral...

Страница 81: ...ndo de escala o la MWP indicada en el panel posterior del instrumento Se debe instalar un dispositivo de protecci n adecuado por ejemplo una v lvula de descarga o un disco de ruptura para proteger el...

Страница 82: ...ulte la gama de adaptadores en la hoja de datos ISO 228 G1 8 ISO 228 G1 8 anillo t rico anillo t rico M todo recomendado M todo alternativo bajo 100 bar AMORTIGUADOR E S 1 ADAPTADOR E S 9 16AUTOC Mach...

Страница 83: ...descargue a la atm sfera Despresurice todos los tubos cuidadosamente hasta la presi n atmosf rica antes de desconectar y conectar a la unidad probada Extreme las medidas de limpieza cuando utilice el...

Страница 84: ...ulte la especificaci n que se proporciona en la hoja de datos comerciales 4 Conecte la UP unidad probada a la conexi n adecuada 5 Rellene y purgue la UP y los tubos de conexi n 4 Kits de montaje 4 1 O...

Страница 85: ...k 7 Coloque el instrumento sobre las espigas 8 Fije el instrumento al rack con dos tornillos y arandelas suministrados 9 Quite las dos espigas y sustit yalas por los dos juegos restantes de tornillos...

Страница 86: ...l 6 Asegure el instrumento en el panel con los cuatro tornillos y arandelas 2 5 Conexiones el ctricas ADVERTENCIA EL CABLE DE TIERRA DEL INSTRUMENTO DEBE ESTAR CONECTADO A LA TIERRA DE PROTECCI N DE L...

Страница 87: ...uestra la pantalla predeterminada en la pantalla t ctil La pantalla t ctil se divide en numerosas teclas de simulaci n 5 2 Requisitos para instrumentos montados en rack y en panel 1 Instale un interru...

Страница 88: ...to En la tabla 1 se muestran las asignaciones de patillas del conector RS232 tipo D de 9 patillas y la relaci n entre las se ales de control del instrumento y de RS232 as como la interfaz de intercone...

Страница 89: ...hoja de datos 6 4 Instalaci n con una unidad figura 8 1 Enchufe un extremo de un cable acabado en conectores IEEE 488 al panel posterior del instrumento 2 Conecte el otro extremo del cable al conecto...

Страница 90: ...nector desde el controlador ordenador consulte la ilustraci n 3 Conector al panel posterior del segundo instrumento consulte la ilustraci n 4 Conecte el conector IEEE 488 del controlador ordenador y e...

Страница 91: ...REPARADO PARA DATOS NDAC NO ACEPTA DATOS 5 9 10 11 17 EOI FINAL O IDENTIFICACI N IFC INTERFAZ LIBRE SRQ SOLICITUD SERVICIO ATN ATENCI N REN REMOTO HABILITADO 1 2 3 4 13 DIO1 DIO2 DIO3 DIO4 DIO5 14 15...

Страница 92: ...Producto p ej PACE1000 N mero de serie Descripci n de la aver a trabajo que se debe realizar Requisitos de seguimiento de la calibraci n Condiciones de funcionamiento Precauciones de seguridad Informe...

Страница 93: ...e Press o PACE 2010 General Electric Company Todos os direitos reservados Especifica es sujeitas a mudan as sem notifica o GE uma marca registrada da General Electric Company As outras empresas ou pro...

Страница 94: ...de tr s portas D Instrumento de sensor remoto 1 Conector de fonte de alimenta o 2 Classifica o el trica 3 Porta de press o 5 6 3 4 A B C 7 22V to 26V 22V to 26V XXXX XXXX XX ANALOGUE 1 CONSULT HANDBOO...

Страница 95: ...opera o do equipamento 1 3 Materiais t xicos Nenhum material reconhecidamente t xico foi utilizado na constru o deste equipamento 1 4 Manuten o O equipamento dever ser mantido de acordo com os proced...

Страница 96: ...uso interno N o classificado para uso em atmosferas potencialmente explosivas Este equipamento atende aos requisitos de todas as diretivas de seguran a europeias O equipamento possui a marca CE Este s...

Страница 97: ...edimentos abaixo 1 Embale o instrumento Ref K0470 Manual do usu rio Refer ncia e especifica o Se o 6 13 2 Retorne o instrumento para calibra o conserto conclua o procedimento para devolu es de produto...

Страница 98: ...S N O USE APARELHOS E EQUIPAMENTOS DANIFICADOS N O EXCEDA A PRESS O DE OPERA O M XIMA DO INSTRUMENTO ESTE EQUIPAMENTO N O FOI CLASSIFICADO PARA USO DE OXIG NIO 2 2 Press o pneum tica Figura 2 1 Consul...

Страница 99: ...escarregados 2 Conecte a Unidade em Teste UUT porta de conex o de sa da Observa o Para instrumentos com conex es NPT use a veda o com press o aplic vel 2 como mostrado na figura abaixo Conex o Entrada...

Страница 100: ...s ADVERT NCIA FAIXAS DE PRESS O 210 bar 3000 psi S O CLASSIFICADAS APENAS PARA USO HIDR ULICO ATEN O N o exceda as press es m ximas especificadas no Manual de Componentes adequados para a unidade em t...

Страница 101: ...ternativo abaixo de 100 bar IO SNUBBER 1 IO ADAPT 9 16AUTOC ISO 228 Macho a Autoclave 9 16 IO DIFFUSER 1 IO ADAPT G1 4 ISO 228 Macho a G1 4 F mea IO ADAPT 1 8NPT ISO 228 Macho a 1 8 NPT F mea IO ADAPT...

Страница 102: ...press o a uma taxa controlada ao descarregar para a atmosfera Cuidadosamente despressurize todos os tubos para a press o atmosf rica antes de desconectar e conectar unidade em teste Mantenha limpeza a...

Страница 103: ...mpo consulte a especifica o fornecida nos Dados T cnicos 4 Conecte a Unidade em Teste UUT porta de conex o apropriada 5 Encha e purgue a UUT e os tubos de conex o 4 Kits de montagem 4 1 Montagem em pr...

Страница 104: ...strumento na prateleira 7 Localize o instrumento nos batoques 8 Fixe o instrumento na prateleira de equipamento com dois parafusos e porcas fornecidos 9 Remova os dois batoques e substitua pelos paraf...

Страница 105: ...nda o instrumento no painel com quatro parafusos e arruelas 2 5 Conex es el tricas ADVERT NCIA O CONDUTOR TERRA DO INSTRUMENTO DEVE SER CONECTADO AO TERRA DE SEGURAN A PARA PROTE O DA ALIMENTA O CA IS...

Страница 106: ...s a sequ ncia de alimenta o o instrumento mostra a exibi o padr o na tela de toque A tela de toque dividida em v rias chaves m micas 5 2 Requisitos para instrumentos montados em prateleira e em paine...

Страница 107: ...onto As conex es de pinos do conector RS232 tipo D de 9 pinos e a rela o entre o instrumento e os sinais de controle RS232 junto com a interface de interconex o de dispositivos s o mostradas na Tabela...

Страница 108: ...Ref a folha de dados 6 4 Instala o de Unidade nica Figura 8 1 Conecte um conector conjunto de cabos IEEE 488 ao painel posterior do instrumento 2 Conecte a outra extremidade do conector conjunto de c...

Страница 109: ...onector do controlador computador Ilustra o de Refer ncia 3 Conector para painel posterior do segundo instrumento Ilustra o de Refer ncia 4 Conecte o conector IEEE 488 ao controlador computador e o ou...

Страница 110: ...ARA DADOS NDAC DADOS N O ACEITOS 5 9 10 11 17 EOI FINALIZAR OU IDENTIFICAR IFC APAGAR INTERFACE SRQ SOLICITA O DE SERVI O AT ATEN O REN REMOTO HABILITADO 1 2 3 4 13 DIO1 DIO2 DIO3 DIO4 DIO5 14 15 16 D...

Страница 111: ...forma es tanto sobre a RGA ou RMA Produto i e PACE1000 N mero de s rie Detalhes do defeito trabalho a ser realizado As exig ncias de rastreabilidade de calibra o Condi es de opera o Precau es de segur...

Страница 112: ...K0467 Revis o A 19 PT Portugu s...

Страница 113: ...GE Digital Solutions K0467 A PACE General Electric Company 2010 GE General Electric Company GE...

Страница 114: ...1 A B C D 1 2 3 4 5 6 7 5 6 3 4 A B C 7 22V to 26V 22V to 26V XXXX XXXX XX ANALOGUE 1 CONSULT HANDBOOK CONSULT HANDBOOK 22V to 26V ANALOGUE 1 CONSULT HANDBOOK D 22V to 26V ANALOGUE 1 VFC 1 15 CONSULT...

Страница 115: ...0467 A 1 PACE 1 1 1 2 1 3 1 4 1 5 1 6 10 50 C 50 122 F 20 70 C 4 158 F IP20 EN60529 5 95 MIL PRF 28800 2 5 E F 2000 6560 EN 61326 EN 61010 1 UL61010 1 CSA 22 2 61010 1 IEC61010 1 100 240 50 60 660 II...

Страница 116: ...sur l instrument indique que l utilisateur doit consulter le manuel d utilisation Ce symbole dans le manuel indique une situation dangereuse Ce symbole alerte l utilisateur sur le danger de choc lect...

Страница 117: ...RU 4 K0467 A 1 8 PACE1000 PACE1000 i PACE1000 ii GE 191 370 iii iv 1 9 1 K0470 6 13 2 K0470 6 12 2 K0470 2 5 19 K0470 2 5 2 1...

Страница 118: ...K0467 A 5 RU 2 2 2 1 2 NPT 2 2 3 ISO228 1 DIN ISO228 1 JIS B0202 G1 8 8 ISO228 1 G 1 8 DIN ISO228 1 JIS B0202 ISO228 1 G 1 8 DIN ISO228 1 JIS B0202 ISO 228 G1 8 ISO 228 G1 8 62 1 62 6 3 3 9 8 3 3...

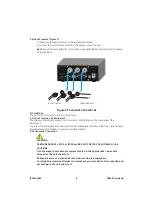
Страница 119: ...RU 6 K0467 A 2 4 3 1 2 NPT 2 3 3 3 1 1 25 MWP 3 2 210 3000 2 1 1 2...

Страница 120: ...3 4 3 5 ISO 228 G1 8 ISO 228 G1 8 IO SNUBBER 1 IO ADAPT 9 16AUTOC 62 XWRFODYH IO DIFFUSER 1 IO ADAPT G1 4 62 2 37 137 62 137 IO ADAPT 1 4NPT 62 137 IO ADAPT 7 16UNF 62 81 IO ADAPT AN4 62 1 IO ADAPT A...

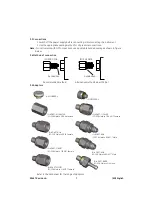
Страница 121: ...RU 8 K0467 A 3 6 210 3000 3 7 3 8 1 1 25 MWP 2 NPT...

Страница 122: ...K0467 A 9 RU 4 3 9 210 9 16 18UNF Autoclave 1 2 3 3 10 2 1 2 3 4 5 4 4 1 5 ISO228 1 G 1 8 DIN ISO228 1 JIS B0202 ISO228 1 G 1 8 DIN ISO228 1 JIS B0202 ISO 228 G1 8 ISO 228 G1 8...

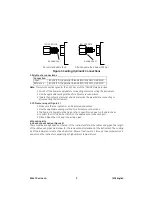
Страница 123: ...RU 10 K0467 A 5 1 1 2 M3 x 6 2 M3 x 8 3 4 5 6 7 8 9 4 2 6...

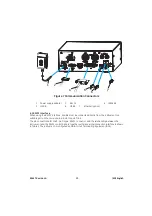
Страница 124: ...K0467 A 11 RU 6 1 1 2 3 1 4 5 6 2 5 GE 191 370...

Страница 125: ...RU 12 K0467 A 5 1 7 1 SELV GE 191 370 2 3 100 240 50 60 660 II 4 5 6 K0470 3 2 5 2 1 2 3 4 5 K0470 3 2 6 RS232 IEEE 488 Supervisor Setup communications c K0470 3 6...

Страница 126: ...K0467 A 13 RU 7 6 1 RS232 RS232 9 RS232 D RS232 1 DCE 1 2 RS232 4 IEEE488 5 USB B 6 USB A 7 Ethernet 2 4 5 6 7 22V to 26V ANALOGUE 1 CONSULT HANDBOOK 1...

Страница 127: ...RTS DTR 6 3 IEEE 488 IEEE 488 IEEE 488 PACE1000 30 IEEE 488 6 4 8 1 IEEE 488 2 IEEE 488 3 IEEE 488 K0470 6 7 9 D RS232 9 D 25 D RxD I P 3 TxD 3 2 TxD O P 2 RxD 2 3 GND 5 GND 5 7 CTS I P 7 RTS 7 4 RTS...

Страница 128: ...K0467 A 15 RU 6 5 8 1 2 3 4 IEEE 488 5 Supervisor Setup communications K0470 6 7 1 2 3...

Страница 129: ...RU 16 K0467 A 8 IEEE 488 IEEE 488 1 6 7 8 9 15 1 5 9 2 654 71 5 1 4 1...

Страница 130: ...K0467 A 17 RU 7 GE www gemeasurement com RMA RGA RMA PACE1000 GE 8 www gemeasurement com...

Страница 131: ...GE Digital Solutions K0467 A PACE 2010 General Electric Company GE General Electric Company GE...

Страница 132: ...1 A B C D 1 2 3 4 5 6 7 5 6 3 4 A B C 7 22V to 26V 22V to 26V XXXX XXXX XX ANALOGUE 1 CONSULT HANDBOOK CONSULT HANDBOOK 22V to 26V ANALOGUE 1 CONSULT HANDBOOK D 22V to 26V ANALOGUE 1 VFC 1 15 CONSULT...

Страница 133: ...1 1 1 2 1 3 1 4 1 5 1 6 LCD 10 C 50 C 50 122 F 20 C 70 C 4 158 F IP20 EN60529 5 95 RH MIL PRF 28800 2 5 E F 2000 6560 EMC EN 61326 EN 61010 1 UL61010 1 CSA 22 2 No 61010 1 IEC61010 1 100 240VAC 50 60...

Страница 134: ...e sur l instrument indique que l utilisateur doit consulter le manuel d utilisation Ce symbole dans le manuel indique une situation dangereuse Ce symbole alerte l utilisateur sur le danger de choc lec...

Страница 135: ...ZH 4 K0467 A 1 8 PACE1000 PACE1000 i PACE1000 ii GE 191 370 iii iv 1 9 1 K0470 6 13 2 K0470 6 12 2 K0470 2 5 19 K0470 2 5 2 1...

Страница 136: ...UT NPT 2 2 2 3 ISO228 1 DIN ISO228 1 JIS B0202 G1 8 8 ISO228 1 G 1 8 DIN ISO228 1 JIS B0202 ISO228 1 G 1 8 DIN ISO228 1 JIS B0202 ISO 228 G1 8 ISO 228 G1 8 100 bar ISO228 1 DIN ISO228 1 JIS B0202 G1 8...

Страница 137: ...ZH 6 K0467 A 2 4 3 1 2 UUT NPT 2 3 3 3 1 1 25 x MWP 3 2 210 bar 3000 psi 2 1 1 2...

Страница 138: ...IO SNUBBER 1 IO ADAPT 9 16AUTOC ISO 228 9 16 IO DIFFUSER 1 IO ADAPT G1 4 ISO 228 G1 4 IO ADAPT 1 8NPT ISO 228 1 8 NPT IO ADAPT 1 4NPT ISO 228 1 4 NPT IO ADAPT 7 16UNF ISO 228 7 16 UNF IO ADAPT AN4 IS...

Страница 139: ...ZH 8 K0467 A 3 6 210 bar 3000 psi 3 7 3 8 1 1 25 x MWP 2 NPT...

Страница 140: ...K0467 A 9 ZH 4 3 9 210 bar 9 16 18UNF 1 2 3 3 10 2 1 2 3 4 UUT 5 4 4 1 5 ISO228 1 G 1 8 DIN ISO228 1 JIS B0202 ISO228 1 G 1 8 DIN ISO228 1 JIS B0202 ISO 228 G1 8 ISO 228 G1 8 100 bar...

Страница 141: ...ZH 10 K0467 A 5 1 1 2 M3 x 6 2 M3 x 8 3 4 5 6 7 8 9 4 2 6...

Страница 142: ...K0467 A 11 ZH 6 1 1 2 3 1 4 5 6 2 5 GE 191 370...

Страница 143: ...ZH 12 K0467 A 5 1 7 1 SELV GE 191 370 2 3 100 240VAC 50 60Hz 660mA II 4 5 6 K0470 3 2 5 2 1 2 OFF 3 4 ON 5 K0470 3 2 6 RS232 IEEE 488 Supervisor Setup communications K0470 3 6...

Страница 144: ...K0467 A 13 ZH 7 6 1 RS232 RS232 1 9 D RS232 RS232 DCE 1 2 RS232 4 IEEE488 5 USB B 6 USB A 7 2 4 5 6 7 22V to 26V ANALOGUE 1 CONSULT HANDBOOK 1...

Страница 145: ...DTR 6 3 IEEE 488 IEEE 488 IEEE 488 PACE1000 30 EMC IEEE 488 3 6 4 8 1 IEEE 488 2 IEEE 488 3 IEEE 488 K0470 6 7 9 D Rs232 9 D 25 D RxD I P 3 TxD 3 2 TxD O P 2 RxD 2 3 GND 5 GND 5 7 CTS I P 7 RTS 7 4 R...

Страница 146: ...K0467 A 15 ZH 6 5 8 1 2 3 4 IEEE 488 5 K0470 6 7 1 2 3...

Страница 147: ...8 IEEE 488 IEEE 488 1 2 N 30 6 7 8 DAV NRFD NDAC 5 9 10 11 17 EOI IFC SRQ ATN REN 1 2 3 4 13 DIO1 DIO2 DIO3 DIO4 DIO5 14 15 16 DIO6 DIO7 DIO8 18 19 20 21 22 GND 6 GND 7 GND 8 GND 9 GND 10 23 24 GND 11...

Страница 148: ...K0467 A 17 ZH 7 GE www gemeasurement com RMA RGA RMA PACE1000 GE COSHH MSDS 8 www gemeasurement com...

Отзывы: