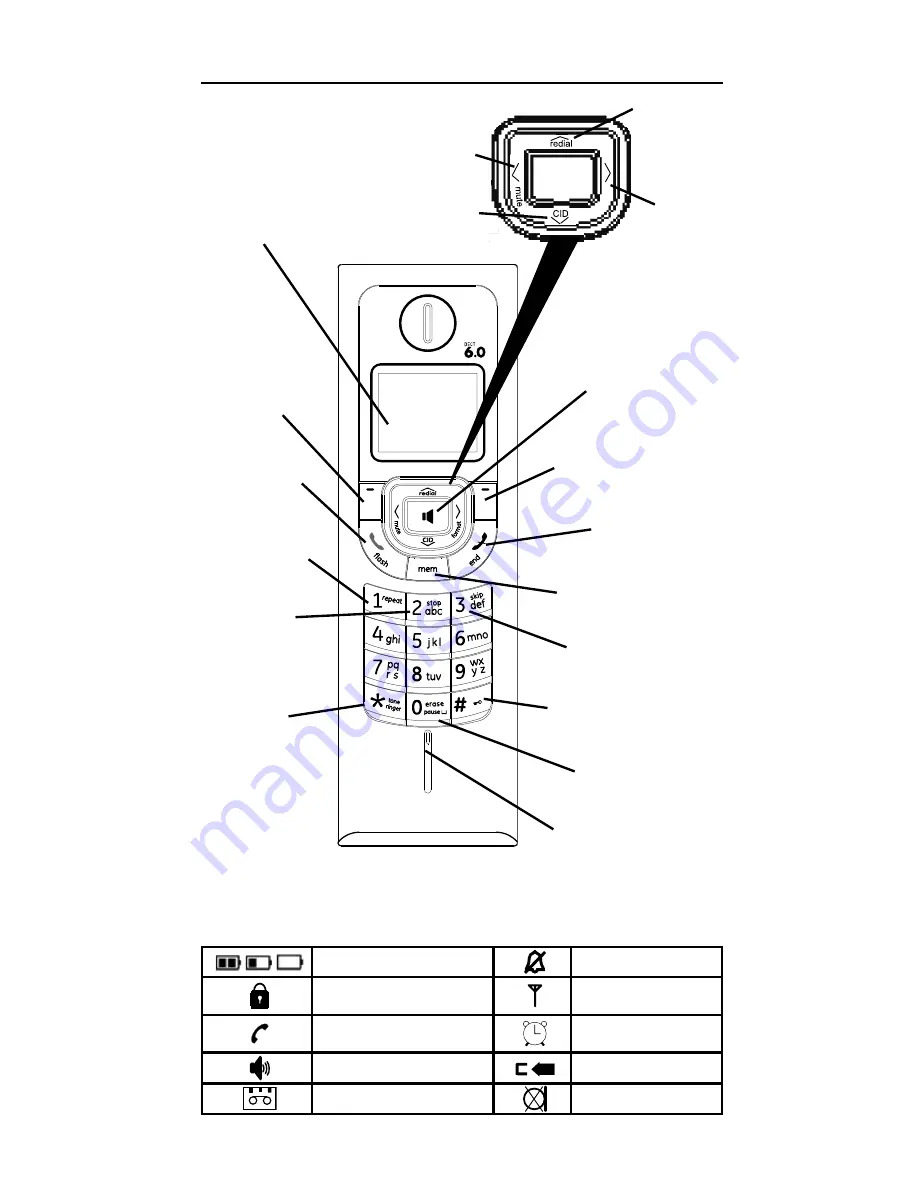
background image

11

Handset Layout

Display Icons

display

talk/flash 

(button)

mem 

(phonebook 

button)

end 

(button)

speaker 

(button)

Soft Key 

Left/menu 

OK (button)

Soft Key 

Right/intercom 

(button)

*tone/ringer 

(button)

# Key Lock 

(button)

microphone

pause 

(button)

redial/

p


(button)

CID/

q


(Caller ID 

button)

mute 

t


(button)

format 

u


(button)

repeat 

(button)

stop 

(button)

skip 

(button)


Battery Status

Ringer OFF

Keypad Locked

In Range Icon

Active Call

Alarm ON Icon

Handsfree Active

CID New Calls

TAM Messages

Mute

Содержание DECT6.0 28225

Страница 1: ...Model 28225 DECT6 0 Cordless Handset Speakerphone Answering System User s Guide...

Страница 2: ...cularly important in rural areas CAUTION Users should not attempt to make such connections themselves but should contact the appropriate electric inspection authority or electrician as appropriate NOT...

Страница 3: ...ice to allow you to maintain uninterrupted service Notice must be given to the telephone company upon termination of your telephone from your line REN Number On the bottom of this equipment is a label...

Страница 4: ...should be installed and operated with a minimum distance of 20 centimeters between the radiator and your body This transmitter must not be co located or operated in conjunction with any other antenna...

Страница 5: ...o Talk 19 Registration 19 Register Handset 19 Deregister Handset 20 Table of Contents Select Base 20 Tones ON OFF 20 Reset Handset 21 Handset Display Settings 21 Wallpaper 21 Handset Name 21 Display C...

Страница 6: ...mming the Phone Book 34 New Entry 34 Edit Entry 35 Dialing from the Phone Book 35 Delete Entry 35 Delete All 36 Call List 36 Changing the Batteries 37 Battery Safety Precautions 37 Display Messages 38...

Страница 7: ...the power in your home goes out Before You Begin Parts Checklist for 28225xx2 Model Make sure your package includes the items shown here Telephone Jack Requirements To use this phone you need an RJ11C...

Страница 8: ...VCR If such interference continues move the cordless telephone farther away from these appliances Certain other communications devices may also use the 1 9GHz DECT frequency for communication and if...

Страница 9: ...erature Avoid other cordless telephones or personal computers Never install telephone wiring during a lightning storm Never install telephone jacks in wet locations unless the jack is specifically des...

Страница 10: ...yout menu button play stop button skip button ans on off answerer on off button charge in use indicator delete button page button memo record button repeat button display do not disturb button volume...

Страница 11: ...ton Soft Key Right intercom button tone ringer button Key Lock button microphone pause button redial p button CID q Caller ID button mute t button format u button repeat button stop button skip button...

Страница 12: ...Model 5 2825 NiMH 1 2V 600mAh rechargeable batteries that are compatible with this unit 1 Locate batteries and batteries door which are packaged together inside a plastic bag and are separate from th...

Страница 13: ...bottom of the base 4 Place the handset in the cradle on the base 5 The charge indicator illuminates verifying the battery is charging The unit will take 20 seconds to register and verify its security...

Страница 14: ...English is selected The indicator displays En or if Fench is select the indicator displays Fr 2 Press the repeat or skip button to change the setting 3 Press the menu button to confirm Recording the...

Страница 15: ...access to your answering system The code can be any 3 digit number from 000 to 999 The pre set code is 123 1 Press the menu button repeatedly until you hear Remote access code is 123 The indicator dis...

Страница 16: ...r the 3rd ring if there are NEW messages OR the unit answers after the 5th ring if there are NO new messages This allows user to access their answering system from another location and then hang up af...

Страница 17: ...list of contacts Handset Settings Set the date time ringer volume ringer tones alarm etc During programming you may exit the menu keep the previous setting and return to the standby mode by pressing...

Страница 18: ...f ring tone 14 ring melodies 4 Press the OK SKL button to confirm the ring type Intercom Ringtone 1 Use the or button to scroll to Int Ringtone through the submenu Ringer Setup 2 Press the OK SKL butt...

Страница 19: ...the incoming call to be taken immediately when the handset is removed from the base station 1 Use the or button to scroll to Auto Talk through the submenu HS Settings 2 Press the OK SKL button 3 Use t...

Страница 20: ...se the or button to scroll to Deregister HS through the submenu Registration 2 Press the OK SKL button 3 If necessary use the or button to select the handset and press OK SKL button Deregister HS show...

Страница 21: ...3 Use the or button to select the desired wallpaper or Wallpaper Off 4 Press the OK SKL button to confirm the selection Handset Name 1 Use the or button to scroll to Handset Name through the submenu D...

Страница 22: ...to Area Code through the submenu Base Setup 2 Press the OK SKL button 3 Enter the Area Code using the number keypad delete any incorrect digits by pressing Clear SKR button 4 Press the OK SKL button...

Страница 23: ...rings or Toll Saver 4 Press the OK SKL to confirm your setting Message Alert 1 Use the or to scroll to Message Alert through the submenu Answer System 2 Press the OK SKL button 3 Use the or to toggle...

Страница 24: ...me it was recorded is announced From the Handset Menu 1 Press the Menu SKL button to access the Main menu 2 Press the OK SKL button again to access the Answer System menu 3 Use the or to scroll to Pla...

Страница 25: ...a memo either at the base unit or from a remote location To record a Memo at the Base 1 Press the and hold the memo record button 2 The system announces Now Recording Begin speaking after the beep 3...

Страница 26: ...tes of recording time This includes messages memos and announcements The maximum number of messages that can be stored is 59 A maximum of 2 minutes is allotted for each message memo or announcement If...

Страница 27: ...l Calls List or Phone Book press the OK SKL button 3 Use the or button to select desired number and press the OK SKL button 4 Press the end button to terminate the call NOTE During the conversation yo...

Страница 28: ...connection press the mute button again DND Do Not Disturb The do not disturb feature DND allows you to mute the ringer of all registered handset s at the same time The phone must be in standby mode P...

Страница 29: ...ls If more than one handset is registered on the base station it is possible to make intercom calls between the handsets 1 Press the INT SKR button 2 Use the or button to select the required handset H...

Страница 30: ...nsfer Forwarding It is possible to put external calls on hold and call other handsets registered to the base or to forward calls After receiving an external call 1 Press the Int SKR button to place th...

Страница 31: ...one company if you receive an incoming call and you are using the GE multi handset system a beep indicates the presence of a Call Waiting call on the line The Call Waiting Caller ID information will b...

Страница 32: ...ds Dialing a CID Number 1 Make sure the phone is OFF not in TALK mode 2 Press the button 3 Use the or buttons to review the CID records 4 Lift the receiver or press the flash or button on the cordless...

Страница 33: ...keypad to enter a name up to15 characters NOTE Use the tone ringer button to change keyboard entry from upper lower case and special characters 6 Press the OK SKL button and use or button to select a...

Страница 34: ...e handset displays the name of the caller when stored in the phone book New Entry 1 Press the Menu SKL button to enter the main menu 2 Use the or button to select Phone Book 3 Press the OK SKL button...

Страница 35: ...e Book 1 Press the mem button when in standby mode the first entry in the phone book appears NOTE If there is no record in phone book the screen displays Empty and it will automatically return to the...

Страница 36: ...ntain up to 30 records 1 Press the Menu SKL button to enter the main menu 2 Use the or button to select Calls List 3 Press the OK SKL button to enter Calls List NOTE If there is no record in call log...

Страница 37: ...side the batteries compartment 5 Put the batteries compartment door back on 6 Place handset in the base to charge Allow the handset batteries to properly charge for 16 hours prior to first use or when...

Страница 38: ...far away from the base and the handset is searching for the base PAGING Someone pressed the PAGE button on the base ANSWER ON Indicates the answering system is set to ON ANSWER OFF Indicates the answ...

Страница 39: ...from your local telephone company in order to receive Caller ID records Telephone Solutions No dial tone Check installation Make sure the base power cord is connected to a working electrical outlet Ma...

Страница 40: ...tery Unit beeps Place handset in base for 20 seconds if it still beeps charge battery for 16 hours Clean the charging contacts on handset and base with a soft cloth See solutions for No dial tone Repl...

Страница 41: ...hone does not support pulse rotary dialing Make sure to enter the correct security code Did unit hang up If you take no action for a period of time it automatically hangs up General Product Care To ke...

Страница 42: ...ttery is low You re out of range of the base Microwave oven is using the same frequency Accessory Information DESCRIPTION MODEL NO AC Power Adaptor 5 2822 Handset Replacement Battery 5 2825 Handset Ch...

Страница 43: ...0445 French for instructions concerning where to mail the product The provisions of this written warranty are in addition to and not a modification of or subtraction from the statutory warranties and...

Страница 44: ...4 Deleting Messages 24 Deregister Handset 20 Dial Mode 22 Dialing a CID Number 32 Dialing from the Phone Book 35 Dialing 27 Digital Security System 8 Disabling the Ringer on the Handset 28 Display Con...

Страница 45: ...om Calls 29 Recording the Outgoing Announcement 14 Redialing 28 Register Handset 19 Registration 19 Remote Access Code 15 Remote Access Code 23 Remote Operation 26 REN Number 3 Reset Handset 21 Review...

Страница 46: ...3 CAN E 08 30 Printed in China Visit the GE website at www GE com phones Thomson Multimedia Ltd 30 Eglinton Ave W Suite 304 Mississauga ON Canada L5R 3E7 2008 Thomson Multimedia Ltd Trademark s Regis...

Отзывы: