Instructions for PY300DC
www.gatexpertstore.com
11
Step 7 - Powering on
·
Ensure that the outer cover has been fitted and fastened back onto the motor base.
·
Before powering up the gate opener make sure the gate can travel by hand in manual mode
(key unlocked).
·
Slide the gate to between the middle of the posts, approximately (see below diagrams).
·
Lock the manual release spanner (key locked) in readiness for automatic mode.
·
Plug the power cord into an approved RCD protected weatherproof outlet.
·
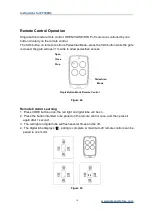
Remote controls included in this kit are factory paired ready for use.
Figure 16
Step 8 - Testing Travel and Limit Stops
·
Ensure gate opener is installed as per step 5, 6 and the sliding gate is in the middle position.
·
Please refer to control board setting(page 15) to set the open limit stop position and closed limit
stop position. The ideal closed final position for the gate frame is 10-15mm from closed gate
end catch.
·
After setting up the limit stop positions, the sliding gate will automatically run to open limit stop
positon and then to the closed limit stop postion, do not cut off the power supply or stop the
gate during it’s Auto-running.
·
Press remote (remotes included in kit are factory paired to the motor) or exteral push button,
the sliding gate will begin to move. When it arriaves at the limit stop position the sliding gate will
stop.
Now the basic open and closed positions are set, for further setting functions and adjusting
parameters, please refer to pages 12-20 in this manual.
Open Limit Stop Position
Closed Limit Stop Position
Содержание PY300DC
Страница 1: ...Sliding Gate Opener User Manual PY300DC Website www gatexpertstore com E mail sales gatexpertstore com...
Страница 14: ...Instructions for PY300DC www gatexpertstore com 10 Figure 14 Figure 15 Open Position Output Gear Mounting Plate...
Страница 26: ...Instructions for PY300DC www gatexpertstore com 22 Drawing and Measurements Figure 29...


