


Operation
Dimple Grinder User’s Guide
15
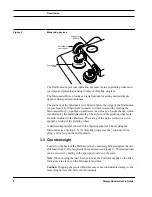
5. Position the specimen mount (and centering ring) until the desired fea-
ture on the specimen coincides with the cross hair.
6. Check correct centering by turning on the Turntable Motor.
The desired dimpled center should rotate about the cross-hair center.
Remove microscope when complete.
4.5 Set Grinding by Dimple Depth
One method of dimpling is to set grinding by dimple depth.
To set grinding by dimple depth
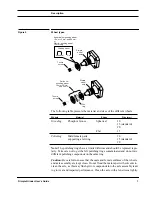
1. Set the Counterweight load (20 g) and select a mid-range grinding
speed.
2. Determine initial specimen thickness.
3. Check that both motors (
T
ABLE
and
A
RM
buttons on Control Panel) are
off.
4. Lower the micrometer end face by rotating the Micrometer Drive
(clockwise).
5. Place the mount plus specimen and centering ring on the Magnetic
Table.
Carefully lower the grinding wheel onto the specimen with the Cam.
6. Raise the micrometer end face.
Rotate the Micrometer Drive until the dial indicator needle has rotated one
complete turn and just reaches zero.
Note: Take care not to raise the Micrometer Drive past zero.
7. Press the
Z
ERO
button to zero the Dimple Depth digital display.
8. Lower the micrometer end face (rotate Drive clockwise) until the digital
display reads the required dimple depth.
The Dial Indicator will show the thickness of material yet to be removed.
9. Place a small amount of diamond compound onto the wheel and the
specimen using a toothpick, then moisten with distilled water.
10. Turn on both motors.
Содержание 656
Страница 2: ...Part Number 656 82002...
Страница 6: ...iv Dimple Grinder User s Guide...
Страница 10: ...viii Dimple Grinder User s Guide...
Страница 42: ...Spares and Consumables 32 Dimple Grinder User s Guide...
Страница 44: ...I 2 Dimple Grinder User s Guide...
Страница 48: ......