


Operation
14
Dimple Grinder User’s Guide
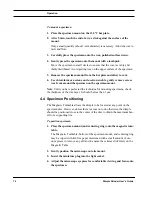
To mount a specimen
1. Place the specimen mount on the 130 °C hot plate.
2. After 5 min, touch the end of a wax stick against the surface of the
mount.
Only a small quantity (about 1-mm diameter) is necessary. Allow the wax to
melt and flow.
3. Carefully place the specimen onto the wax, polished surface down.
4. Gently press the specimen onto the mount with a toothpick.
Move the specimen in small circles to ensure that the wax is evenly and
thinly distributed. Avoid getting wax on the upper surface of the specimen.
5. Remove the specimen mount from the hot plate and allow to cool.
6. Use chloroform or acetone and a cotton swab to gently remove excess
wax from around the specimen on the specimen mount.
Note
: Until you have perfected the technique for mounting specimens, check
the thickness of the wax layer. It should be less than 3 µm.
4.4 Specimen Positioning
The Magnetic Turntable allows the dimple to be located at any point on the
specimen disc. However, unless there is a reason to do otherwise, the dimple
should be positioned close to the center of the disc to obtain the maximum ben-
efit of a supporting rim.
To position specimen
1. Place the specimen mount (and centering ring) onto the magnetic turn-
table.
The Magnetic Turntable, bottom of the specimen mount, and centering ring
may be wiped with lint-free paper moistened with a small amount of vac-
uum grease to remove any dirt and to ensure these items slide freely on the
Magnetic Table.
2. Gently position the microscope onto its mount.
3. Insert the miniature plug into the light socket.
4. Adjust the microscope eyepiece for comfortable viewing and focus onto
the specimen.
Содержание 656
Страница 2: ...Part Number 656 82002...
Страница 6: ...iv Dimple Grinder User s Guide...
Страница 10: ...viii Dimple Grinder User s Guide...
Страница 42: ...Spares and Consumables 32 Dimple Grinder User s Guide...
Страница 44: ...I 2 Dimple Grinder User s Guide...
Страница 48: ......