


Description
4
Dimple Grinder User’s Guide
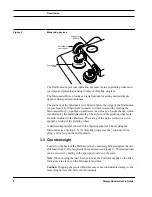
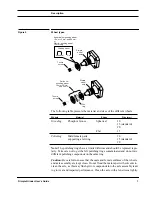
Figure 2
Measuring devices.
The Dial Indicator provides indication of contact between grinding wheel and
specimen and presents an analog display of dimpling progress.
The Micrometer Drive provides a digital readout for setting desired dimple
depth or final specimen thickness.
The end face of the Micrometer sits directly below the stylus of the Dial Indica-
tor (see Figure 8). When the Micrometer end face is raised (by rotating the
Micrometer Drive), it pushes up and raises the stylus by a height change, which
is indicated by the dial/digital display. The stylus and the grinding wheel axle
are both mounted to the Platform. The raising of the stylus results in a corre-
sponding raising of the grinding wheel.
A desired dimple depth (shown in the digital readout) can be set using the
Micrometer (see Section 4.5). As dimpling progresses, the “amount of dim-
pling” can be read on the Dial Indicator.
3.3 Counterweight
Located on the back of the Platform is the Counterweight that supplies the vari-
able load (from 0–40 g) applied to the specimen (see Figure 1). The desired load
can be selected by dialing in the appropriate value on the scale.
Note
: When varying the load, be sure to raise the Platform slightly so the Dial
Indicator stylus is not on the Micrometer end face.
Caution
: Dropping the pivoted Platform may cause considerable damage to the
measuring devices and will void the warranty.
Analog dial
indicator
Raise/lower
cam control
Micrometer
drive
Содержание 656
Страница 2: ...Part Number 656 82002...
Страница 6: ...iv Dimple Grinder User s Guide...
Страница 10: ...viii Dimple Grinder User s Guide...
Страница 42: ...Spares and Consumables 32 Dimple Grinder User s Guide...
Страница 44: ...I 2 Dimple Grinder User s Guide...
Страница 48: ......