background image

53

Pr

eliminary

Main Menu Page

Setup Page

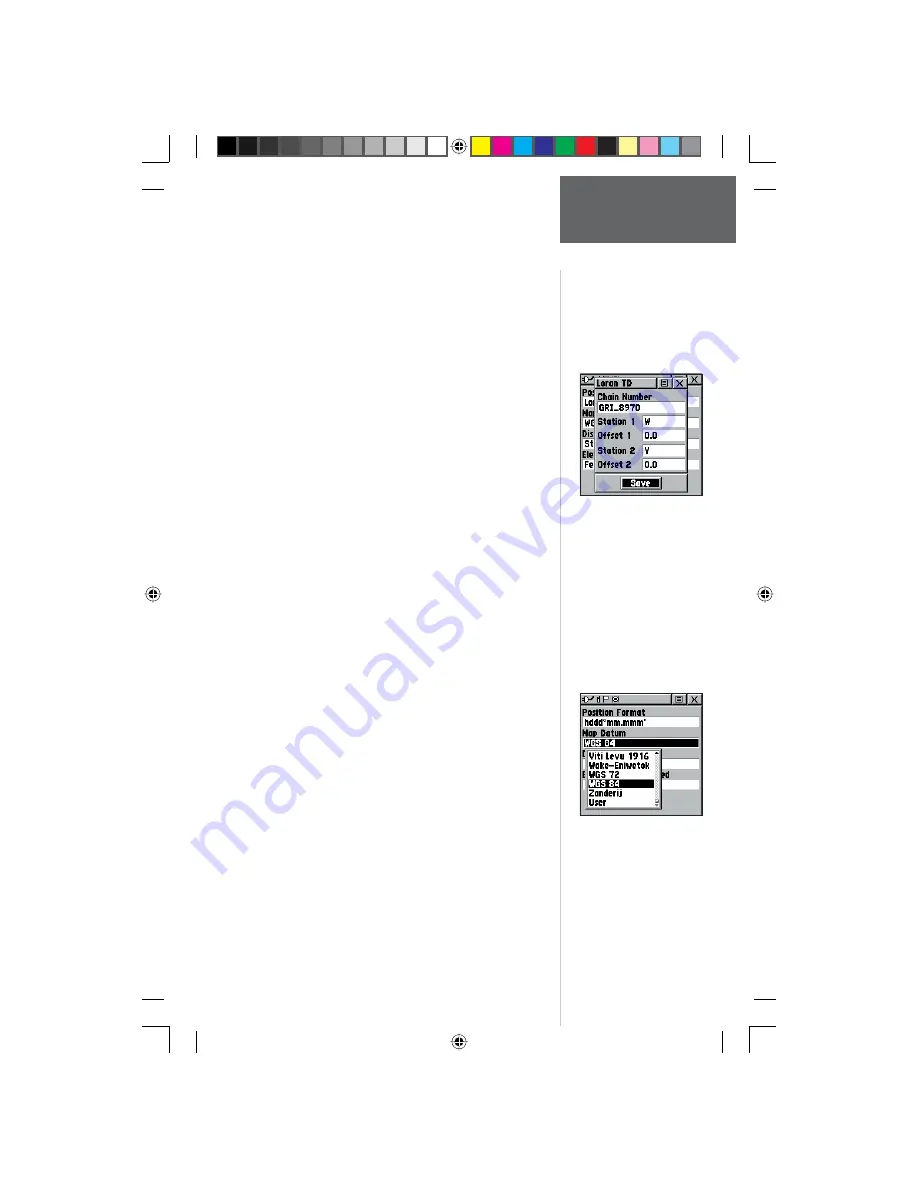
To setup Loran TD from the Main Menu:

1.   When ‘Loran TD’ is chosen, the Loran TD setup 

window will automatically appear.

2.   To change the settings of any of the fi ve fi elds, 

highlight the fi eld, press the 

CLICK STICK IN

.

3.   When done, highlight ‘Save’ and press IN.

4.   To return to the setup page, simply select Loran TD 

from the Position Format fi eld again..

If the active GRI Chain, secondary stations or offsets 

have been changed since the waypoint was created, the 
waypoint will now reference the active GRI chain and 
secondary stations and adjust the TD coordinates ac-
cordingly. Remember that the GPS is not relying on the 
LORAN signal for navigation and actually converts the TD 
coordinate to a useful LAT/LON coordinate (in the back-
ground) before storing the waypoint to memory or using 
it for navigation. Because of this the unit can navigate to a 
TD coordinate anywhere in the world.

For more information on Loran TDs, you may down-

load Garmin’s “Loran TD Position Format Handbook” 
from the Garmin web site at http://www.Garmin.com/
support/userManual.html.

Map Datum -

 Offers a selection of nearly all map 

datums in common use. Every map is based on a map da-
tum (a reference model of the earth’s shape) and is usually 
listed in the title block of the map. If you are comparing 
GPS coordinates to a paper map, chart, or other reference, 
the map datum in this fi eld must match the horizontal 
map datum used to generate the map or other reference. 
The default datum is WGS 84 (World Geodetic Survey 
1984) and should only be changed when using maps or 
charts specifying a different datum. If a map does specify 
a datum, use the options list to fi nd datums applicable to 
the region of the map, selecting the one that provides the 
best positioning at a known point. If necessary, you also 
may choose the ‘User’ datum for custom designed grids.

Distance/Speed -

 You can choose from three units of 

measure to display your rate of travel.

Elevation/Vertical Speed -

 You can choose from two 

units of measure to record your elevation and vertical 
speed.

Setting Loran TD Info

Map Datum

Options Menu 

190-00284-00_Prelim_FCC.indd   53

9/18/2003, 3:51:26 PM

Содержание Rino 130

Страница 1: ...130 2 way radio personal navigator owner s manual and reference guide P r e l i m i n a r y 190 00284 00_Prelim_FCC indd a 9 18 2003 3 50 25 PM...

Страница 2: ...viewed for personal use provided that such electronic or printed copy of this manual or revision must contain the complete text of this copy right notice and provided further that any unauthorized co...

Страница 3: ...s The Introduction section provides FCC safety war ranty product registration information and the Table of Contents The Main Pages section listed in same order as viewed on screen provides details abo...

Страница 4: ...to correct the interference by one or more of the following measures Reorient or relocate the receiving antenna Increase the separation between the equipment and receiver Connect the equipment into an...

Страница 5: ...he use of authorized government charts not replace them Only official government charts and notices to mariners contain all information needed for safe navigation and as always the user is responsible...

Страница 6: ...industry reviewed the available body of research to develop the ANSI Standard C95 1 The design of your radio complies with the FCC guidelines and those standards Antenna Care Use only the supplied or...

Страница 7: ...manufacturer or its representative regard ing your vehicle You should also consult the manufacturer of any equipment that has been added to your vehicle Posted Facilities Turn your radio OFF in any fa...

Страница 8: ...BE YOUR SOLE AND EXCLUSIVE REMEDY FOR ANY BREACH OF WARRANTY Products sold through online auctions are not eligible for rebates or other special offers from Garmin Online auction confirmations are not...

Страница 9: ...e reverse engineer or reduce to human readable form the Software or any part thereof or create any derivative works based on the Software You agree not to export or re export the Software to any count...

Страница 10: ...utions iii v Warranty vi Software License Agreement vii Product Registation vii Table of Contents viii The Main Pages UnitOverview 1 Radio Page The Main Page 2 Status Bar 3 My ID 3 4 Channels and Code...

Страница 11: ...y of a North American base map that includes Interstate and State Highways and Exit Information Using MapSource Garmin s map data software not included you could choose to have the Rino 130 display up...

Страница 12: ...activity including static and weak voice signals You might choose this option if a signal is getting out of range or weak The Informational Picture on the bottom half of screen features Garmin s Mr Ma...

Страница 13: ...ing Radio Transmission Backlight On Radio On Peer To Peer On Location Ready to Send Keylock On Alarm Clock On GPS On and Position Ready GPS On Position Not Ready Status Bar My ID and Symbol Fields Ove...

Страница 14: ...f available face icons 2 Move the CLICK STICK Up or Down to scroll through the selections Since not all the selections can fit in the window you will see a slider bar on the right side indicating your...

Страница 15: ...x A for more information on FRS GMRS and its operational aspects To change the Channel and or Code 1 Using the CLICK STICK highlight the Channel or Code field and then press the CLICK STICK key IN Thi...

Страница 16: ...nel s 1 Using the CLICK STICK highlight the Scan or Monitor button and then press the CLICK STICK key IN Scan will start searching through the available channels Monitor will open the channel in order...

Страница 17: ...om one of ten tones Roger Tone When the TALK key is released a tone is sent to signify the end of the transmission This option allows you to choose from one of four tones or set the tone to Off Ring T...

Страница 18: ...nels See page 2 for more information on using GMRS channels Scramble This feature adds a level of security to your conversations with other Rino 130 users only When On the voice transmission will soun...

Страница 19: ...ken signal symbols are shown to indicate activity on that channel Audio remains muted because the incoming signal does not match the squelch code your unit is set to The Mark Waypoint figure will disp...

Страница 20: ...and Radio On Ready to transmit Position Position received from other Rino user GPS Off Radio On Position sending not available GPS On and Radio Off GPS operation only GPS and Radio On Ready to transm...

Страница 21: ...ontact Page Overview The first time that a signal is received from another Rino user a New Contact page will be displayed From the New Contact page you can show their location on your map Goto their l...

Страница 22: ...have a GPS location on the last transmission a mark will appear below the flag To view the contact details highlight the details field and press LEFT or RIGHT on the CLICK STICK to change to the next...

Страница 23: ...nu is displayed 2 Highlight Find N Go and press the CLICK STICK IN 3 Highlight the desired category and press the CLICK STICK IN For the Contacts List select the desired contact and press the CLICK ST...

Страница 24: ...the right side of the Map Page you can choose to show either the Contact Bar see also pg 12 Data Fields or show the Map Only As you highlight the contacts on the Contact Bar the Map page will center...

Страница 25: ...t selected in the Units field of the Unit Setup Page not to be confused with the Map Setup Page If you zoom in so far that the resolution of the map data is exceeded and the appear ance of the map is...

Страница 26: ...stance near the top of the screen Choosing either Contact Bar or Data Fields reduces the map area Setup Map Displays the Setup Map Pages which al lows you to tailor the map to your requirements such a...

Страница 27: ...s you to send the location of that item project a waypoint from it save it as a waypoint set a proximity circle around it add it to a route or view the sun and moon phase or view hunt and fish informa...

Страница 28: ...Fields on the right side of the page can be programmed to provide a variety of travel and navigation information A list of the choices can be found below Not all data types will be available on every...

Страница 29: ...available only if MapSource Data is loaded when On the triangle icon locks to the road that you are traveling Display Mode Land or Water choice displays in light color while the other displays in a d...

Страница 30: ...he PAGE button or the on screen X button to return to the Map Page Measure Distance option To use the Measure Distance option 1 Select Measure Distance from the Options Menu and then press IN on the C...

Страница 31: ...list of data field choices may be found on page 18 and definitions may be found in Appendix F While you are navigating a route the pointer indicates the direction a bent arrow of the turn to the next...

Страница 32: ...mable with a choice of different data options See page 18 for details on changing data fields The Bearing Pointer and Compass Ring work inde pendently of the direction of your movement and the directi...

Страница 33: ...f the Navigation or Map Page and press the CLICK STICK 2 Select Stop Navigation then press the CLICK STICK To change data fields 1 Use the CLICK STICK to highlight the desired data field and then pres...

Страница 34: ...formation options that you prefer and arranging them in a desired order on the page you can customize the Trip Computer Page to meet your navigation needs The Options Menu allows you to reset the Trip...

Страница 35: ...select the option and place it in the data field To access the page Options Menu 1 Use the CLICK STICK to highlight the Options Menu on screen button and press it IN to display the Options Menu 2 Hig...

Страница 36: ...e If a page is added to the Main Page Sequence it will not appear in the Main Menu To move insert or remove a Main Page 1 From the Main Menu highlight the Option Menu on screen button and press the CL...

Страница 37: ...nal tracking and tells you when the unit is ready to navigate Setup Page Allows tailoring of items such as time for mat units of measure display backlighting timeout and contrast adjustment heading se...

Страница 38: ...above the waypoint name 4 To view the waypoint details highlight the details field and press LEFT or RIGHT on the CLICK STICK to change to the next data field 5 To save the waypoint highlight OK and...

Страница 39: ...T or RIGHT on the CLICK STICK to change to the Location field Press IN and enter the new coordinates using the numerical keyboard Highlight and press OK when finished 3 You may also change the waypoin...

Страница 40: ...edit a waypoint 1 Use the Find N Go Menu to display the waypoint contact or highlight it on the Map Page and press IN 2 To view the details highlight the details field and press LEFT or RIGHT on the...

Страница 41: ...map detail using MapSource to use that option To access the Find N Go Menu 1 Hold IN on the CLICK STICK button to access the Shortcut Menu Highlight Find N Go press IN or 2 From the Main Menu highligh...

Страница 42: ...nd then press it IN to display the Information Page for that waypoint 3 With the Information Page displayed you can select Goto to create a direct line of travel to the waypoint Select Map to view the...

Страница 43: ...elling the name of the city by using the keyboard When you have entered enough characters to define the name a match list displays If you are using find By Nearest scroll through the list to find the...

Страница 44: ...he selected service The Exit Services Information Page displays the name of the service its direction from the exit and a list of the services available each marked by a check At the bottom of these I...

Страница 45: ...elect the desired type and then press it IN to display the list for that type 4 Use the Options Menu at the top of page to select from either By Name or Nearest options Selecting By Name displays a ke...

Страница 46: ...enu for other choices To locate an intersection 1 Display the Find N Go Menu and use the CLICK STICK to highlight the Intersection category and press it IN to display the Find Intersection page 2 High...

Страница 47: ...ntacts or Intersections to the left 3 Press LEFT Pressing RIGHT will return you to the sub page buttons then UP or DOWN on the CLICK STICK to highlight an item on the list and press IN on the CLICK ST...

Страница 48: ...a predicted rate of movement The Data Fields to the right of the page display information relative to your travel as appropriate for the type of data selected to appear in those fields 4 Use the PAGE...

Страница 49: ...tegories and display the Information Page for the selected waypoint city exit point of interest etc Highlight the on screen Use button and press IN on the CLICK STICK to place it on the Routes List 5...

Страница 50: ...n page options button from the Route Page and press the CLICK STICK IN to access the Options Menu 2 Highlight the Copy Route option and then press IN on the CLICK STICK to copy The copied route displa...

Страница 51: ...to display the Information Page for the new point and then select the on screen OK button to add it the route To remove a point from the route list 1 Select the point that you want to remove from the...

Страница 52: ...en Map button at the bottom of the page and press IN on the CLICK STICK to display the Route Map Page 3 Use the CLICK STICK to move the panning arrow to either end of the displayed route until the end...

Страница 53: ...oint in the route 1 Follow Steps 1 and 2 above 2 Place the map panning arrow on the point you are currently viewing and press IN to display the Options Menu Select Next and press IN again to view the...

Страница 54: ...Enroute to a route waypoint Leg Course The line of travel between two route waypoints Leg Distance The distance between two route waypoints Leg Time The time required to travel from a route waypoint t...

Страница 55: ...he current track log is displayed in a win dow at the top of the page After the Track Log is Cleared it displays zero percent When the display reaches 100 the most recent track points start to overwri...

Страница 56: ...Tracback button and then press IN on the CLICK STICK This displays the Tracback Menu with two options To Beginning and To End Highlight the desired option and then press IN on the CLICK STICK to enab...

Страница 57: ...hlight Waypoints or Contacts and press IN on the CLICK STICK You may also select from other items listed on the Find N Go screen 2 From the Review Page highlight Use and press the CLICK STICK IN to co...

Страница 58: ...lity produces a more accurate position fix When enabled the GPS mode set to Normal and the interface set to other than RTCM mode this feature searches for a WAAS satellite near your location and then...

Страница 59: ...t Restart Search Select this option if today is not date provided Continue Acquiring Select this option if no other option applies The unit will attempt to gather GPS signals The Satellite Page option...

Страница 60: ...the page and then press it IN to display the Options Menu 2 Highlight either the Track Up or North Up option depending on which is currently in use and press in on the CLICK STICK to activate To ente...

Страница 61: ...y a 24 hour cycle Military Time Time Zone Can be set to one of the eight US Time Zones or 24 International Time Zones nearest city or geographical region Select Other so you can enter the UTC Time Off...

Страница 62: ...India Zones Irish Grid Loran TD Maidenhead MGRS New Zealand Qatar Grid RT90 Swedish Grid Swiss Grid Taiwan Grid User Grid W Malayan RSO Using the LORAN TD Format When creating new waypoints using LORA...

Страница 63: ...armin s Loran TD Position Format Handbook from the Garmin web site at http www Garmin com support userManual html Map Datum Offers a selection of nearly all map datums in common use Every map is based...

Страница 64: ...contrast slider and then press IN on the CLICK STICK to activate 2 Move the CLICK STICK up or down to move the slider until the desired contrast has been set Heading Page You can select the type of he...

Страница 65: ...ing a standard RT CM SC 104 format without output capabilities RTCM In NMEA Out Allows DGPS input using a standard RTCM SC 104 format and supports the output of standard NMEA 0183 version 3 0 data RTC...

Страница 66: ...t System Page options 1 Use the CLICK STICK to highlight the field and then press IN to display options Then use the CLICK STICK to select the desired option and press IN To display Software Version a...

Страница 67: ...the current month and year 1 Choose Set To Current Date from the Options Menu To create a reference note for a selected date 1 Use the CLICK STICK to highlight the day of the month and then press IN...

Страница 68: ...ill be heard unless Message Beep is Off under System Setup and Alarm Clock will appear on the screen Press IN on the CLICK STICK to acknowledge the alarm Calculator This feature provides you with all...

Страница 69: ...ss IN You may also press the Z Zoom key to capture the lap time To reset the stopwatch 1 With the stopwatch stopped use the CLICK STICK to highlight the Reset field and then press IN You may also pres...

Страница 70: ...press IN on the CLICK STICK to activate If you choose Current Location the field values displayed on the page displays your location If you choose Use Map a map page displays Use the map pointer to id...

Страница 71: ...in acres hectares and square feet square yards square meters square kilometers and square miles To calculate the area 1 With the Rino having a GPS fix press Start when you are ready to begin 2 Begin w...

Страница 72: ...to stay on the move Two or more players attempt to bomb each other using their Rino radios All players must be on the same channel code to play Move your cursor around on the map page using your CLICK...

Страница 73: ...your own rules and enjoy Press CALL to show the score and PAGE to quit the game Beast Hunt The objective is to find and kill the beast with an ar row before it incinerates you or you fall into one of...

Страница 74: ...encies fire police etc GMRS use is currently not allowed in Canada More sophisticated FRS radios also include call func tions squelch codes channel scan and voice scramble Call functions allow you to...

Страница 75: ...expect your FRS radio to offer reliable operation at one mile range If the area between you and another FRS operator is free of obstructions operation up to a two mile range can be achieved What are t...

Страница 76: ...p to 5 miles on GMRS Radio Output Power FRS 0 5 watt GMRS 1 0 watt Power Input Three 1 5 volt AA batteries3 Battery Life GPS only up to 28 hours FRS only up to 20 hours FRS and GPS up to 15 hours5 Spe...

Страница 77: ...ds free at it s best Utilize the Rino s VOX Voice Operated Transmission feature with this headset and voice activated boom mic Instructional Video For getting accustomed to your Rino basic operations...

Страница 78: ...this unit Follow detailed instructions for data transfer in the MapSource User s Manual Garmin MapSource CD ROM s offer a variety of detailed mapping data and navigation information MapSource is also...

Страница 79: ...is for RTCM You have not collected enough infor mation from the WAAS satellite MetroGuide map data is not activated The Track Log feature is turned Off There is too much map clutter or the scale is s...

Страница 80: ...le Send Location is off 10 seconds have not elapsed since last location transmission or GPS is set to Off Keylock is enabled Press and hold TALK key in until done talking Turn radio On Make sure other...

Страница 81: ...r route Final Distance The remaining distance to your final destination Final ETA The estimated time of day you will reach your final destination Final ETE The estimated time needed to reach your fina...

Страница 82: ...rip Odometer A running tally of distance travelled since last reset Trip Time Moving A running tally of movement time travelled since last reset Trip Time Stopped A running tally of stopped time trave...

Страница 83: ...Proprietary Sentences PGRME estimated error PGRMM datum string PGRMZ altitude PSLIB beacon receiver control DGPS Differential GPS corrections are accepted in RTCM SC 104 version 2 0 for mat through th...

Страница 84: ...7 462 600 4 462 6375 18 462 625 5 462 6625 19 462 650 6 462 6875 20 462 675 7 462 7125 21 462 700 8 467 5625 22 462 725 9 467 5875 10 467 6125 11 467 6375 12 467 6625 13 467 6875 14 467 7125 Code Code...

Страница 85: ...s 67 Accuracy Circle 15 Activate a Route 43 Alarm Clock 26 27 58 Area Calculation Page 26 27 61 Arrow Panning 17 AutoZoom 19 B Backlight Timer 56 Backlighting On Off 56 Battery Level Indicator 3 Batte...

Страница 86: ...7 8 Reset Trip Page 24 25 Ring Tone 7 Roger Tone 7 Routes 39 44 Creating 39 Copying 40 Deleting 40 Naming 40 Editing 40 42 Inverting 40 Navigating 43 44 Route Map Page 42 43 S Satellite Page 26 27 48...

Страница 87: ...1 13 63 UTC Offset 51 V Vibrate 7 View Waypoints on Route 9 VOX Level 8 W WAAS Enable Disable 56 Warnings iii v Waypoints Deleting 30 Editing 30 List 32 Marking 29 Naming 29 Projecting 30 Proximity 47...

Страница 88: ...Park Industrial Estate Romsey SO51 9DL U K Garmin Corporation No 68 Jangshu 2nd Road Shijr Taipei County Taiwan www garmin com Part Number 190 00284 00 Rev A For the latest free software updates throu...

Отзывы: