190-01007-C1
GTN Xi Part 23 AML STC Maintenance Manual
Rev. 1
Page 4-9
4.6 Transient Voltage Suppressor (TVS) (If Installed)
After a suspected lightning strike, each TVS and TVS assembly (if installed) must be replaced. Refer to
Section 6.9 for information on installing in-line TVSs.
4.6.1 GTN Xi TVS1 Check (GTN Xi #1 Only)
NOTE
The GTN Xi should be the only LRU connected to the NAV/GPS circuit breaker. If other
equipment is connected to the NAV/GPS circuit breaker, it must be disconnected prior to
conducting the following check. No other TVS devices should be on this circuit. If the TVS
being checked is not isolated, erroneous readings may result.
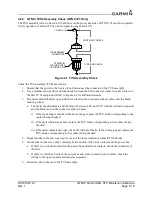
For a dual GTN Xi installation, only GTN Xi #1 will have the TVS protection. The following checks will
only apply to GTN Xi #1. Refer to the appropriate GTN Xi power interconnect drawings. To check the
TVS on the GTN Xi power inputs, the following steps should be followed:
1. Remove the GTN Xi unit as described in Section 6.1.
2. Open the GTN Xi unit’s circuit breaker and use a multimeter to perform a diode check between
P1001-19 and ground:
a. The meter should indicate open with the red lead on P1001-19 and the black lead on ground.
b. The meter should indicate a diode drop of 2.0V-2.5V for 30KPA48A diodes and a drop of
1.5V-2.0V for 15KPA84A diodes with the red lead on ground and the black lead on P1001-19.
i) If the diode drop is outside of the above range, replace the TVS.
ii) If the meter indicates a short during steps 2a or 2b, replace the TVS.
iii) If the meter indicates an open in both directions, check the continuity of the fuse.
iv) If the fuse is open, replace the fuse and repeat the check.
v) If the fuse is good, check the wiring for faults. If the wiring is good, replace the TVS.
3. Verify continuity between P1001-19 and P1001-20.
4. Re-install the GTN Xi unit as described in Section 6.1 and reset the GTN Xi unit’s circuit breaker.
Содержание GTN Xi Series
Страница 42: ......
Страница 92: ...190 01007 C1 GTN Xi Part 23 AML STC Maintenance Manual Rev 1 Page 6 17 Figure 6 9 Fan Wiring Replacement...
Страница 163: ......


