background image

The sensor may be tilted when installed on an asymmetrical 

hub. This does not affect operation.

3

Rotate the wheel to check for clearance.
The sensor should not contact other parts of your bike.
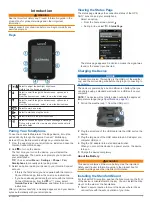
NOTE: 

The LED flashes green for five seconds to indicate 

activity after two revolutions.

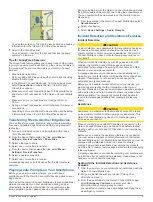
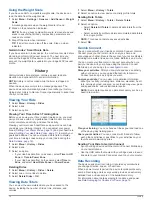
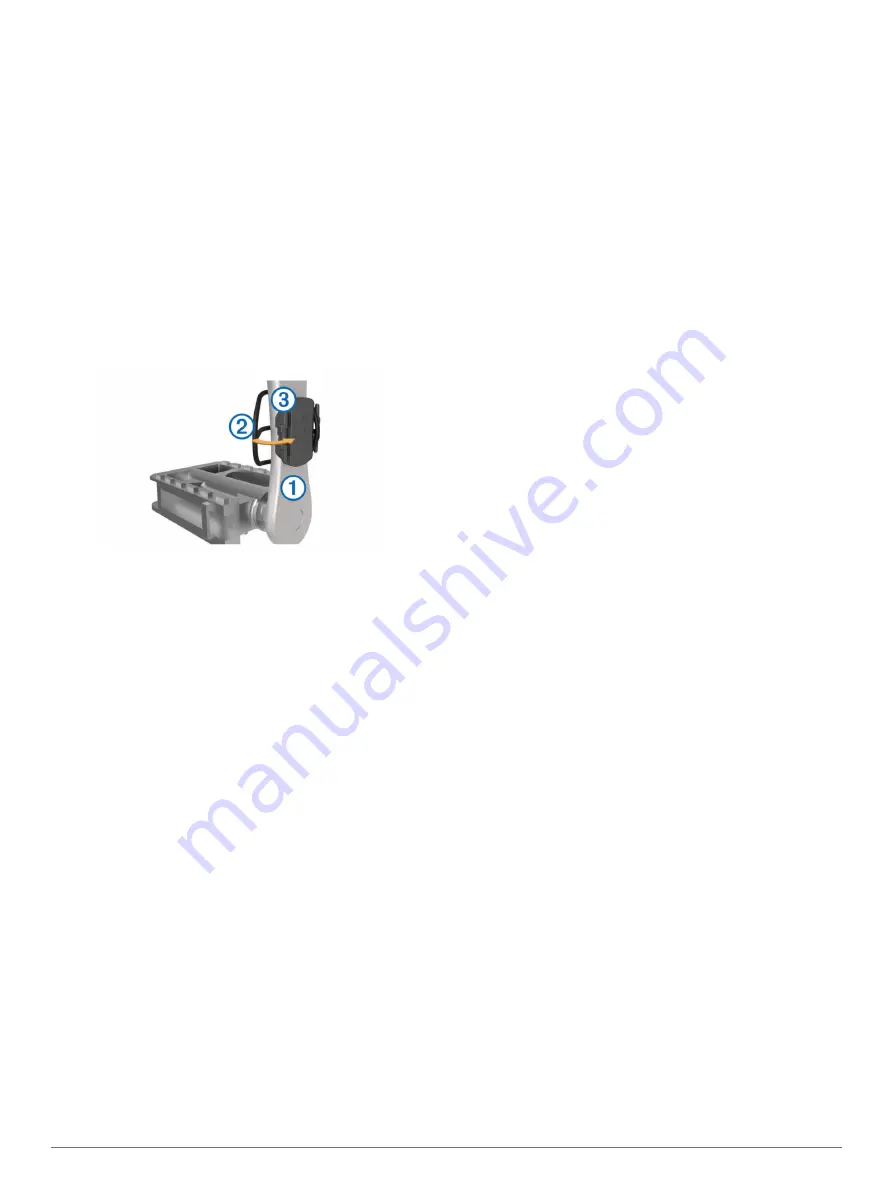
Installing the Cadence Sensor

NOTE: 

If you do not have this sensor, you can skip this task.

TIP: 

Garmin recommends you secure your bike on a stand while 

installing the sensor.
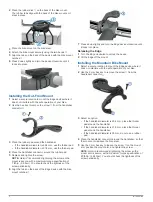
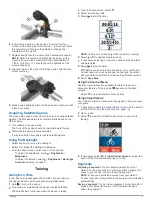
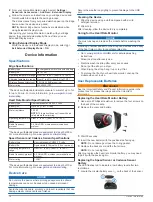
1

Select the band size that fits your crank arm 

À

 securely.

The band you select should be the smallest one that 

stretches across the crank arm.

2

On the non-drive side, place and hold the flat side of the 

cadence sensor on the inside of the crank arm.

3

Pull the bands 

Á

 around the crank arm, and attach them to 

the hooks 

Â

 on the sensor.

4

Rotate the crank arm to check for clearance.
The sensor and bands should not contact any part of your 

bike or shoe.

NOTE: 

The LED flashes green for five seconds to indicate 

activity after two revolutions.

5

Take a 15 minute test ride and inspect the sensor and bands 

to ensure there is no evidence of damage.

About the Speed and Cadence Sensors

Cadence data from the cadence sensor is always recorded. If no 

speed and cadence sensors are paired with the device, GPS 

data is used to calculate the speed and distance.
Cadence is your rate of pedaling or “spinning” measured by the 

number of revolutions of the crank arm per minute (rpm).

Data Averaging for Cadence or Power

The non-zero data-averaging setting is available if you are 

training with an optional cadence sensor or power meter. The 

default setting excludes zero values that occur when you are not 

pedaling.
You can change the value of this setting (

Data Recording 

Settings

, page 17

).

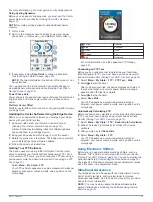
Pairing Your ANT+ Sensors

Before you can pair, you must put on the heart rate monitor or 

install the sensor.
Pairing is the connecting of ANT+ wireless sensors, for example, 

connecting a heart rate monitor with your Garmin device.

1

Bring the device within 3 m (10 ft.) of the sensor.

NOTE: 

Stay 10 m (33 ft.) away from other riders' ANT+ 

sensors while pairing.

2

Select 

Menu

 > 

Settings

 > 

Sensors

 > 

Add Sensor

.

3

Select an option:
• Select a sensor type.

• Select 

Search All

 to search for all nearby sensors.

A list of available sensors appears.

4

Select one or more sensors to pair with your device.

5

Select 

Add Sensor

.

When the sensor is paired with your device, the sensor status 

is Connected. You can customize a data field to display 

sensor data.

Training with Power Meters

• Go to 

www.garmin.com/intosports

 for a list of ANT+ sensors 

that are compatible with your device (such as Vector

).

• For more information, see the owner's manual for your power 

meter.

• Adjust your power zones to match your goals and abilities 

(

Setting Your Power Zones

, page 12

).

• Use range alerts to be notified when you reach a specified 

power zone (

Setting Range Alerts

, page 16

).

• Customize the power data fields (

Customizing the Data 

Screens

, page 16

).

Setting Your Power Zones

The values for the zones are default values and may not match 

your personal abilities. You can manually adjust your zones on 

the device or using Garmin Connect. If you know your functional 

threshold power (FTP) value, you can enter it and allow the 

software to calculate your power zones automatically.

1

Select 

Menu

 > 

My Stats

 > 

Training Zones

 > 

Power Zones

.

2

Enter your FTP value.

3

Select 

Based On:

.

4

Select an option:
• Select 

watts

 to view and edit the zones in watts.

• Select 

% FTP

 to view and edit the zones as a percentage 

of your functional threshold power.

Calibrating Your Power Meter

Before you can calibrate your power meter, you must install it, 

pair it with your device, and begin actively recording data with it.
For calibration instructions specific to your power meter, see the 

manufacturer's instructions.

1

Select 

Menu

 > 

Settings

 > 

Sensors

.

2

Select your power meter.

3

Select 

Calibrate

.

4

Keep your power meter active by pedaling until the message 

appears.

5

Follow the on-screen instructions.

Pedal-Based Power

Vector measures pedal-based power.
Vector measures the force you apply a few hundred times every 

second. Vector also measures your cadence or rotational 

pedaling speed. By measuring the force, the direction of force, 

the rotation of the crank arm, and time, Vector can determine 

power (watts). Because Vector independently measures left and 

right leg power, it reports your left-right power balance.

NOTE: 

The Vector S system does not provide left-right power 

balance.

Cycling Dynamics

Cycling dynamics metrics measure how you apply power 

throughout the pedal stroke, and where you apply power on the 

pedal, allowing you to understand your particular way of riding. 

Understanding how and where you produce power allows you to 

train more efficiently and evaluate your bike fit.

NOTE: 

You must have a dual sensing Edge system to use 

cycling dynamics metrics.

12

ANT+ Sensors

Содержание EDGE 520 PLUS

Страница 1: ...EDGE 520PLUS Owner sManual...

Страница 2: ...es These trademarks may not be used without the express permission of Garmin Android is a trademark of Google Inc Apple and Mac are trademarks of Apple Inc registered in the U S and other countries Th...

Страница 3: ...ion 8 Bluetooth Connected Features 8 Starting a GroupTrack Session 8 Tips for GroupTrack Sessions 9 Transferring Files to Another Edge Device 9 Playing Audio Prompts on Your Smartphone 9 Incident Dete...

Страница 4: ...ion 18 Specifications 18 Edge Specifications 18 Heart Rate Monitor Specifications 18 Speed Sensor and Cadence Sensor Specifications 18 Device Care 18 Cleaning the Device 18 Caring for the Heart Rate M...

Страница 5: ...obile app from the or menu select Garmin Devices Add Device and follow the on screen instructions After you pair successfully a message appears and your device syncs automatically with your smartphone...

Страница 6: ...heck the tightness of the screw periodically 6 Align the tabs on the back of the Edge device with the bike mount notches 7 Press down slightly and turn the Edge device clockwise until it locks into pl...

Страница 7: ...side and wait while the device locates satellites The satellite bars turn green when the device is ready 3 From the home screen select 4 Select an activity profile 5 Select to start the timer NOTE His...

Страница 8: ...You can race against the segment leader your past performance or other riders if applicable The goal automatically adjusts based on your current performance A message appears when the segment is compl...

Страница 9: ...e value for the rest interval and select 7 Select one or more options To set the number of repetitions select Repeat To add an open ended warm up to your workout select Warm Up On To add an open ended...

Страница 10: ...r activity select Save Ride Cancelling a Training Target Select Cancel Target OK Personal Records When you complete a ride the device displays any new personal records you achieved during that ride Pe...

Страница 11: ...on Courses 6 Select the course 7 Select Ride Tips for Training with Courses Use turn guidance Course Options page 7 If you include a warmup select to begin the course and warm up as normal Stay away f...

Страница 12: ...vice must be connected to your Bluetooth enabled smartphone to take advantage of some features LiveTrack Allows friends and family to follow your races and training activities in real time You can inv...

Страница 13: ...s 2 Select your device 3 Select Device Settings Audio Prompts Incident Detection and Assistance Features Incident Detection CAUTION Incident detection is a supplemental feature primarily designed for...

Страница 14: ...Wrap the strap around your chest and connect the strap hook to the loop NOTE The care tag should not fold over The Garmin logos should be right side up 4 Bring the device within 3 m 10 ft of the heart...

Страница 15: ...age of your resting heart rate About Heart Rate Zones Many athletes use heart rate zones to measure and increase their cardiovascular strength and improve their level of fitness A heart rate zone is a...

Страница 16: ...ect Add Sensor When the sensor is paired with your device the sensor status is Connected You can customize a data field to display sensor data Training with Power Meters Go to www garmin com intosport...

Страница 17: ...a value measured in watts per kilogram your power output in watts and a position on the color gauge Purple Superior Blue Excellent Green Good Orange Fair Red Untrained For more information see the ap...

Страница 18: ...t one or more rides to delete 3 Select Delete Rides OK Viewing Data Totals You can view the accumulated data you have saved to the device including the number of rides time distance and calories 1 Sel...

Страница 19: ...o download new data fields that present sensor activity and history data in new ways You can add Connect IQ data fields to built in features and pages Widgets Provide information at a glance including...

Страница 20: ...example you can set the device to alert you when your cadence is below 40 RPM and over 90 RPM You can also use a training zone Training Zones page 6 for the range alert 1 Select Menu Settings Activit...

Страница 21: ...d Text Alerts Allows you to enable phone notifications from your compatible smartphone Missed Calls and Texts Displays missed phone notifications from your compatible smartphone System Settings Select...

Страница 22: ...Hz ANT wireless communications protocol Water rating 1 ATM The device withstands pressure equivalent to a depth of 10 m For more information go to www garmin com waterrating Device Care NOTICE Do not...

Страница 23: ...hone While connected to your Garmin Connect account the device downloads several days of satellite data allowing it to quickly locate satellite signals Take your device outside to an open area away fr...

Страница 24: ...tination You must be navigating for this data to appear ETA at Next The estimated time of day when you will reach the next waypoint on the route adjusted to the local time of the waypoint You must be...

Страница 25: ...Power Phase R Peak Lap The average power phase peak angle for the right leg for the current lap Power TSS The Training Stress Score for the current activity Power watts kg The amount of power output i...

Страница 26: ...Calculations Zone of Maximum Heart Rate Perceived Exertion Benefits 1 50 60 Relaxed easy pace rhythmic breathing Beginning level aerobic training reduces stress 2 60 70 Comfortable pace slightly deep...

Страница 27: ...1938 650 x 23C 1944 650 35A 2090 650 38B 2105 650 38A 2125 700 18C 2070 700 19C 2080 700 20C 2086 700 23C 2096 700 25C 2105 700C Tubular 2130 700 28C 2136 700 30C 2146 700 32C 2155 700 35C 2168 700 38...

Страница 28: ...ning 5 6 initial setup 19 installing 1 2 11 12 intervals workouts 5 K keys 1 L language 17 19 laps 1 lifetime athlete 15 LiveTrack 8 9 locations 6 deleting 7 editing 6 sending 10 M maps 6 7 orientatio...

Страница 29: ......

Страница 30: ...support garmin com May 2018 190 02424 00_0A...

Страница 31: ...Quick Start Manual Manuel de demarrage rapide Manuale di avvio rapido Schnellstartanleitung Guia de inicio rapido Manual de inicio rapido GARMINe 2 9 18 27 36 45...

Страница 32: ...m the home screen select to view the status page Select to scroll through the data screens options and settings From the home screen select to view the device menu 0 Select to mark anew lap I Select t...

Страница 33: ...device is oriented toward the sky You can install the bike mount on the stem or the handlebars 1 Select a secure location to mount the device where it does not interfere with the safe operation of you...

Страница 34: ...mpatible smartphone or fitness device Some features require you to install the Garmin Connect Mobile app on your smartphone Go to www garmin com intosports apps for more information NOTE Your device m...

Страница 35: ...preset text message This feature is available with compatible Android smartphones Quick Start Manual Audio prompts Allows the Garmin Connect Mobile app to play status announcements on your smartphone...

Страница 36: ...logos on the module and the strap should be right side up 2 Wet the electrodes 2 and the contact patches on the back of the strap to create a strong connection between your chest and the transmitter...

Страница 37: ...ur bike or shoe NOTE The LED flashes green for five seconds to indicate activity after two revolutions Quick Start Manual 5 Take a 15 minute test ride and inspect the sensor and bands to ensure there...

Страница 38: ...omputer NOTE The device will not charge when outside the approved temperature range page 8 1 Pull up the weather cap CD from the USB port 8 2 Plug the small end of the USB cable into the USB port on t...

Страница 39: ...n com intosports Go to www garmin com learningcenter Go to buy garmin com or contact your Garmin dealer for information Manuel de demarrage rapide about optional accessories and replacement parts Gett...

Страница 40: ...hese trademarks may not be used without the express permission of Garmin Android M is atrademark of Google Inc The Bluetooth word mark and logos are owned by the Bluetooth SIG Inc and any use of such...

Страница 41: ...UXNVMRQHU IRU GJH IMHUQNRQWUROO GJH IMlUUNRQWUROOVLQVWUXNWLRQHU QVWUXNFMD REV XJL SLORWD GJH DUPLQ WKH DUPLQ ORJR DQG GJH DUH WUDGHPDUNV RI DUPLQ WG RU LWV VXEVLGLDULHV UHJLVWHUHG LQ WKH 86 DQG RWKHU...

Страница 42: ...XUQHG RQ XVWRPL LQJ WKH FWLRQ H URP WKH GJH KRPH VFUHHQ VHOHFW 6HQVRUV GJH 5HPRWH 6HQVRU HWDLOV 6HOHFW 6LQJOH 3UHVV RU 3UHVV DQG ROG 6HOHFW D IXQFWLRQ IRU WKH DFWLRQ NH RU H DPSOH RX FDQ VHW WKH DFWLR...

Страница 43: ...SODFH DQG WLJKWHQ WKH WKUHH VFUHZV 127 R QRW RYHUWLJKWHQ 6SHFLILFDWLRQV DWWHU W SH 8VHU UHSODFHDEOH 5 YROWV DWWHU OLIH 8S WR HDUV KRXU SHU GD 2SHUDWLQJ WHPSHUDWXUH UDQJH URP WR IURP WR 5DGLR IUHTXHQF...

Страница 44: ...DUPLQ WG RU LWV VXEVLGLDULHV ZZZ JDUPLQ FRP VXSSRUW...

Страница 45: ...8 Vorgesetzte Halterung Anweisungen 11 lnstrucciones del soporte frontal 15 lnstruyoes para suporte externo frontal 18 Voorsteun lnstructies 21 lnstruktioner til Out Front Mount 25 Etukiinnityksen oh...

Страница 46: ...andlebar If the handlebar diameter is 25 4 mm use the thicker pad If the handlebar diameter is 31 8 mm use the thinner pad 4 Place the handlebar connector around the rubber pad 5 Replace and tighten t...

Страница 47: ...stalling the Lever Adapter Some optional accessories require the use of the lever adapter Go to buy garmin com to purchase accessories 1 Use a2 mm hex key to remove the two screws CD on the bottom of...

Страница 48: ...The red mark indicates the open position 6 Snap the lever to the closed position to lock the Edge device into the mount NOTE For more information about mounting the accessory see the accessory instru...

Страница 49: ...Garmin the Garmin Logo and Edge are trademarks of Garmin Ltd or its subsidiaries registered in the USA and other countries These trademarks may not be used without the express permission of Garmin Pr...

Страница 50: ...CD June 2014 190 01583 92_0A Printed in Taiwan...

Страница 51: ...wwwo garmino com HRMcare 2014 Garm1 n 0 Ltd or its subsidiaries...

Страница 52: ...e sui prodotto 9 Wazne informacje dotyczqce Wichtige Sicherheits und bezpieczenstwa i produktu 35 Produktinformationen 11 Dulezite bezpecnostni informace a Informacion importante sabre el informace o...

Страница 53: ...ectTU Mobile app does not contact emergency services on your behalf Always use your best judgement and operate the bicycle in a safe manner Make sure your bicycle and hardware are properly maintained...

Страница 54: ...nt to part 15 of the FCC rules These limits are designed to provide reasonable protection against harmful interference in aresidential installation This equipment generates uses and can radiate radio...

Страница 55: ...min navigation product resulting from its use in proximity to any handset or other device that utilizes aterrestrial broadband network operating on frequencies that are close to the frequencies used b...

Страница 56: ......

Страница 57: ...2016 Garmin Ltd or its subsidiaries Printed in Taiwan March 2018 190 00720 9G_OC...

Отзывы: