background image

The Varia RTL515/RTL516 and Your 

Radar Display Unit

You can display radar data using the compatible rear display 

unit (RDU).

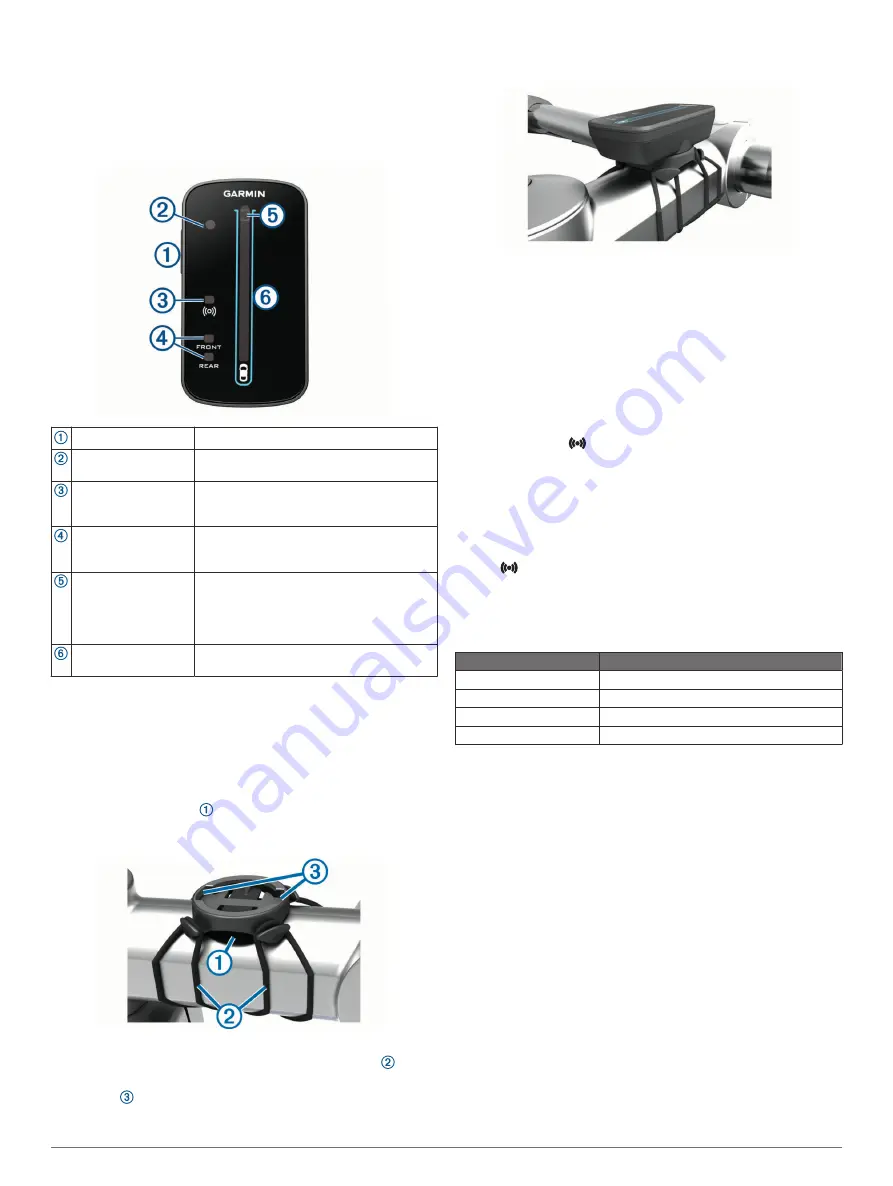
Varia RDU Device Overview

Device key

Turns the device on and off.

Ambient light sensor

Detects available light and automatically 
adjusts the brightness of the display.

Connection status 
LED

Appears solid blue when the device is 
paired with the taillight. Flashes blue when 
the device is searching for the taillight.

FRONT and REAR 
device status LEDs

Flashes red when the battery is low. 
Appears solid red when there is a device 
error.

Threat level LED
Charging status LED 
(

Charging the Device

page 5

)

Changes color based on the potential level 
of threat. Green indicates no vehicle is 
detected. Amber indicates a vehicle is 
approaching. Red indicates a vehicle is 
advancing at a high rate of speed.

Vehicle position LEDs Moves up the column as the vehicle gets 

closer to your bike.

Installing the Varia RDU Device

NOTE: 

If you do not have a Varia RDU device, you can use a 

compatible Edge device.
You can install the device on the stem or the handlebars.

1

Select a secure location to mount the device where it does 

not interfere with the safe operation of your bike.

2

Place the rubber disk   on the back of the bike mount.
The rubber tabs align with the back of the bike mount so it 

stays in place.

3

Place the bike mount on the bike stem.

4

Attach the bike mount securely using the two bands  .

5

Align the tabs on the back of the device with the bike mount 

notches  .

6

Press down slightly and turn the device clockwise until it 

locks into place.

Pairing the Radar Device with the RDU 

Device

The Varia RDU device can be paired with one radar device at a 

time.

1

Hold the Varia RDU device key for 5 seconds.
The threat level LED flashes purple.

2

Turn on the radar unit.

3

Bring the devices within 1 cm of each other, and wait while 

the devices connect.
The Varia RDU 

 LED turns solid blue and the threat level 

LED turns solid green.
The Varia RTL515/RTL516 status LED flashes purple.

Turning On the Varia RDU Device

Hold the device key for 1 second to turn on the device.
The LEDs fill the column to indicate the battery level.
The 

 LED flashes blue while it is searching for the radar 

device.

Varia RDU Battery Status LED

When you turn on the device, the LED at the top of the column 

briefly indicates the battery status.

LED Activity

Status

Flashing green

The device is charging.

Solid green

Charging is complete.

Flashing yellow

The battery is low.

Flashing red

The battery is critically low.

Setting the Varia RDU Device Tones

• Press the device key to turn on tones.
• Press the device key again to turn off tones.

Turning Off the Varia RDU Device and Radar 

Device

If the Varia RDU device is paired with the radar device, you can 

turn off both devices at the same time.

Hold the device key on the Varia RDU device for 1 second.

Other Compatible Devices

Pairing the Radar Device with a Compatible 

Edge Device

This task is for the Edge 1030, 830, 530, and 130 devices. If 

your device is not listed, go to 

buy.garmin.com

.

1

Bring the Edge device within range (3 m) of the sensor.

NOTE: 

Stay 10 m away from other ANT+ sensors while 

pairing.

2

Turn on the Edge device.

4

The Varia RTL515/RTL516 and Your Radar Display Unit

Содержание EDGE 1030 PLUS

Страница 1: ...GPS Cycling Bike Computer On Device Workout Suggestions ClimbPro Pacing Guidance and More User Manual of Product 2 Garmin 010 02376 00 Varia RTL515 Cycling Rearview Radar with Tail Light Visual and Au...

Страница 2: ...EDGE 1030PLUS Owner sManual...

Страница 3: ...permission of Garmin Android is a trademark of Google Inc Apple iPad iPhone iPod and Mac are trademarks of Apple Inc registered in the U S and other countries The BLUETOOTH word mark and logos are own...

Страница 4: ...4 Using Garmin Connect Training Plans 14 Viewing the Training Calendar 14 Interval Workouts 14 Creating an Interval Workout 14 Starting an Interval Workout 15 Training Indoors 15 Pairing Your ANT Indo...

Страница 5: ...On and Off 34 Cancelling an Automated Message 34 Sending a Status Update After an Incident 34 Turning On LiveTrack 35 Starting a GroupTrack Session 35 Tips for GroupTrack Sessions 36 Setting the Bike...

Страница 6: ...ng the Widget Loop 55 Data Recording Settings 56 Changing the Units of Measure 56 Turning the Device Tones On and Off 56 Changing the Device Language 56 Time Zones 56 Setting Up Extended Display Mode...

Страница 7: ...Appendix 64 Data Fields 64 VO2 Max Standard Ratings 68 FTP Ratings 69 Heart Rate Zone Calculations 69 Wheel Size and Circumference 70 iv Table of Contents...

Страница 8: ...re you begin or modify any exercise program Device Overview Select to enter sleep mode and wake the device Hold to turn the device on and off and lock the touchscreen Select to mark a new lap Select t...

Страница 9: ...le Select to access connected features and settings Select to access your Connect IQ apps widgets and data fields Viewing Widgets Your device is preloaded with several widgets and more are available w...

Страница 10: ...your smartphone install and open the Garmin Connect app 2 Hold to turn on the device The first time you turn on the device you will select the device language The next screen prompts you to pair with...

Страница 11: ...1 Pull up the weather cap from the USB port 2 Plug the small end of the USB cable into the USB port on the device 3 Plug the large end of the USB cable into an AC adapter or a computer USB port 4 Plug...

Страница 12: ...ration of your bike 2 Place the rubber disk on the back of the bike mount Two rubber disks are included and you can select the disk that best fits your bike The rubber tabs align with the back of the...

Страница 13: ...ndlebar diameter is 31 8 mm use the thinner pad 4 Place the handlebar connector around the rubber pad 5 Replace and tighten the screw NOTE Garmin recommends tightening the screw so the mount is secure...

Страница 14: ...o that the mount arm is above the bike stem 5 Use the 3 mm hex key to loosen the screw on the mount arm position the mount arm and tighten the screw NOTE Garmin recommends tightening the screw so the...

Страница 15: ...ce may need a clear view of the sky to acquire satellite signals The time and date are set automatically based on the GPS position TIP For more information about GPS go to www garmin com aboutGPS 1 Go...

Страница 16: ...ional data screens You can swipe down from the top of the data screens to view the widgets 7 If necessary tap the screen to view status overlay data including battery life or return to the home screen...

Страница 17: ...From the Strava Segment Explore widget select a segment 2 Select an option Select to star the segment in your Strava account Select Download Ride to download a segment to your device and ride it Sele...

Страница 18: ...l automatically adjusts based on your current performance A message appears when the segment is complete Viewing Segment Details 1 Select Training Segments 2 Select a segment 3 Select an option Select...

Страница 19: ...p target type For example select Heart Rate Zone to maintain a consistent heart rate during the step 8 If necessary select a target zone or enter a custom range For example you can select a heart rate...

Страница 20: ...workout data An audible alarm sounds when you are about to finish a workout step A message appears counting down the time or distance until a new step begins Stopping a Workout At any time select to e...

Страница 21: ...1 Select Training Training Plan 2 Select 3 Select a day to view a scheduled workout or a saved ride Interval Workouts You can create interval workouts based on distance or time The device saves your...

Страница 22: ...Indoor Trainer page 15 You can use your device with an indoor trainer to simulate resistance while following a course activity or workout While using an indoor trainer GPS is turned off automatically...

Страница 23: ...status shows you how your training affects your fitness and performance Your training status is based on changes to your training load and VO2 max over an extended time period VO2 max VO2 max is the m...

Страница 24: ...rn to a higher training load when you feel ready Unproductive Your training load is at a good level but your fitness is decreasing Your body may be struggling to recover so you should pay attention to...

Страница 25: ...x Your VO2 max estimate appears as a number and position on the color gauge Purple Superior Blue Excellent Green Good Orange Fair Red Poor VO2 max data and analysis is provided with permission from Th...

Страница 26: ...s The gauge indicates whether your current load is low high or within the optimal range to maintain or improve your fitness level The optimal range is determined based on your individual fitness level...

Страница 27: ...der scaling back the duration and frequency of your workouts About Training Effect Training Effect measures the impact of an activity on your aerobic and anaerobic fitness Training Effect accumulates...

Страница 28: ...recovery time recommendation uses your VO2 max estimate and may seem inaccurate at first The device requires you to complete a few activities to learn about your performance The recovery time appears...

Страница 29: ...Fair Red Untrained For more information see the appendix FTP Ratings page 69 Conducting an FTP Test Before you can conduct a test to determine your functional threshold power FTP you must have a paire...

Страница 30: ...me time and under the same conditions every day 1 Select My Stats Stress Score Measure 2 Stand still and rest for 3 minutes Turning Off Performance Notifications Performance notifications are turned o...

Страница 31: ...Garmin Connect settings select Performance Stats Training Status Resume Training Status TIP You should sync your device with your Garmin Connect account Personal Records When you complete a ride the d...

Страница 32: ...u can record and store locations in the device Marking Your Location Before you can mark a location you must locate satellites If you want to remember landmarks or return to a certain spot you can mar...

Страница 33: ...ormation Select Recent Finds to navigate to one of the last 50 locations you have found Select Select Search Area to narrow your search area 3 Select a location 4 Select Ride 5 Follow the on screen in...

Страница 34: ...ance and bearing from a marked location to a new location 1 Select Navigation Saved Locations 2 Select a location 3 Select the location information at the top of the screen 4 Select Project Location 5...

Страница 35: ...t View Map The device calculates your route and a map of the route appears TIP You can select to view an elevation plot of the route 7 Select Ride Creating and Riding a Round Trip Course The device ca...

Страница 36: ...urse 7 Select Ride Tips for Riding a Course Use turn guidance Course Options page 30 If you include a warmup select to begin the course and warm up as normal Stay away from your course path as you war...

Страница 37: ...bs on a course Before your ride you can view details about the climbs including when they occur average gradient and total ascent The climb categories based on length and gradient are indicated by col...

Страница 38: ...ct Navigation Map Map Theme Adjusts the appearance of the map for your ride type Map Themes page 32 Popularity Map Highlights popular roads or trails for your ride type The darker the road or trail th...

Страница 39: ...our route Calculation Method Sets the method used to calculate your route Lock on Road Locks the position icon which represents your position on the map onto the nearest road Avoidance Setup Sets the...

Страница 40: ...nds and family to follow your races and training activities in real time With LiveTrack course sharing you can also share your active course You can invite followers using email or social media allowi...

Страница 41: ...ty Tracking Emergency Contacts Your emergency contacts names and phone numbers appear Requesting Assistance Before you can request assistance you must enable GPS on your Edge device 1 Hold for five se...

Страница 42: ...fore you can start a GroupTrack session you must have a smartphone with the Garmin Connect app paired to your device Pairing Your Smartphone page 3 During a ride you can see the riders in your GroupTr...

Страница 43: ...motion it sounds an alarm and sends an alert to your connected smartphone Playing Audio Prompts on Your Smartphone Before you can set up audio prompts you must have a smartphone with the Garmin Connec...

Страница 44: ...or to the Garmin Express application on your computer before you can connect to a Wi Fi network 1 Select an option Download the Garmin Connect app and pair your smartphone Pairing Your Smartphone page...

Страница 45: ...2 Wet the electrodes and the contact patches on the back of the strap to create a strong connection between your chest and the transmitter 3 Wrap the strap around your chest and connect the strap hook...

Страница 46: ...y heart rate zones are calculated based on percentages of your maximum heart rate Fitness Goals Knowing your heart rate zones can help you measure and improve your fitness by understanding and applyin...

Страница 47: ...r on top of the wheel hub 2 Pull the strap around the wheel hub and attach it to the hook on the sensor The sensor may be tilted when installed on an asymmetrical hub This does not affect operation 3...

Страница 48: ...LED flashes green for five seconds to indicate activity after two revolutions 5 Take a 15 minute test ride and inspect the sensor and bands to ensure there is no evidence of damage About the Speed and...

Страница 49: ...our Power Zones page 42 Use range alerts to be notified when you reach a specified power zone Setting Range Alerts page 52 Customize the power data fields Adding a Data Screen page 51 Setting Your Pow...

Страница 50: ...wer meter connected using ANT technology to use cycling dynamics metrics For more information go to www garmin com performance data Using Cycling Dynamics Before you can use cycling dynamics you must...

Страница 51: ...s See the owner s manual for your Varia device for more information NOTE You may need to update the Edge software before pairing Varia devices Updating the Software Using Garmin Express page 57 Enabli...

Страница 52: ...elect an option To send a preset message select Send Preset and select a message from the list To send a text message select Start Conversation select the message contacts and enter the message text o...

Страница 53: ...e including the number of rides time distance and calories Select History Totals Deleting Data Totals 1 Select History Totals 2 Select an option Select to delete all data totals from the history Selec...

Страница 54: ...ice records points every second Recording points every second provides an extremely detailed track and uses more of the available memory For information about data averaging for cadence and power see...

Страница 55: ...you must empty the Trash folder to completely remove the files Disconnecting the USB Cable If your device is connected to your computer as a removable drive or volume you must safely disconnect your d...

Страница 56: ...eate a separate activity profile for training for racing and for mountain biking The activity profile includes customized data pages activity totals alerts training zones such as heart rate and speed...

Страница 57: ...fter five minutes of inactivity Using Auto Sleep page 53 Select Auto Features Auto Pause to change when the activity timer automatically pauses Using Auto Pause page 54 Select Auto Features Auto Scrol...

Страница 58: ...Data Screen 1 Select Activity Profiles 2 Select a profile 3 Select Data Screens 4 Select a data screen 5 Select Layout and Data Fields 6 Swipe left or right to change the layout 7 Select 8 Select an...

Страница 59: ...time the device records a specified value or interval For example you can set the device to alert you every 30 minutes 1 Select Activity Profiles 2 Select a profile 3 Select Alerts 4 Select an alert...

Страница 60: ...You can use the Auto Lap feature to mark the lap at a specific distance automatically This feature is helpful for comparing your performance over different parts of a ride for example every 10 miles...

Страница 61: ...running 1 Select Activity Profiles 2 Select a profile 3 Select Auto Features Auto Scroll 4 Select a display speed Starting the Timer Automatically This feature automatically detects when your device...

Страница 62: ...Settings Changing the Device Language page 56 Display Settings Select System Display Auto Brightness Automatically adjusts the backlight brightness based on the ambient light Brightness Sets the backl...

Страница 63: ...Tones Changing the Device Language Select System Language Time Zones Each time you turn on the device and acquire satellites or sync with your smartphone the device automatically detects your time zo...

Страница 64: ...must have a Garmin Connect account and you must download the Garmin Express application 1 Connect the device to your computer using the USB cable When new software is available Garmin Express sends i...

Страница 65: ...gulatory information such as identification numbers provided by the FCC or regional compliance markings as well as applicable product and licensing information 1 Select 2 Select System Regulatory Info...

Страница 66: ...rate monitor unsnap the module when not in use User Replaceable Batteries WARNING See the Important Safety and Product Information guide in the product box for product warnings and other important in...

Страница 67: ...e enough to remove 3 Remove the cover and the battery 4 Wait 30 seconds 5 Insert the new battery into the cover observing polarity NOTE Do not damage or lose the O ring gasket 6 Twist the cover clockw...

Страница 68: ...ashing the device is active and ready to send data Troubleshooting Resetting the Device If the device stops responding you may need to reset it This does not erase any of your data or settings Hold fo...

Страница 69: ...Turn off your smartphone and your device and turn them back on again Enable Bluetooth technology on your smartphone Update the Garmin Connect app to the latest version Remove your device from the Garm...

Страница 70: ...can manually calibrate the compass 1 Select System Calibrate Compass 2 Follow the on screen instructions Temperature Readings The device may display temperature readings that are higher than the actua...

Страница 71: ...se the remaining ascent when you are using an elevation target Assist Mode The current eBike assistance mode Avg HRR The average percentage of heart rate reserve maximum heart rate minus resting heart...

Страница 72: ...t and total descent for the current activity EPOC The amount of excess post exercise oxygen consumption EPOC for the current activity EPOC indicates the strenuousness of your workout ETA at Destinatio...

Страница 73: ...ent lap Lap Right Pwr Phase The average power phase angle for the right leg for the current lap Laps The number of laps completed for the current activity Lap Speed The average speed for the current l...

Страница 74: ...values for the current activity Speed Graph A line graph showing your speed for the current activity Step Time The time elapsed for the current workout step Sunrise The time of sunrise based on your...

Страница 75: ...ile 20 29 30 39 40 49 50 59 60 69 70 79 Superior 95 55 4 54 52 5 48 9 45 7 42 1 Excellent 80 51 1 48 3 46 4 43 4 39 5 36 7 Good 60 45 4 44 42 4 39 2 35 5 32 3 Fair 40 41 7 40 5 38 5 35 6 32 3 29 4 Poo...

Страница 76: ...a Power Meter Boulder CO VeloPress 2010 Heart Rate Zone Calculations Zone of Maximum Heart Rate Perceived Exertion Benefits 1 50 60 Relaxed easy pace rhythmic breathing Beginning level aerobic trainin...

Страница 77: ...ecessary you can manually enter your wheel circumference in the speed sensor settings The tire size is marked on both sides of the tire This is not a comprehensive list You can also measure the circum...

Страница 78: ...75 1890 24 1 1 4 1905 24 2 00 1925 24 2 125 1965 26 7 8 1920 26 1 1 0 1913 26 1 1952 26 1 25 1953 26 1 1 8 1970 26 1 40 2005 26 1 50 2010 26 1 75 2023 26 1 95 2050 26 2 00 2055 26 1 3 8 2068 26 2 10...

Страница 79: ...1938 650 x 23C 1944 650 35A 2090 650 38B 2105 650 38A 2125 700 18C 2070 700 19C 2080 700 20C 2086 700 23C 2096 700 25C 2105 700C Tubular 2130 700 28C 2136 700 30C 2146 700 32C 2155 700 35C 2168 700 38...

Страница 80: ......

Страница 81: ...support garmin com GUID D9E9CF32 5A89 4140 8B6A 0A61633E397F v4 August 2022...

Страница 82: ...VARIA REARVIEWRADARRTL515 RTL516 Owner sManual...

Страница 83: ...n concerning the use of this product Garmin the Garmin logo ANT Edge f nix Forerunner and v voactive are trademarks of Garmin Ltd or its subsidiaries registered in the USA and other countries Garmin C...

Страница 84: ...ing the Varia RDU Device 4 Pairing the Radar Device with the RDU Device 4 Turning On the Varia RDU Device 4 Turning Off the Varia RDU Device and Radar Device 4 Other Compatible Devices 4 Pairing the R...

Страница 85: ......

Страница 86: ...the device as high on the seat post as possible for optimal light visibility and radar detection NOTE The mount surface should be vertical The mounts are designed to accommodate most seat post angles...

Страница 87: ...5 minutes or until you press the device key 5 Select your sensor and select Add When the sensor is paired with your Edge device the sensor status is Connected The radar and bike light status icons ap...

Страница 88: ...p connects to your Varia radar device using Bluetooth technology The app displays radar information and enables you to view settings After pairing the app displays a colored banner indicating the thre...

Страница 89: ...d turn the device clockwise until it locks into place Pairing the Radar Device with the RDU Device The Varia RDU device can be paired with one radar device at a time 1 Hold the Varia RDU device key fo...

Страница 90: ...ice completely The status LED flashes green while charging The status LED is solid green when charging is complete 6 Remove the USB cable and close the weather cap Tips for Charging the Device Connect...

Страница 91: ...go to www garmin com waterrating Product Updates On your computer install Garmin Express www garmin com express This provides easy access to these services for Garmin devices Software updates Product...

Страница 92: ...uetooth technology from your smartphone settings and turn it back on Turn both devices off and turn them back on The Varia RTL515 RTL516 device sends light and radar data to the Varia app The Varia ap...

Страница 93: ...e 2 4 F f nix 5 Forerunner 5 G Garmin Express 6 updating software 6 GPS signal 2 I indoor training 6 installing 1 4 K keys 1 4 L light modes 1 M mounting the device 1 4 O O rings See bands P pairing 2...

Страница 94: ......

Страница 95: ...support garmin com GUID C41F445D 457F 447D 88C8 FE286BF157E9 v3 February 2021...

Отзывы: