You can purchase an approved Garmin AC-DC adapter
suitable for home or office use from a Garmin dealer or
Device Maintenance
Device Care
NOTICE
Avoid dropping your device.
Do not store the device where prolonged exposure to extreme
temperatures can occur, because it can cause permanent
damage.
Never use a hard or sharp object to operate the touchscreen, or
damage may result.
Do not expose the device to water.
Cleaning the Camera Lens
NOTICE
Do not use a dry cloth to clean the lens. Use of a dry cloth may
damage the lens.
Avoid chemical cleaners and solvents that can damage plastic
components.
You should clean the camera lens regularly to improve the
quality of recorded video.
1
Wipe the lens with a soft, non-scratch cloth dampened with
water or alcohol.
2
Allow the lens to air dry.
Cleaning the Outer Casing
NOTICE
Avoid chemical cleaners and solvents that can damage plastic
components.
1
Clean the outer casing of the device (not the touchscreen)
using a cloth dampened with a mild detergent solution.
2
Wipe the device dry.
Cleaning the Touchscreen
1
Use a soft, clean, lint-free cloth.
2
If necessary, lightly dampen the cloth with water.
3
If using a dampened cloth, turn off the device and disconnect
the device from power.
4
Gently wipe the screen with the cloth.
Avoiding Theft
• Remove the device and mount from sight when not in use.
• Remove the residue left on the windshield by the suction cup.
• Do not keep your unit in the glove compartment.
• Register your device at
Resetting the Device
You can reset your device if it stops functioning.
Hold the power key for 12 seconds.
Removing the Device, Mount, and Suction
Cup
Removing the Device from the Mount
1
Press the release tab or button on the mount.
2
Tilt the device forward.
Removing the Mount from the Suction Cup
1
Turn the device mount to the right or left.
2
Apply pressure until the socket on the mount releases the
ball on the suction cup.
Removing the Suction Cup from the Windshield
1
Flip the lever on the suction cup toward you.
2
Pull the tab on the suction cup toward you.
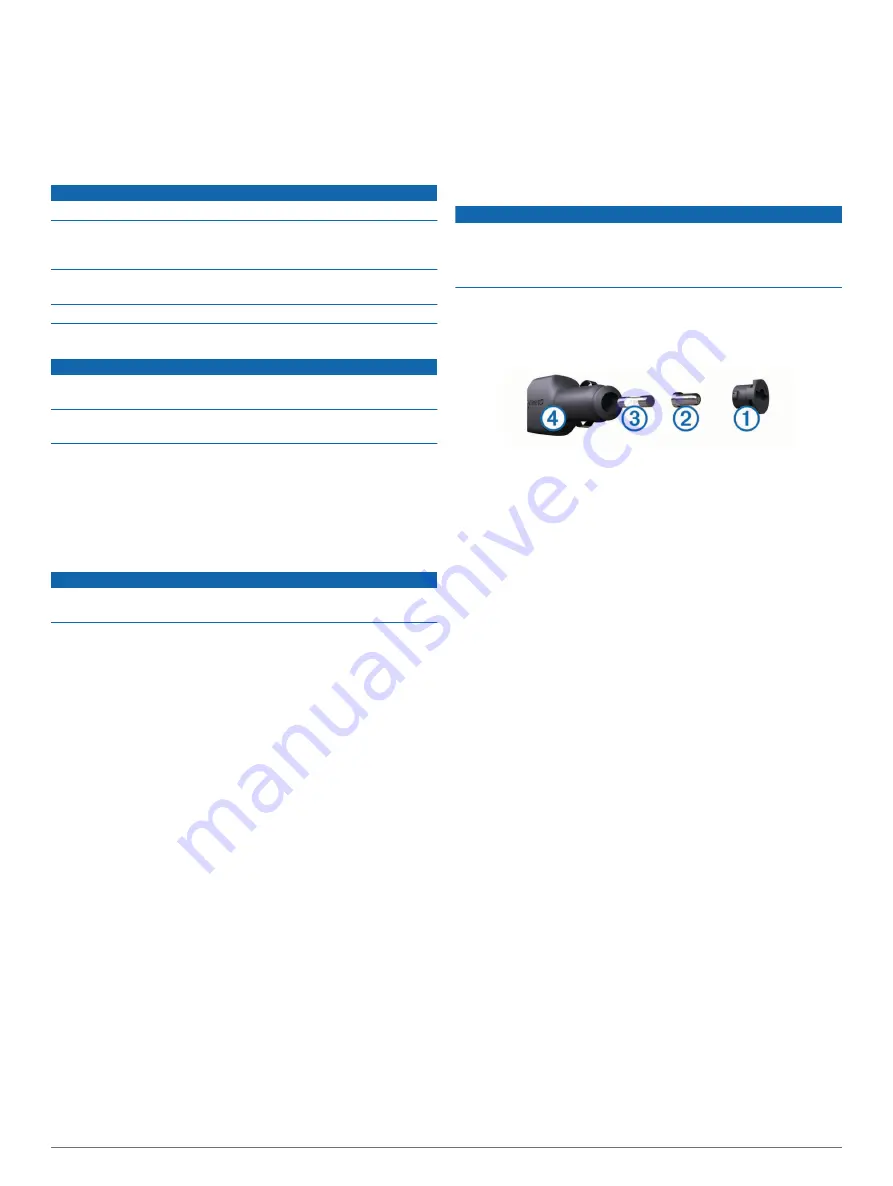
Changing the Fuse in the Vehicle Power
Cable
NOTICE
When replacing the fuse, do not lose any of the small pieces
and make sure they are put back in the proper position. The
vehicle power cable does not work unless it is assembled
correctly.
If your device does not charge in your vehicle, you may need to
replace the fuse located at the tip of the vehicle adapter.
1
Rotate the end piece
À
90 degrees counter clockwise to
unlock it.
TIP:
You may need to use a coin to remove the end piece.
2
Remove the end piece, the silver tip
Á
, and the fuse
Â
.
3
Insert a new fast-blow fuse that has the same current, such
as 1 A or 2 A.
4
Place the silver tip in the end piece.
5
Push in the end piece and rotate it 90 degrees clockwise to
lock it back into the vehicle power cable
Ã
.
Troubleshooting
My video recordings are blurry
• Clean the camera lens (
).
• Clean the windshield in front of the camera.
• Verify the area of the windshield in front of the camera is
cleared by the windshield wipers, and move the device, if
necessary.
My video recordings are choppy or
incomplete
• For the best camera and video results, use a high-quality
memory card with a speed rating of class 10 or higher.
A slower memory card may not record video quickly enough.
• If the device displays a memory card error alert, replace the
memory card (
Installing the Dash Camera Memory Card
).
• Update your device to the latest software (
and Software with Garmin Express
).
How can I extend the life of my camera
memory card?
All microSD memory cards wear out after they are overwritten a
large number of times. Because the dash camera records
continuously, you should replace the memory card occasionally
(
Installing the Dash Camera Memory Card
). Your device
detects memory card errors automatically and alerts you when it
is time to replace your memory card.
You can take these actions to help extend the life of the memory
card.
20
Device Maintenance
Содержание DriveAssist 50
Страница 1: ...Garmin DriveAssist 50 Owner s Manual February 2016 190 01923 00_0A...
Страница 29: ......


