manualshive.com logo in svg
background image

Document #  G_GHD_OM_PASTACUISINE_4607873 – 08/21

 15

PREVENTIVE MAINTENANCE Continued

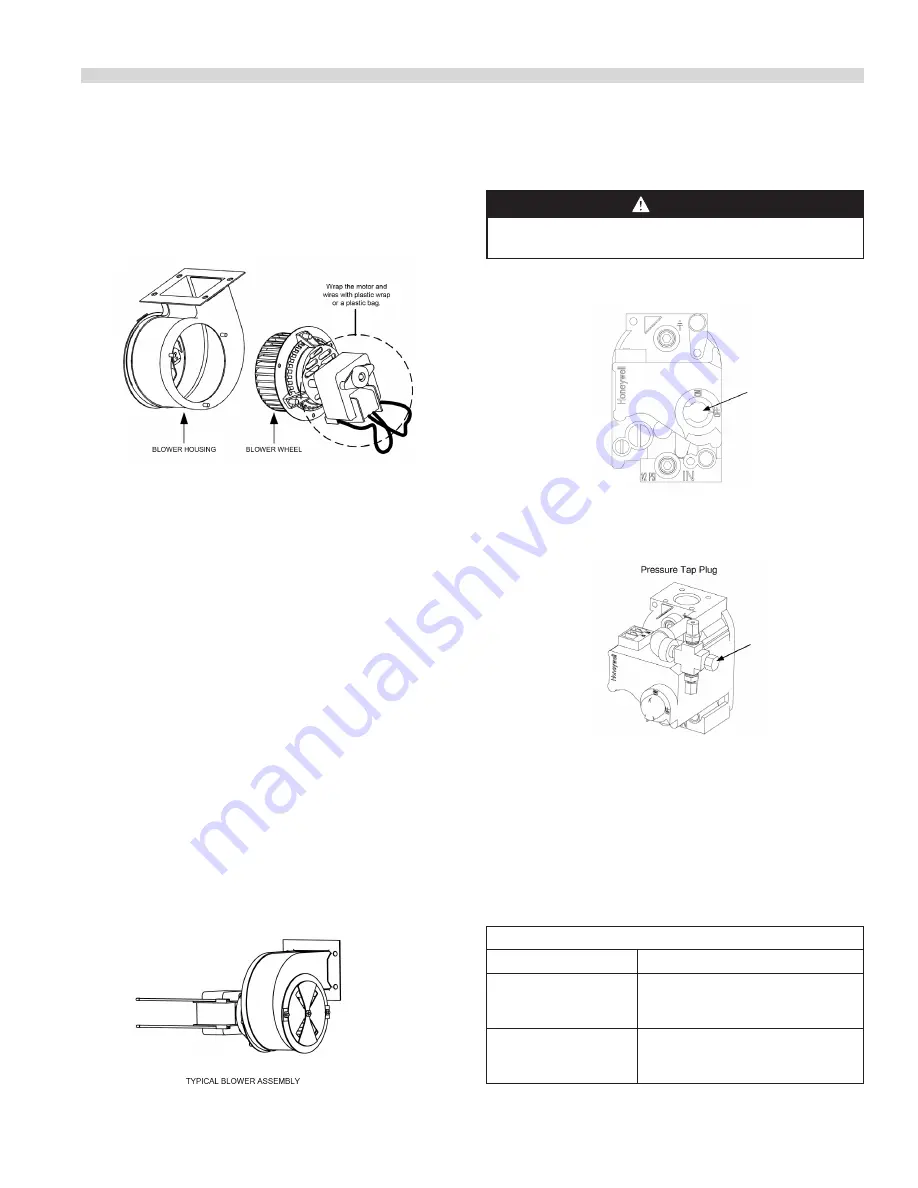
4.  Wrap the motor with plastic wrap to prevent water from 

entering it.  Spray degreaser or detergent on the blower 

wheel and the blower housing.  Allow it to soak for five 

minutes.  Rinse the wheel and housing with hot tap 

water, then dry with a clean cloth.

5.  Remove the plastic wrap from the blower motor 

assembly.  Reassemble the blower motor assembly and 

blower housing.  Reinstall the blower assembly in the 

cooker and reconnect the wires disconnected in Step 1.

4.  Reinstall the blower shield or shield assembly.

5.  Light the cooker in accordance with the procedure 

described in section - Operating Instructions.

6.  After the burners have been lit for at least 90 seconds, 

observe the flames through the burner view-ing ports.  

The air/gas mixture is properly adjusted when the burner 

manifold pressure is in accordance with the applicable 

table (Burner Gas Pressure- on this page) and the burners 

display a bright orange-red glow.  If a blue flame is 

observed, or if there are dark spots on a burner face, the 

air/gas mixture requires ad-justment.

On the side of the blower housing opposite the motor is 

a plate with one or two locking nuts.  Loosen the nut(s) 

enough to allow the plate to be moved, then adjust the 

position of the plate to open or close the air intake opening 

until a bright orange-red glow is obtained.  Carefully hold the 

plate in position and tighten the locking nut(s).

Adjusting the Burner Gas Pressure

 DANGER

Garland recommends that ONLY qualified service 

personnel perform this task.

1.  Ensure that the gas valve knob is in the 

OFF

 position.


2.  Remove the pressure tap plug from the gas valve 

assembly.

3.  Insert the fitting for a gas pressure-measuring device into 

the pressure tap hole

4.  Place the gas valve in the 

ON

 position.

5.  Place the power switch in the 

ON

 position.  When the 

burner has lit and burned steadily for at least one minute, 

compare the gas pressure reading to the pressure for the 

corresponding gas in the appropriate table below.

Burner Gas Pressure
Gas

Pressure

Natural

3” WC

.087 kPa

8.718 mbar

Propane

8.25” WC

2.05 kPa

20.55 mbar

Содержание PASTA MAGIC

Страница 1: ...nd web site at http www garland group com The information contained herein including design and parts specifications may be superseded and is subject to change without notice WARNING IMPROPER INSTALLA...

Страница 2: ...BUILDING OFFICIALS AND CODE ADMINISTRATORS INTERNATIONAL INC BOCA AND THE FOOD SERVICE SANITATION MANUAL OF THE FOOD AND DRUG ADMINISTRATION GARLAND PASTA COOKERS EQUIPPED WITH LEGS ARE FOR PERMANENT...

Страница 3: ...eparations 7 Connection to Gas Line 8 Converting to Another Gas Type 9 Operating Instructions 10 Finding Your Way Around the Pasta Cooker 10 Controller 11 Operating Instructions 12 Start up Procedure...

Страница 4: ...n addition to the model number serial number and type of gas please be prepared to describe the nature of the problem and have ready any other information that you think may be helpful in solving your...

Страница 5: ...gas fired appliances Qualified personnel must be experienced in such work be familiar with all gas precautions involved and have complied with all requirements of applicable national and local codes...

Страница 6: ...s defined in Section 1 5 of this manual should perform all installation and service on Garland equipment Conversion of this appliance from one type of gas to another should only be performed by qualif...

Страница 7: ...cooker door Connect a cooker only to the type of gas indicated on the rating plate Installation shall be made with a gas connector that complies with the national and local codes or regulations in fo...

Страница 8: ...egulatory agency of the country in which the appliance is installed 4 For units equipped with basket lifts install the basket lift arms onto the rods located at the top rear of the cabinet to ensure t...

Страница 9: ...ng to Another GasType DANGER Your cooker is configured at the factory for a specific type of gas If you desire to switch from one type of gas to another specific gas conversion components must be inst...

Страница 10: ..._PASTACUISINE_4607873 08 21 10 OPERATING INSTRUCTIONS FindingYourWay Around the Pasta Cooker Overflow Low water sensor High water sensor Temp probe Drain Cook pot Trouble light Controller Drain valve...

Страница 11: ...ces the efficiency of the cooker and can cause erroneous temperature and water level sensing NOTE Do not use deliming solution to clean these units Use of deliming solution will damage all stainless s...

Страница 12: ...hould display a bright orange red glow If a blue flame is observed or if there are dark spots on a burner face the air gas mixture requires adjustment as explained below NOTE Adjusting the Air Gas Mix...

Страница 13: ...r turn the unit off and add cold water until the solution is cool Drain the solution and clean the cookpot thoroughly with a solution of dishwashing detergent and hot water 5 Rinse the cookpot at leas...

Страница 14: ...water and or food products Clean Water Level Sensors Temperature Probe Cookpot and Rinse Tank 1 Turn the equipment off and drain the cookpot and rinse tank if so equipped 2 Remove the probe cover and...

Страница 15: ...display a bright orange red glow If a blue flame is observed or if there are dark spots on a burner face the air gas mixture requires ad justment On the side of the blower housing opposite the motor...

Страница 16: ...sing wire was removed 3 Place the power switch in the ON position to light the burners After the cookpot temperature reaches 2000F 930C wait at least one minute before checking the reading NOTE The cl...

Страница 17: ...Document G_GHD_OM_PASTACUISINE_4607873 08 21 17 THIS PAGE INTENTIONALLY LEFT BLANK...

Страница 18: ...the Welbilt KitchenCare HOTLINE 844 724 2273 Verify that electrical cords are plugged in and that circuit breakers are on Verify that water supply valves are open and that the drain valves are fully c...

Страница 19: ...es not sense sufficient water in the cookpot it will not allow the burners to fire B Remove the probe block cover and clean the sensors using a Scotchbrite or similar pad and a solution of detergent a...

Страница 20: ...oller If the AUTOFILL functions correctly the only cause possible is a failed controller A Order replacement controller from FASC or distributor WATER WILL NOT BOIL Cookpot verified to be full of wate...

Страница 21: ...Document G_GHD_OM_PASTACUISINE_4607873 08 21 21 Notes...

Страница 22: ...Document G_GHD_OM_PASTACUISINE_4607873 08 21 22 Notes...

Страница 23: ...Document G_GHD_OM_PASTACUISINE_4607873 08 21 23 THIS PAGE INTENTIONALLY LEFT BLANK...

Страница 24: ...therm Crem Delfield fitkitchen Frymaster Garland Kolpak Lincoln Manitowoc Merco Merrychef and Multiplex Bringing innovation to the table welbilt com 2021 Welbilt Inc except where explicitly stated oth...

Отзывы: