


III. PREPARATION AND USE
Remove all packaging materials and take out the grill with its accessories. Remove all
adhesive foils, stickers or paper from the grill. After the first putting into operation, set the
3
position and let an grill in operation with a window open for about 10 minutes, then turn
it off and let it cool down. Short mild emission of smoke is not a defect and is no reason for
complaint. After it has cooled down clean the parts that will come in contact with food using
hot water with detergent, thoroughly rinse with clean water and wipe dry, if necessary allow
to dry (see paragraph
V. MAINTENANCE
). Now the appliance is ready for use.
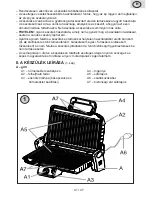
Grill opening
(Fig. 8, 9, 10)
Hold lid
A2
with handle
A4
and lift it off to the blocked position (about 50°), to the maximum
position and lift it off so that the grill is opened to the horizontal position (180°). In this
state you can prepare various kinds of food on each separate grill plate (e.g. sausages,
pancakes, fried eggs etc.). You can fold the grill by snapping the lid shut.
Changing the boards
(Fig. 2, 3, 4)
Press button
A7
and remove board
A5
by tilting. Insert the protrusions on the board to the
two openings in the coating and secure by tilting (you will hear a click sound)
IV. OPERATING INSTRUCTIONS
(Fig. 2 - 11)
Place the grill on a dry and even surface (e.g. kitchen table) at a height of at least 85 cm,
out of the reach of children. Insert the power plug
A6
into the power socket and check that
it does not lead under the grill or over any sharp or hot surfaces. The socket must be readily
accessible so that the appliance could be easily disconnected from the mains in case of
danger.. Set the control dial
A1
to the
1
or
2 or 3
position.
A red signaling light
A3
will come on, signaling connection to electric power supply. The
plates will start to heat. Allow the grill to heat up for approximately 10 minutes without
placing any food on it. When the operating temperature is reached, the green signaling
light
A3
will come ON. Place the food on grilling surface
A5
(preferably on its centre)
and snap the lid shut. The floating hinge automatically adapts height of the upper lid to
thickness/strength of food.
During grilling, you can push plates „slightly“ to each other using handle
A4
. Turn off the
grill by turning the temperature control dial
A1
to position
1
(and unplug supply cord
A6
from el. socket) a few minutes before finishing grilling because the hotplate is sufficiently
hot to complete the grilling of the food. Remove food using suitable wooden or plastic
turner.
Note
– Do not forget to place a small container (saucer or plate) under the drip channel of your
plates to collect any juices, oil and fat. that might run off.
– When the temperature is changed using the control dial
A1
during the course of grilling
it will take approx. 5 to 10 minutes for the hotplate to achieve the set temperature.
– Do not close the lid by excessive force!
– While heating the thermostat may cycle (the indicator light turns on and off). This is not
considered to be a defect.
i
GB
33
/ 47
Содержание GRI 660
Страница 52: ......


