GAR AC/DC 180. Instructions Manual.
13
Screw T should always be in place so as to
avoid deterioration in the equipment due to
negligence in the connection.
The connection to mains is made with the
input hose. This cable has three wires, two of which
are connected to the mains and the other (yellow,
with green border) must be connected to the earth
intake of the plug.
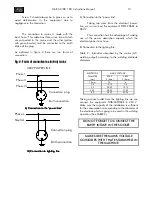
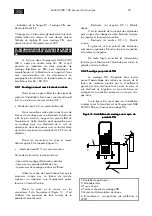
As indicated in figure 4 there are two forms of
connection:
Fig. 4. Forms of connection to electricity mains.
Fig. 4. Forms of connection to electricity mains.
Fig. 4. Forms of connection to electricity mains.
Fig. 4. Forms of connection to electricity mains.
Phase I
Connection plug
Phase II
Phase III
Earth connection
380V POWER LINE
A) Connection to the "power lines"
A) Connection to the "power lines"
A) Connection to the "power lines"
A) Connection to the "power lines"
Phase I
Neutral
Connection plug
Earth connection
B) Connection to lighting line
B) Connection to lighting line
B) Connection to lighting line
B) Connection to lighting line
A) Connection to the "power line".
Taking two wires from the electrical "power"
line, we can connect the equipment TWO-PHASE to
380 V.
This connection has the advantage of making
use of the power absorption capacity which the
electrical power lines have.
B) Connection to the lighting line.
Table 2.. Intensities absorbed by the mains (A.C.
welding output) according to the welding electrode
diameters.
ELECTRODE
MAINS VOLTAGE
DIAMETER
220V
380V
(mm)
I1 (Amp)
I1 (Amp)
1,5mm
10
6
2,0
12-14
7-8
2,5
20-23
12-13
3,25
30-35
17-20
4,0
38-42
22-24
Taking a socket outlet from the lighting line we can
connect the equipment SINGLE-PHASE to 220 V.
Make sure the capacity of the installation is sufficient
for the consumption corresponding to the diameter of
the electrode which is going to be used in the welding
operation. (See TABLE 2).
DO NOT FORGET TO CONNECT THE
EARTH INTAKE IN THE SOCKET.
MAKE SURE THE MAINS VOLTAGE
COINCIDES WITH THAT ESTABLISHED IN
THE MACHINE
.


