background image

ENGLISH

• 25 •

3 SAFETY 

STANDARDS

Never let live parts come into contact with 
water: short-circuit hazard! The superheated 
steam and hot water can cause scalding! 
Never direct the steam or the hot water jet 
towards body parts! Touch the steam /hot 
water nozzle carefully: scalding hazard!

Intended Use

-  Do not make technical changes and use the 

appliance inappropriately: damage/injury 
hazard!

-  This appliance is not intended for use by 

persons (including children) with reduced 
physical, sensory or mental capabilities, or 
lack of experience and knowledge, unless 
they have been given supervision or instruc-
tion concerning use of the appliance by a 
person responsible for their safety.

  Children should be supervised to ensure that 

they do not play with the appliance.

Power Supply

-  Connect the coffee maker to a suitable outlet 

only.

-  The voltage must match the one specifi ed 

on the nameplate of the appliance.

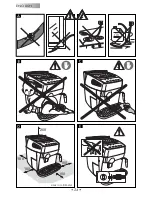
Power Supply Cord (Fig.A)

-  Never use the coffee maker if it has a faulty 

cord.

-  The defective cord must be replaced im-

mediately.

-  An authorized service centre must replace 

the defective cords and plugs immedi-
ately.

-  Do not let the cord touch sharp edges, very 

hot objects and oily surfaces.

-  Do not carry or pull the coffee maker by the 

cord.

-  Do not pull the cable to remove the plug, 

and do not touch the plug with wet hands 
or feet.

-  Avoid letting the cord dangle from tables or 

raised surfaces.

Preventing Injury (Fig.B)

-  Ensure that the machine is out of the reach 

of children.

  Children are not aware of the risks involved 

in electrical appliances.

-  Do not leave packing material near chil-

dren.

Scalding Hazard (Fig.C)

-  Do not direct the fl ow of the superheated 

steam and/or hot water towards yourself 
and/or others: 

scalding hazard!

-  Always use the correct handles or knobs.
-  Do not insert objects through the openings 

in the appliance.

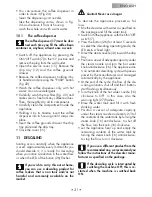
Space necessary to installation, usage, 
and maintenance. (Fig.D)

-  Place the machine on a fl at, even surface.
-  The machine must be positioned in a safe 

place where it cannot be knocked over or 
cause injury.

-  Choose a position that is well-lit, hygienic 

and where a wall socket is easily acces-
sible.

-  To prevent melting or damage to the casing, 

do not rest the machine on very hot surfaces 
or near open fl ames.

-  Place the coffee maker 10 cm away from 

walls and cooking tops.

-  Do not keep the machine at a temperature 

below 0°C; frost may damage the ma-
chine.

-  The wall outlet must be reachable at all 

times.

-  Do not use the coffee maker outdoors.

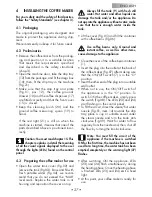
Cleaning (Fig.E)

-  Before cleaning the coffee maker, switch the 

ON/OFF switch (7) to “O”; then, remove 
the plug from the wall outlet.

-  Wait for the machine to cool down.
-  Never immerse the appliance in water! 

Avoid splashes.

Содержание SYNCRONY COMPACT

Страница 1: ...SYNCRONY COMPACT INSTRUCÇOES E MODO DE EMPREGO OPERATING INSTRUCTIONS ...

Страница 2: ...tar o revendedor ou o fabricante diretamente Estaremos à disposição para todos os esclarecimentos necessários Congratulations Congratulations on choosing this top quality espresso machine and many thanks you for you confidence in our products Before operating the machine we reccomend you read the following instructions thoroughly which explain how to use clean and maintain the machine For any othe...

Страница 3: ... 3 ...

Страница 4: ... 4 ...

Страница 5: ... 5 ...

Страница 6: ...r se a máquina expresso está na posição Off antes de inserir a ficha na tomada Para a desligar colocá la no Off e retirar depois a ficha da tomada 12 Ter muito cuidado durante a utilização do vapor GUARDAR AS PRESENTES INSTRUÇÕES DE USO CUIDADOS Qualquer intervenção de assistência com excepção das operações de limpeza e de manutanção normal deverá ser prestada por um centro de assistência autorizado...

Страница 7: ...pa Manter estas páginas abertas durante a leitura das instruções para o uso 1 2 Uso destas instruções para o uso Conservar estas instruções para o uso em um lugar seguro e anexá las à máquina para café se por acaso uma outra pessoa for utilizá la Para ulteriores informações ou no caso de problemas não examinados totalmente ou só de modo insuficiente nas presentes instru ções dirigir se aos Centros ...

Страница 8: ...PORTUGAL 8 100 100 250 100 100 Medida en Milímetros ...

Страница 9: ... por arestas pontiagudas sobre objectos muito quentes e protegê lo do óleo Não transportar ou puxar a máquina para café pelo fio Não retirar o plugue da tomada puxando o pelo cabo e não tocá lo com as mãos ou os pés molhados Evitar que o fio de alimentação caia livre mente de mesas ou estantes Protecção de outras pessoas Fig B Mantenha a máquina de café fora do alcan ce das crianças e assegure se qu...

Страница 10: ...os de assistência autorizados declina se qualquer responsa bilidade por eventuais danos Contra Incêndio Em caso de incêndio utilizar extintores com anidrido carbónico CO2 Não utilizar água ou extintor com pó DESCRIÇÃO COMPONENTES Fig 01 1 Porta café em grão 2 Tampa móvel porta café em grão con serva aroma 3 Botão regulação moagem 4 Botão regulação dose 5 Tampa doseador café em pó 6 Superfície apoi...

Страница 11: ...ncher com água potável fres ca Fig 04 o reservatório aconselha se de não superar a referência assinalada com o dizer MAX Recolocar o reservatório da água na sua sede apropriada e reposicio nar a tampa sobre o mesmo Colocar no reservatório 9 sempre e somente água fresca sem gás Água quente e também outros líquidos podem da nificar o reservatório e ou a máquina Não colocar a máquina em função sem águ...

Страница 12: ... em direcção a valores mais baixos A variação do grau de moagem será notado somente depois da preparação de três quatro cafés Usar misturas de café em grão para máquinas expresso Evitar utilizar graus de moagem em posições extremas Ex 1 16 nestes casos utilizar misturas de café diferen tes Conservar o café em lugar fresco em um recipiente hermeticamente fechado A moagem deve ser regulada caso o ca...

Страница 13: ...ntidade correcta de café em pó para inserir no doseador utilizar somente o medidor 19 fornecido junto com a máqui na Inserir um só medidor de café em pó por vez para obter dois cafés é obrigatório efectuar dois ciclos separados em sucessão um do outro Pressionar a tecla 22 para seleccionar a fun ção o led localizado na tecla acende se Levantar a tampa do doseador de café em pó Fig 13 Retirar com o...

Страница 14: ...te toda esta fase o led 25 lampeja Antes de emitir vapor esperar que o led verde de temperatura pronta 25 tenha se acendido de modo fixo isto está a indicar a obtenção da temperatura correcta de funcionamento Direccionar o tubo do vapor 14 em cima do recipiente recolhe gotas abrir o botão 16 Água quente vapor por alguns ins tantes para fazer sair a água residual do tubo do vapor em breve tempo come...

Страница 15: ... na posição O e retirar a ficha da tomada de corrente da parede Abrir a portinha de serviço 15 em seguida tirar o recipiente recolhe gotas 12 e con sequentemente a gaveta recolhe fundos Retirar o grupo distribuidor segurando o pela própria alça e pressionar a tecla indi cada pela escritura PUSH Fig 22 O grupo distribuidor pode ser lavado so mente com água quente sem detergente Lavar cuidadosamente ...

Страница 16: ...metros em função das exigências do utilizador Para programar as funções é obrigatório en trar na modalidade de programação agindo como segue Assegurar se que o interruptor geral 7 da máquina esteja na posição O e que o bo tão da água quente 16 esteja fechado Pressionar as teclas 23 e 25 e contempo raneamente ligar a máquina no interruptor geral 7 Deste modo entra se na modalidade de pro gramação d...

Страница 17: ...s necessárias para o uso correcto para as funções operativas e a manutenção cuidadosa do aparelho Estes conhecimentos e a observância das presentes instruções representam a premis sa para um uso sem perigo no pleno respei to da segurança em caso de funcionamento e manutenção do aparelho Desejando se ulteriores informações ou se surgissem pro blemas particulares que se pense que nas presentes instr...

Страница 18: ... preparar 2 cafés expressos LUZ VERDE 24 LAMPEJANTE EM MODO LENTO Máquina a preparar 1 café normal LUZ VERDE 24 LAMPEJANTE EM MODO VELOZ Máquina a preparar 2 cafés normais LUZ VERDE 25 FIXA Máquina com temperatura pronta para emissão do vapor LUZ VERDE 25 LAMPEJANTE Máquina em fase de aquecimento para emissão do vapor LUZ VERMELHA 26 LAMPEJANTE A máquina necessita de um ciclo de descalcificação Ef...

Страница 19: ...m grão vazio Encher o reservatório com café em grão e iniciar novamente o processo LED VERMELHO 28 LAMPEJANTE Gaveta fundos de café cheia Para que a luz lampejante vermelha se apague esvaziar a gaveta recolhedora de sed LED VERMELHO 21 FIXO Grupo distribuidor recipiente recolhe gotas portinha anterior não em posição correcta para o funcionamento da máquina Para que a luz de sinalização vermelha se...

Страница 20: ... e r p m i á t s e a n i u q á m a d o t i u c r i c O o i r á c l a c o d a n i u q á m a r a c i f i c l a c s e D e d o p o ã n r o d i u b i r t s i d o p u r g O o d a r i t e r r e s a d a r o f á t s e r o d i u b i r t s i d o p u r G o ã ç i s o p a h n i t r o p a r a h c e F a n i u q á m a r a g i L r o d i u b i r t s i d o p u r g O o ç i v e s e d o ã ç i s o p à e t n e m a c i t a...

Страница 21: ..._______ ____________________________________________________________ ____________________________________________________________ ____________________________________________________________ ____________________________________________________________ ____________________________________________________________ ____________________________________________________________ __________________________...

Страница 22: ...lways turn appliance OFF then plug cord into the wall outlet To disconnect turn switch to OFF then remove plug from wall outlet 12 Use extreme caution when using hot steam SAVE THESE INSTRUCTIONS CAUTION Any servicing other than cleaning and user maintenance should be performed by an authorized service centre Do not immerse base in water To reduce the risk of fire or electric shock do not disassemb...

Страница 23: ... appliance The figures referred to in the text can be found on the cover flap Keep these pages open when reading the instructions 1 2 Using this instruction book Keep these instructions in a safe place and hand them over to any other person who uses this coffee maker For additional information or for informa tion on topics not covered or inadequately covered in this book contact the authorized servi...

Страница 24: ...ENGLISH 24 100 100 250 100 100 sizes in millimeter ...

Страница 25: ...e cord Do not pull the cable to remove the plug and do not touch the plug with wet hands or feet Avoid letting the cord dangle from tables or raised surfaces Preventing Injury Fig B Ensure that the machine is out of the reach of children Children are not aware of the risks involved in electrical appliances Do not leave packing material near chil dren Scalding Hazard Fig C Do not direct the flow of ...

Страница 26: ...nguishers CO2 Do not use water or powder extinguishers DESCRIPTION OF PARTS See Fig 01 1 Coffee bean container 2 Coffee bean container cover aroma preserver 3 Grinding control knob 4 Dose control knob 5 Ground coffee doser cover 6 Drip plate for placing coffee cups 7 ON OFF switch 8 Water tank cover 9 Water tank 10 Coffee grounds drawer 11 Power cord 12 Drip tray plate 13 Height adjustable coffee ...

Страница 27: ...n its housing and reposition the cover on top Always fill the tank 9 with fresh still water Hot water and other liquids can damage the tank and or the appliance Do not operate the appliance without water make sure that there is enough water inside the tank Lift the cover Fig 05 and fill the container with coffee beans Fig 06 Use coffee beans only Ground and instant coffee as well as other items caus...

Страница 28: ...the grind when the coffee is not dispensed properly Coffee pours out too fast excessively coarse grind Set the knob on lower numbers Coffee drips out slowly and or not at all excessively fine grind Set the knob on higher numbers 6 ADJUSTING THE COFFEE DOSE FIG 11 You may select the quantity of coffee dose that you wish to grind The manufacturer sets an average dose in the factory To change the grou...

Страница 29: ...make the coffee press the desired coffee button 23 or 24 the selected button starts flashing see chapter 15 while the other switches off The dispensing cycle begins After carrying out the prebrewing cycle coffee will start to come out of the spout 13 The coffee will stop flowing automatically when the preset level is reached see par 7 3 You can interrupt the flow of coffee by pres sing the button 23 ...

Страница 30: ...owly with up down movements to make uniform frothing Fig 16 After using the steam for the desired time shut off the steam 16 The same system can be used to heat other beverages Clean the steam nozzle with a damp cloth Fig 17 9 1 Making coffee after using the steam function If you want to make more coffee immediately after steaming milk you must press the but ton again 25 During the transition peri...

Страница 31: ...e makers that is non toxic and or not harmful and commonly available on the market Caution Never use vinegar To descale the appliance proceed as fol lows Mix the descaler with water as specified on the package and fill the water tank Switch ON the appliance with the ON OFF switch 7 Press the button 26 for at least 5 seconds to select the descaling operating mode the LED emits a fixed light Direct the...

Страница 32: ... press the button 22 repeatedly up to when the correct number of lit buttons are displayed indicating the water hardness level Hardness 1 buttons 22 and 23 lit Hardness 2 buttons 22 23 and 24 lit Hardness 3 buttons 22 23 24 and 25 lit Hardness 4 buttons 22 23 24 25 and 26 lit The hardness index matches the 1 4 squares on the strip 12 2 Programming the rinsing cycle Immediately after switching ON t...

Страница 33: ...ting agreement legal contract or similar and that the information is not changed by any other document All the manufacturer s obligations and liabili ties are based on the relative sale contract that also specifies all warrantee terms and conditions The contractual warrantee terms and condi tions are not limited or extended based on this instruction book This instruction book contains information p...

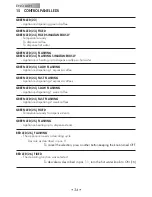
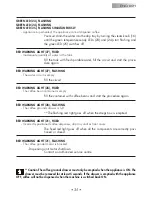
Страница 34: ...ED 23 FAST FLASHING Appliance dispensing 2 espresso coffees GREEN LED 24 SLOW FLASHING Appliance dispensing 1 weak coffee GREEN LED 24 FAST FLASHING Appliance dispensing 2 weak coffees GREEN LED 25 FIXED Temperature ready to dispense steam GREEN LED 25 FLASHING Appliance heating up to dispense steam RED LED 26 FLASHING The appliance needs a descaling cycle Descale as described in par 11 To cancel ...

Страница 35: ...offee bean container is empty Fill the container with coffee beans and start the procedure again RED WARNING LIGHT 28 FLASHING The coffee grounds drawer is full The flashing red light goes off when the dregs box is emptied RED WARNING LIGHT 21 FIXED Incorrectly positioned coffee dispenser drip tray and or front cover The fixed red light goes off when all the components are correctly posi tioned or c...

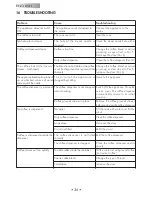
Страница 36: ... t i u c r i c e h T g n i l a c s y b d e g g o l c e c n a i l p p a e h t e l a c s e D d e m m a j s i r e s n e p s i d e e f f o c e h T d e p p a n s t o n s i r e s n e p s i d e e f f o c e h T g n i s u o h s t i o t n i e h t e s o l C e c n a i l p p a e h t N O h c t i w S r e s n e p s i d e e f f o c e h T r e v o c e c i v r e s l a i t i n i s t i o t s n r u t e r y l l a c i t a...

Страница 37: ...______________________ ____________________________________________________________ ____________________________________________________________ ____________________________________________________________ ____________________________________________________________ ____________________________________________________________ ____________________________________________________________ ___________...

Страница 38: ...______________________ ____________________________________________________________ ____________________________________________________________ ____________________________________________________________ ____________________________________________________________ ____________________________________________________________ ____________________________________________________________ ___________...

Страница 39: ...______________________ ____________________________________________________________ ____________________________________________________________ ____________________________________________________________ ____________________________________________________________ ____________________________________________________________ ____________________________________________________________ ___________...

Страница 40: ...COD 15001280 REV 00 DEL 15 07 07 TYPE SUP025Y GAGGIA S p A 20087 Robecco sul Naviglio MI Italia Tel 039 02 94 99 31 Fax 039 02 94 70 888 Internet www gaggia it E mail gaggia gaggia it ...

Отзывы: