1. HOW TO INSTALL THE SYSTEM
1-3
1.1.2
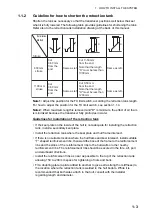
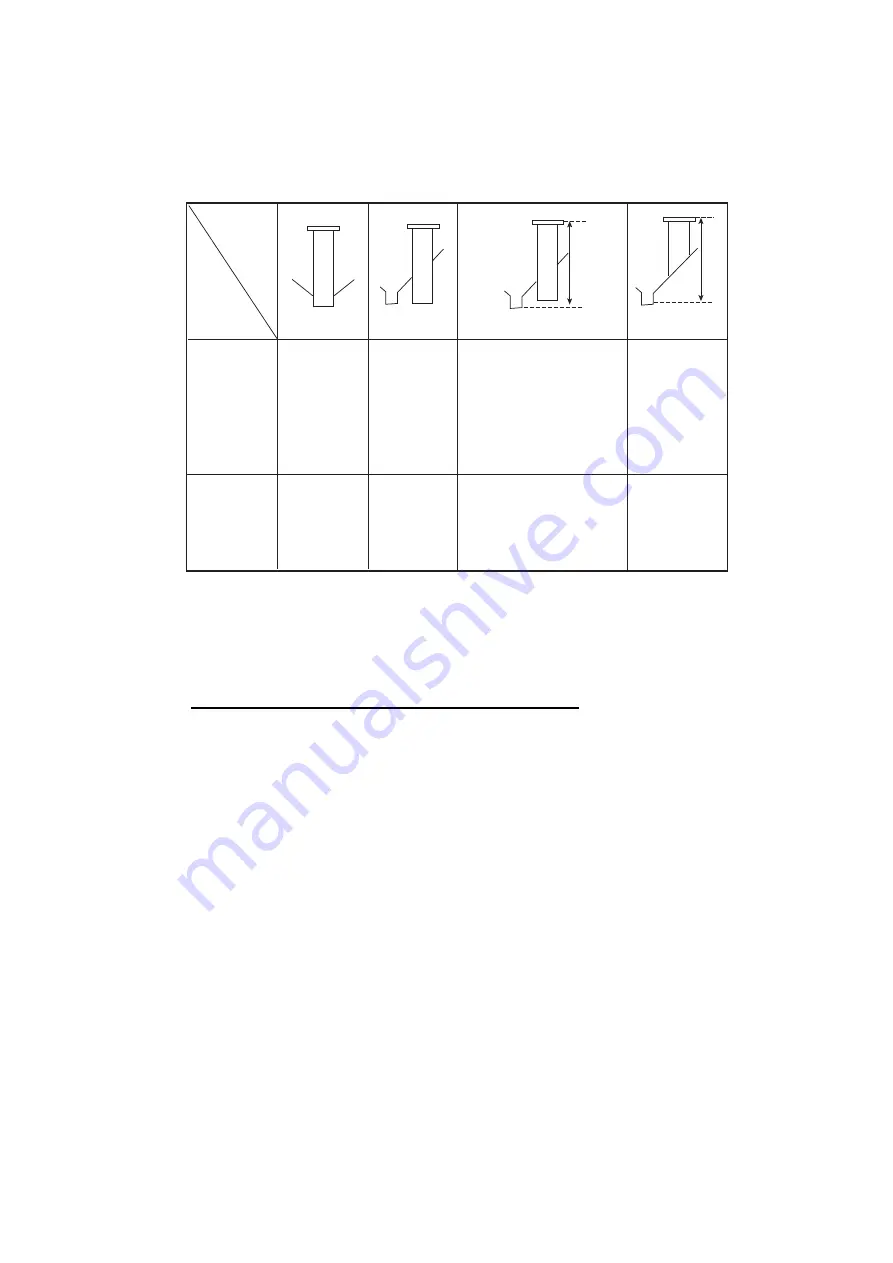
Guideline for how to shorten the retraction tank
Shorten the tank as necessary so that the transducer positions well below the keel
when it is fully lowered. The following table provides guidelines for shortening the tank.
Refer also to the retraction tank installation drawing at the back of this manual.
Note 1:
Adjust the position for the TX limit switch, according the retraction tank length.
For how to adjust the position for the TX limit switch, see section 1.1.4.
Note 2:
When maximum length is removed and "D" is minimum, the effect of air foam
is minimized because the transducer fully protrudes in water.
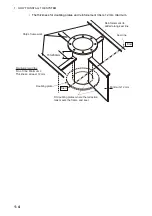
Guidelines for installation of the retraction tank
• If the keel plate on the inside of the hull is not adequate for installing the retraction
tank, install a secondary keel plate.
• Install the retraction tank where the keel plate and hull frame intersect.
• If there is no suitable location where the hull frame and keel intersect, install suitable
“T” shaped reinforcement ribs, then weld the base of the frame to the reinforcement
ribs and the sides of the reinforcement ribs to the hull walls or other nearby
reinforcement ribs. The reinforcement ribs should be secured in the fore, aft, port
and starboard directions.
• Install the reinforcement ribs as near as possible to the top of the retraction tank,
allowing 150 to 200 mm space for tightening of nuts and bolts.
• Fit a doubling plate (a plate added to another to give extra strength or stiffness) to
the location where the retraction tank is welded to the hull bottom. While it is
recommended that both sides attach to the hull, consult with the installer
regarding length and diameter.
Cut 0-50 mm
from the end.
Note that the length
"D" must be less than
1200 mm.
Cut 0-50 mm
from the end.
Note that the length
"D" must be less than
1000 mm.
Same as left.
Same as left.
Cut
0-50 mm
from the
end.
Cut
0-50 mm
from the
end.
800 mm
stroke
Stroke
D
D
Installation
Method
1100 mm
stroke
Same as left.
Same as left.
Содержание FSV-85-MARK-2
Страница 34: ...1 HOW TO INSTALL THE SYSTEM 1 26 This page is intentionally left blank ...
Страница 58: ...2 WIRING 2 24 This page is intentionally left blank ...
Страница 86: ...D 1 7 Jul 2021 H MAKI ...
Страница 87: ...D 2 7 Jul 2021 H MAKI ...
Страница 88: ...D 3 7 Jul 2021 H MAKI ...
Страница 89: ...D 4 7 Jul 2021 H MAKI ...
Страница 90: ...D 5 7 Jul 2021 H MAKI ...
Страница 91: ...D 6 7 Jul 2021 H MAKI ...
Страница 92: ...22 Apr 2014 H MAKI D 7 ...
Страница 93: ...D 8 24 Jun 2021 H MAKI ...
Страница 94: ...D 9 24 Mar 2021 H MAKI ...
Страница 95: ...D 10 24 Jun 2021 H MAKI ...
Страница 96: ...D 11 24 Jun 2021 H MAKI ...
Страница 98: ...D 13 17 Feb 2021 H MAKI ...
Страница 99: ...28 Apr 2018 H MAKI D 14 ...
Страница 100: ...D 15 13 Sep 2011 Y NISHIYAMA ...
Страница 101: ...D 16 13 Sep 2011 Y NISHIYAMA ...
Страница 102: ...D 17 13 Sep 2011 Y NISHIYAMA ...


