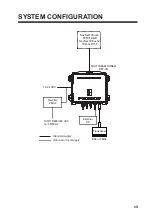


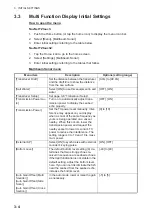
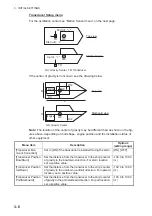

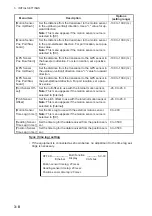


2. WIRING
2-6
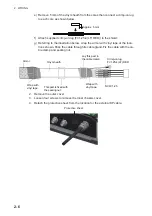
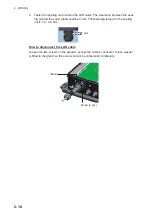
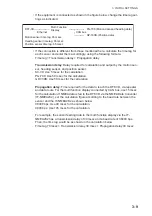
e) Remove 5 mm of the vinyl sheath from the cores then connect a crimp-on lug
to each core as shown below.
f) Attach supplied crimp-on lug (FV1.25-4(LF) RED)) to the shield.
g) Referring to the illustration below, wrap the armor with vinyl tape at the loca-
tions shown. Pass the cable through its cable gland. Fix the cable with the ca-
ble clamp and sealing nut.
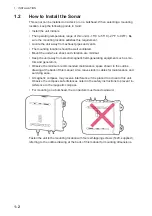
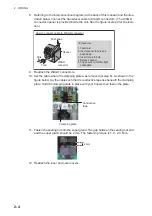
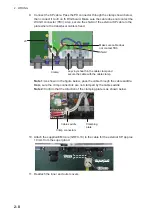
2. Remove the outer cover.
3. Loosen four screws to remove the inner chassis cover.
4. Detach the protective sheet from the location for the external KP cable.
Approx. 5 mm
This part is fixed with
the sealing nut.
Lay this part in
the cable clamp.
Armor
Vinyl sheath
NCW-1.25
Wrap with
vinyl tape.
Wrap with
vinyl tape.
Crimp-on lug
FV1.25-4(LF) RED
Protective sheet
Содержание DFF-3D
Страница 1: ...MULTI BEAM SONAR DFF 3D OPERATOR S MANUAL www furuno com Model ...
Страница 10: ...SYSTEM CONFIGURATION viii This page is intentionally left blank ...
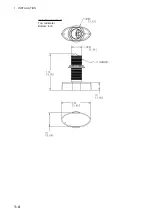
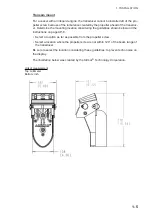
Страница 14: ...1 INSTALLATION 1 4 Unit of measurement Top millimeter Bottom inch ...
Страница 16: ...1 INSTALLATION 1 6 This page is intentionally left blank ...
Страница 36: ...3 INITIAL SETTINGS 3 10 This page is intentionally left blank ...
Страница 54: ...4 OPERATION 4 18 This page is intentionally left blank ...
Страница 68: ...APPENDIX 4 INSTALLATION OF TRANSDUCER TM54 AP 12 This page is intentionally left blank ...
Страница 71: ...D 1 20 Sep 2016 H MAKI 20 Sep 2016 H MAKI 20 Sep 2016 H MAKI 20 Sep 2016 H MAKI ...
Страница 74: ...INDEX IN 2 Z Zoom display 4 8 ...


