

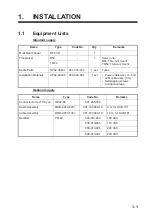
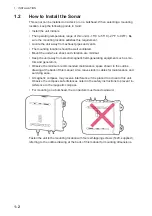


2. WIRING
2-3
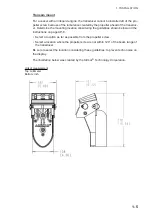
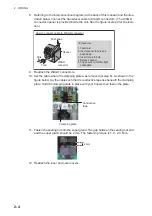
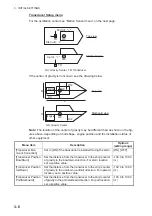
4. Detach three WAGO connectors, TB1, TB2, TB3.
5. Unfasten the sealing nut from the super gland for the transducer cable.
6. Unfasten two screws to remove the clamping plate for the transducer cable.
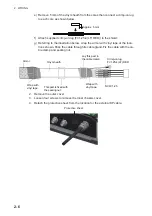
7. Pass the transducer cable through the sealing nut (unfastened at step 5), then
pass the cable through the super gland and into the unit.
WAGO connector
opener
WAGO connector
TB1
TB2
TB3
Super gland
Sealing nut
Unfasten these screws to
remove the clamping plate.
Содержание DFF-3D
Страница 1: ...MULTI BEAM SONAR DFF 3D OPERATOR S MANUAL www furuno com Model ...
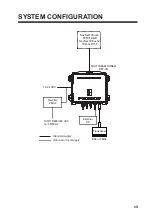
Страница 10: ...SYSTEM CONFIGURATION viii This page is intentionally left blank ...
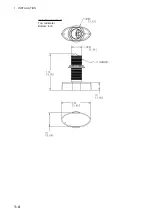
Страница 14: ...1 INSTALLATION 1 4 Unit of measurement Top millimeter Bottom inch ...
Страница 16: ...1 INSTALLATION 1 6 This page is intentionally left blank ...
Страница 36: ...3 INITIAL SETTINGS 3 10 This page is intentionally left blank ...
Страница 54: ...4 OPERATION 4 18 This page is intentionally left blank ...
Страница 68: ...APPENDIX 4 INSTALLATION OF TRANSDUCER TM54 AP 12 This page is intentionally left blank ...
Страница 71: ...D 1 20 Sep 2016 H MAKI 20 Sep 2016 H MAKI 20 Sep 2016 H MAKI 20 Sep 2016 H MAKI ...
Страница 74: ...INDEX IN 2 Z Zoom display 4 8 ...


