background image

15

EN

Real Time Tape Counter

• This shows the elapsed recording or playback time in 

hours, minutes, and seconds on screen. (Nothing is shown 
in the case of blank portion.)

• The “ – ” indication will appear when the tape is rewound 

further than the tape counter position “0:00:00”.
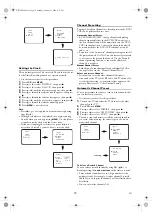
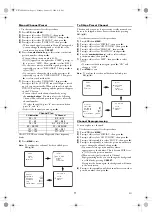
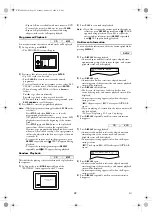
Timer Recording

You may programme the DVD/VCR to start and end a 
recording while you are away. You can set 8 programmes to 
record on specific days, daily or weekly within a 1-year period.

• Use the remote control for this procedure.
• Insert a cassette tape with its erase-prevention tab in place. 

(If necessary, rewind or fast forward the tape to the point at 
which you want to begin recording.)

1)

Press 

VCR

, then 

MENU

.

2)

Press 

K

 or 

L

 to select “TIMER”, then press 

B

.

Note:

If you have not set the clock yet, “CLOCK” setting 
menu appears. If so, follow the steps outlined in the 
“Setting the Clock”. Then, set the timer.

• When  you  press 

B

 after pressing 

K

 or 

L

 during steps 

3)

 to 

9)

, the input mode will move to the next step.

• If you do not press 

B

 within 5 seconds of setting an item, 

the input mode will move to the next step.

• Press 

s

 to go back one step from the current setting during 

steps 

4)

 to 

9)

. If 

s

 is pressed when the TIMER NUMBER 

is flashing, the entire programme contents will be erased.
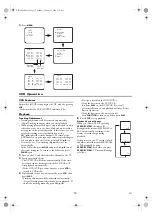
3)

Programme number flashes. Press 

K

 or 

L

 repeatedly until 

the desired programme number appears. Then, press 

B

.

4)

For once-only recording 

: Press 

K

 or 

L

 repeatedly until 

the relevant month appears. 

For daily recording

 : To record a TV programme at the 

same time on the same channel from Monday through 
Friday. While the month digit is flashing, press 

K

 or 

L


repeatedly to select “MO-FR”.

For everyday recording

 : To record a TV programme at 

the same time on the same channel everyday. While the 
month digit is flashing, press 

K

 or 

L

 repeatedly to select 

“MO-SU”.

For weekly recording

 : To record a TV programme at the 

same time on the same channel every week. While the 
month digit is flashing, press 

K

 or 

L

 repeatedly to select 

“W-MO” (example: every monday).
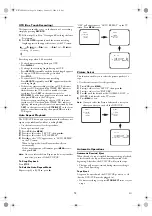
5)

For once-only recording only

 : Press 

K

 or 

L

 repeatedly 

until your desired day appears.

6)

Press 

K

 or 

L

 repeatedly until the relevant start hour 

appears. Next, enter the minute digit.

7)

Press 

K

 or 

L

 repeatedly until the relevant end hour 

appears. Next, enter the minute digit.

8)

Press 

K

 or 

L

 repeatedly until the relevant channel number 

appears.

9)

Press 

K

 or 

L

 repeatedly until the desired tape speed 

appears.

10)

Press 

B

. Programme 1 is now completed.

•To set another timer programme, repeat steps 

3)

 to 

10)

.

11)

Press 

MENU

 to exit.

12)

Press 

T-SET

 to activate a timer recording.

The VCR goes into timer-standby mode.


To Stop a Timer Programme Which Has Already 
Started

Press 

STOP/EJECT

 on the DVD/VCR.

Note: STOP

 on the remote control will not function in the  

Timer Recording mode.

To Correct Timer Programmes

If the unit is already in timer standby mode, press 

STOP/EJECT

 on the unit or 

T-SET 

to exit from the standby 

mode.

1)

Repeat steps 

1)

 to 

3)

 in the “Timer Recording”.

2)

Select the setting you want to change using 

B

 or 

s

.

3)

Enter the correct numbers using 

K

 or 

L

, then press 

B

.

4)

Press 

MENU

 to exit.

5)

Press 

T-SET

 to return to timer standby mode.

To Cancel or Check the Start/End Time

If the unit is already in timer standby mode, press 

STOP/EJECT

 on the unit or 

T-SET

 to exit from the standby 

mode.

1)

Repeat steps 

1)

 to 

2)

 in the “Timer Recording”.

2)

Select a programme number you want to check using 

K

 or 

L

. The details of selected programme appears on the TV 

screen. You may cancel the entire programme by pressing 

s

.

3)

Press 

MENU

 to exit.

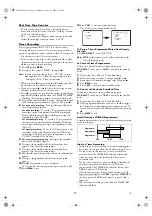
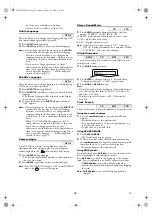
Avoid Overlap of TIMER Programmes...

A timer programme does not work while another programme 
is under execution.

Hint for Timer Recording

• If either there is a power failure or this unit is unplugged for 

more than 30 seconds, clock and all timer settings are lost.

• If a tape is not in this unit or does not have the erase-

prevention tab, the TIMER REC indicator flashes and 
timer recording cannot be performed. Please insert a 
recordable tape.

• If a tape runs out before a timer recording is finished, the 

unit ejects the tape and switches into DVD mode 
automatically. The TIMER REC indicator flashes. Press 

T-SET

 to activate VCR function.

• Once the unit goes into Timer- standby mode, no VCR 

functions are available until 

T-SET

 is pressed. (

OUTPUT

 on 

the front panel and 

VCR

 on the remote control will not 

function.)

• When all timer recordings are finished, the TIMER REC 

indicator will flash.
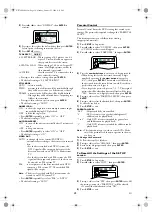
MENU

TIMER
SET UP
INITIAL

TIMER NUMBER      1

START
END

DATE

CHANNEL
SPEED

--/--
--:--

--:--

--
--

9:00

10:00

11:00

Programme 1

Programme 2

Programme 3

H9779ED(EN).fm  Page 15  Monday, October 25, 2004  4:21 PM

Содержание DDVR-5505V

Страница 1: ...various drivers manuals software etc are available for free download 3 Before calling please have valid proof of purchase model type serial number and a precise description of the problem ready Servi...

Страница 2: ...in a fire or electric shock 6 Never spill liquid on this unit If liquid is spilled and penetrates into the unit consult qualified service personnel 7 Use this unit in a horizontal flat position only 8...

Страница 3: ...R6 AA batteries RF cable Scart cable Owner s Manual Timer Recording 15 Auto Return 16 Quick Find 16 Index Search 16 Time Search 16 Copying a Video Tape 17 Status Display 17 DVD Operation 18 Basic Pla...

Страница 4: ...sound recorded on the high density Super Audio CD layer cannot be delivered Any other discs without compatibility indications Important Copyright Information DVD Unauthorized copying broadcasting publ...

Страница 5: ...ck Press and hold this button for 1 5 seconds or more to search backward through the disc 15 CHANNEL VCR To change TV channels To adjust the tracking manually during playback 16 Remote Sensor 17 TIMER...

Страница 6: ...tions 23 g To search forward through the disc DVD To fast forward the tape VCR 24 PLAY To begin playback 25 DVD Press this button before using the remote control for DVD features 26 PAUSE To pause pla...

Страница 7: ...our TV conforms to RGB input signal the Euro AV scart connection ensures you the best picture and audio quality However if your TV does not conform to RGB input signal the S VIDEO OUT and ANALOG AUDIO...

Страница 8: ...ows you to enjoy the surround sound while producing the effecting of being in a movie theater or a concert hall If output is Dolby Digital encoded audio connect to a Dolby Digital decoder and set DOLB...

Страница 9: ...Use the remote control for this procedure 1 Press VCR then MENU 2 Press K or L to select INITIAL then press B 3 Press K or L to select LANGUAGE then press B 4 Press K or L repeatedly to select your d...

Страница 10: ...ned channels Use the Manual channel presetting function to tune in the additional channels you require Manual Channel Preset Each channel is tuned manually and individually Follow the steps laid out i...

Страница 11: ...essing CH K L Use the remote control for this procedure 1 Press VCR then MENU 2 Press K or L to select INITIAL then press B 3 Press K or L to select CH TUNING then press B 4 Press K or L to select MAN...

Страница 12: ...tch to VCR mode 3 If playback does not start automatically press VCR then press PLAY Tracking adjustment will be activated automatically Digital Tracking function when you start playback To adjust the...

Страница 13: ...number buttons or CH K L to select the channel to be recorded 3 Press SPEED SYSTEM to select the tape speed SP LP 4 Press REC OTR to begin recording The REC indicator on the front panel comes on 5 Pre...

Страница 14: ...B 3 Press K or L to select AUTO REPEAT 4 Press B so that ON appears next to AUTO REPEAT on the TV screen When in Stop mode Auto Repeat mode will start automatically If the on screen menu still remains...

Страница 15: ...atedly until the relevant end hour appears Next enter the minute digit 8 Press K or L repeatedly until the relevant channel number appears 9 Press K or L repeatedly until the desired tape speed appear...

Страница 16: ...d if PAUSE is pressed and released during recording The time gap between index marks on the tape should be greater than 1 minute for SP recording and 2 minutes for LP recording Use the remote control...

Страница 17: ...ate copyright laws and may not record clearly Status Display To check the Counter or Clock Channel number press DISPLAY Each time you press DISPLAY TV screen will change as illustrated When you select...

Страница 18: ...deliver the picture or the sound This is not a malfunction Disc Menus 1 Press MENU The DVD main menu will appear 2 If the feature is not available symbol may appear on the TV screen 3 If disc menu is...

Страница 19: ...Refer to page 24 Fast Forward Reverse Search 1 During playback press g or h repeatedly to select the required forward or reverse speed For DVDs and Video CDs fast forward or reverse search speed is d...

Страница 20: ...d angle will be displayed on the display bar at the top of the screen 2 Press ANGLE repeatedly to select your desired angle Note If the ANGLE ICON setting is OFF in the DISPLAY menu the icon will not...

Страница 21: ..._ _ _ _ _ _ _ appears in the display 3 When you reach the desired point press ENTER The Title or Track and elapsed time will appear on the TV screen 4 To return to a marker later press SEARCH MODE re...

Страница 22: ...creen 2 Press PLAY to start random playback Note If you like to repeat the current track in the random selections press REPEAT repeatedly until TRACK appears during playback If you like to repeat the...

Страница 23: ...ting Choose the appropriate audio settings for your equipment It only affects during the playback of DVDs 1 Press SETUP in Stop mode 2 Press s or B to select CUSTOM then press ENTER CUSTOM mode screen...

Страница 24: ...R repeatedlly to select PAL or AUTO The default setting is AUTO Parental Control Parental Control limits the DVD viewing that exceeds your settings The password is required to change the PARENTAL LEVE...

Страница 25: ...Malayalam 5958 Maltese 5966 Maori 5955 Marathi 5964 Moldavian 5961 Mongolian 5960 Nauru 6047 Nepali 6051 Norwegian NOR 6061 O R Occitan 6149 Oriya 6164 Oromo Afan 6159 Panjabi 6247 Pashto Pushto 6265...

Страница 26: ...remote control Aim the remote control directly at the sensor on the front panel Reduce the distance to this unit Replace the batteries in the remote control Re insert the batteries with their polarit...

Страница 27: ...ntistatic spray intended for analogue records Cleaning the disc lens After prolonged use dirt or dust may accumulate at the disc lens To ensure good playback quality clean the disc lens with CD Lens C...

Страница 28: ...irective 89 336 EEC Low Voltage Directive 73 23 EEC CE Marking 93 68 EEC We declare that the following product DVD VCR Model DDVR 5505V Trade Name Funai is in compliance with following Regulations EN...

Отзывы: