background image

TX100 S2

Service Supplement

43

Replacement routines

Ê

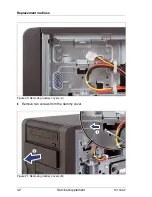
Push out the dummy cover using a screwdriver as shown (1).

Ê

Pull the dummy cover out of the chassis and remove it (2).

4.1.6.2

Installing dummy covers

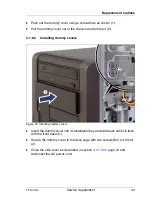
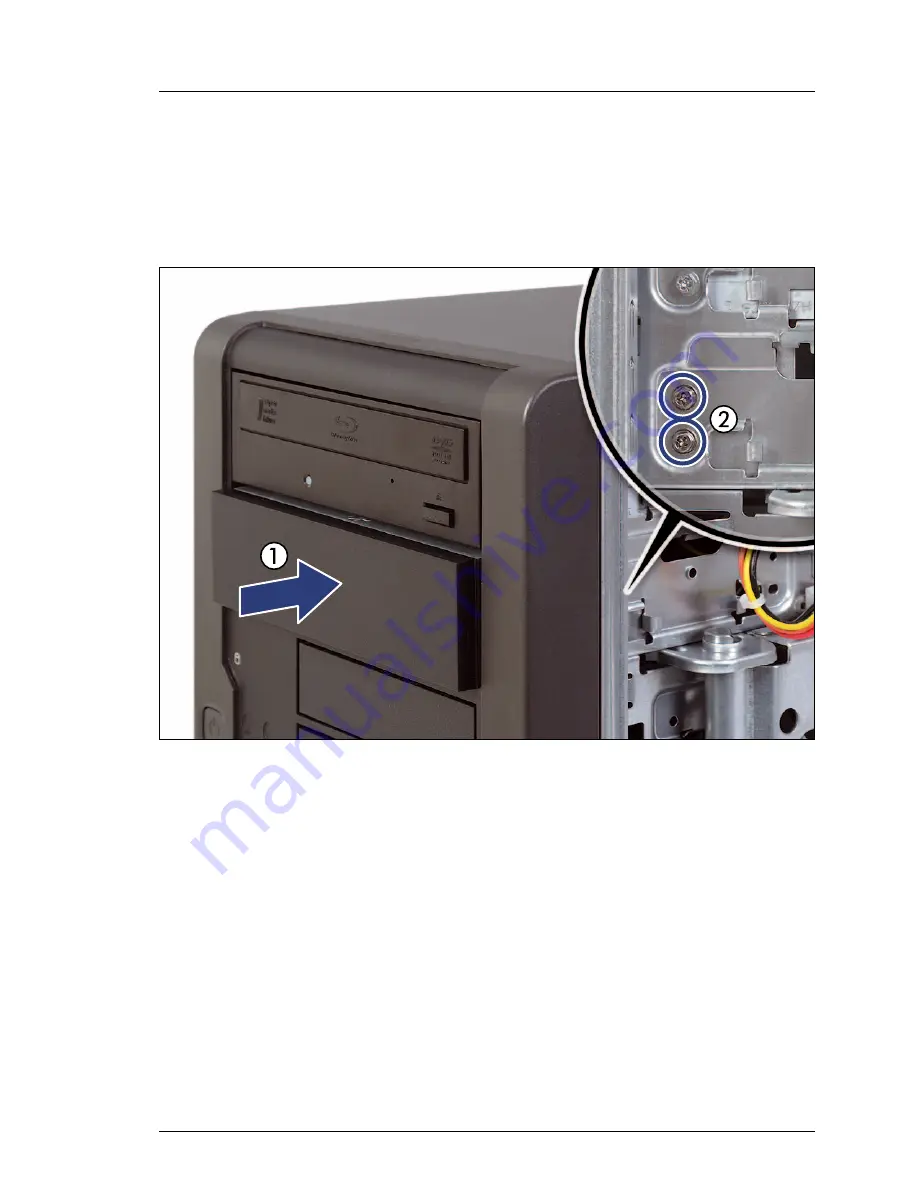
Figure 22: Installing dummy covers

Ê

Insert the dummy cover into its installation bay and slide back until it is flush 
with the front bezel (1).

Ê

Secure the dummy cover to the drive cage with two screws (M3 x 4.5 mm) 
(2).

Ê

Close the side cover as described in section 

4.1.1.2 on page 24

 and 

reconnect the AC power cord.

Содержание PRIMERGY TX100 S2

Страница 1: ...Service Supplement English PRIMERGY TX100 S2 Server Service Supplement Edition July 2010 ...

Страница 2: ... Copyright and Trademarks Copyright 2010 Fujitsu Technology Solutions GmbH All rights reserved Delivery subject to availability right of technical modifications reserved All hardware and software names used are trademarks of their respective manufacturers The contents of this manual may be revised without prior notice Fujitsu assumes no liability for damages to third party copyrights or other righ...

Страница 3: ... assemblies and in the mouse and keyboard are limited life components Use of these components beyond their operating life may result in electrolyte leakage or depletion potentially causing emission of foul odor or smoke As a guideline in a normal office environment 25 C operating life is not expected to be reached within the maintenance support period 5 years However operating life may be reached ...

Страница 4: ...omputer issued by JEITA the Japan Electronics and Information Technology Industries Association Technology controlled by the Foreign Exchange and Foreign Trade Control Law of Japan Documents produced by Fujitsu may contain technology controlled by the Foreign Exchange and Foreign Trade Control Law of Japan Documents which contain such technology should not be exported from Japan or transferred to ...

Страница 5: ...TX100 S2 Service Supplement Only for the Japanese market I Although described in this manual some sections do not apply to the Japanese market These options and routines include USB Flash Module UFM ...

Страница 6: ......

Страница 7: ...he HDD cage 25 4 1 2 2 Closing the HDD cage 27 4 1 3 Opening and closing the front bezel 28 4 1 3 1 Removing the front bezel 28 4 1 3 2 Installing the front bezel 31 4 1 4 Removing or installing the air duct 33 4 1 4 1 Removing the air duct 33 4 1 4 2 Installing the air duct 37 4 1 5 Replacing accessible drives 39 4 1 5 1 Removing accessible drives 39 4 1 5 2 Installing accessible drives 40 4 1 6 ...

Страница 8: ...ves 67 4 6 Replacing fans 72 4 6 1 Replacing the front fan module system fan 1 72 4 6 2 Replacing the rear fan module system fan 2 80 4 7 Replacing the processor 85 4 7 1 Removing the processor heat sink 85 4 7 2 Replacing the processor 88 4 7 3 Installing the processor heat sink 94 4 8 Replacing the system board 96 4 9 Replacing the Trusted Platform Module TPM 104 4 10 Replacing the USB Flash Mod...

Страница 9: ...0 series and budget options to choose from the PRIMERGY TX100 S2 offers an excellent price performance ratio Zero Watt power consumption in off mode and power supply unit PSU with 88 energy efficiency Benefit from Fujitsu s pioneering experience in Green IT save money and minimize environmental impact Low noise levels Effective hardware air flow design ensures a silent system for an ergonomic work...

Страница 10: ...al PRIMERGY TX100 S2 Server Options Guide System Board D2779 for PRIMERGY TX100 S2 Technical Manual PRIMERGY TX100 S2 Server Service Supplement D2779 BIOS Setup Utility for PRIMERGY TX100 S2 manual Information procedure Manual Detailed safety notes Safety notes and other important information manual Features and technical data of the server Operating Manual Installation and operation among other t...

Страница 11: ...lacing the processor replacing the heat sink Installing accessible drives Installing expansion cards and BBU Installing the TPM Installing the UFM Options Guide Cabling Replacement routines Replacing system fans Replacing the front panel cable Replacing the front USB module Replacing the power supply unit Replacing hard disk drives Replacing the processor Replacing the system board Replacing the T...

Страница 12: ...enu items Quotation marks indicate names of chapters and terms that are being emphasized Ê describes activities that must be performed in the order shown V CAUTION pay particular attention to texts marked with this symbol Failure to observe this warning may endanger your life destroy the system or lead to the loss of data I indicates additional information notes and tips ...

Страница 13: ...need the Operating Manual for the server the Options Guide for the server and the Technical Manual for the system board Ê Shut down the server correctly switch it off pull all power cords out of the power outlet and open the server as described in the chapter Replacement routines on page 23 Ê Replace the defective component as described in the relevant chapter Ê Follow the below procedures describ...

Страница 14: ......

Страница 15: ...e device Wait until the device has acclimatized to room temperature and is absolutely dry before starting it up Material damage may be caused to the device if this requirement is not observed Transport the device only in the original packaging or in packaging that protects it from knocks and jolts Installation and operation V CAUTION This unit should not be operated in ambient temperatures above 3...

Страница 16: ...ver is still running but a peripheral device e g memory subsystem fails during a power outage Data cables must be adequately shielded Ethernet cabling has to comply with EN 50173 and EN 50174 1 2 standards or ISO IEC 11801 standard respectively The minimum requirement is a Category 5 shielded cable for 10 100 Ethernet or a Category 5e cable for Gigabit Ethernet Route the cables in such a way that ...

Страница 17: ...warranty is void if the server is damaged during installation or replacement of system expansions Only set screen resolutions and refresh rates that are specified in the operating manual for the monitor Otherwise you may damage your monitor If you are in any doubt contact your sales outlet or customer service center Before installing removing internal options to from the server turn off the server...

Страница 18: ... only be replaced with identical batteries or with a type recommended by the manufacturer see the technical manual for the system board Do not throw batteries into the trash can Batteries must be disposed of in accordance with local regulations concerning special waste Replace the lithium battery on the system board in accordance with the instructions in the technical manual for the system board A...

Страница 19: ...gh humidity and airborne dust levels are to be avoided Electric shocks and or server failures may be caused by liquids such as water or metallic items such as paper clips entering a drive Shocks and vibrations are also to be avoided Do not insert any objects other than the specified CDs DVDs BDs Do not pull on press hard or otherwise handle the CD DVD BD tray roughly Do not disassemble the optical...

Страница 20: ... avoid dust damage and deformation keep the CD DVD BD in its case whenever it is not in use Do not store CDs DVDs BDs at high temperatures Areas exposed to prolonged direct sunlight or near heating appliances are to be avoided I You can prevent damage from the optical drive and the CDs DVDs BDs as well as premature wear of the disks by observing the following suggestions Only insert disks in the d...

Страница 21: ...ays discharge static build up e g by touching a grounded object before working with such components Any devices or tools that are used must be free of electrostatic charge Wear a suitable grounding cable that connects you to the external chassis of the system unit Always hold components with ESDs at the edges or at the points marked green touch points Do not touch any connectors or conduction path...

Страница 22: ......
Страница 23: ... CAUTION Follow the safety instructions in chapter Safety instructions on page 15 4 1 Preparation 4 1 1 Opening and closing the side cover 4 1 1 1 Removing the side cover Figure 2 Removing the side cover Ê Terminate all applications and shut down the server ...

Страница 24: ... switches off Ê Disconnect the AC power cord from the system Ê Pull the locking lever 1 and fold out the side cover 2 Ê Unlatch and remove the side cover 3 4 1 1 2 Closing the side cover Figure 3 Closing the side cover Ê Latch the bottom edge of the side cover to the server chassis 1 Ê Close the side cover 2 until it locks in place Ê Reconnect the AC power cord ...

Страница 25: ...e Replacing the front USB module Replacing the power supply unit Replacing hard disk drives Replacing the processor Replacing the system board Replacing the Trusted Platform Module TPM Replacing the USB Flash Module UFM Ê Shut down the server and disconnect the AC power cord from the system Ê Remove the side cover as described in section 4 1 1 1 on page 23 Figure 4 Opening the HDD cage A Ê Loosen ...

Страница 26: ...26 Service Supplement TX100 S2 Replacement routines Figure 5 Opening the HDD cage B Ê Fold open the HDD cage I The integrated torque controller will safely retain the HDD cage at any angle ...

Страница 27: ...e HDD cage Figure 6 Closing the HDD cage Ê Fold down the drive cage 1 I Ensure that no cables are strained or trapped Ê Secure the drive cage with its knurled captive screw 2 Ê Close the side cover as described in section 4 1 1 2 on page 24 and reconnect the AC power cord ...

Страница 28: ...th the chassis slightly elevated above the detached front bezel Ê Remove the side cover as described in section 4 1 1 1 on page 23 Ê Remove all accessible drives and dummy covers as described in sections 4 1 5 1 on page 39 and 4 1 6 1 on page 41 I In order to fully remove the front bezel you first have to disconnect the front panel cable from the system board and detach it from the cable cable cla...

Страница 29: ...Disconnecting the front panel cable Ê Disconnect the front panel cable from the system board 1 Ê Open the cable clamps 2 and detach the front panel cable Figure 8 Unlatching the front bezel Ê Press down 1 and out 2 on the three locking latches on the front bezel ...

Страница 30: ...fully rotate open the front bezel 1 Ê Carefully unhook the front bezel 2 V Be careful not to strain the front panel cable Ê When fully removing the front bezel carefully pull the front panel cable out of the chassis and thread the system board connector through the recess in the chassis front ...

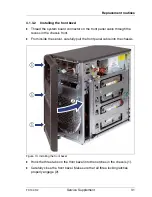
Страница 31: ... panel cable through the recess in the chassis front Ê From inside the server carefully pull the front panel cable into the chassis Figure 10 Installing the front bezel Ê Hook the three tabs on the front bezel into the notches in the chassis 1 Ê Carefully close the front bezel Make sure that all three locking latches properly engage 2 ...

Страница 32: ...ugh the cable clamps 2 Snap close both cable clamps Ê Reconnect the front panel cable T26139 Y3701 V147 to the system board 3 Ê Reinstall the front fan module as described in section 4 6 1 on page 72 Ê Reinstall the air duct as described in section 4 1 4 2 on page 37 Ê Reinstall accessible drives and or dummy covers as described in sections 4 1 5 2 on page 40 and 4 1 6 2 on page 43 Ê Close the HDD...

Страница 33: ... 1 Replacing the front panel cable Removing the processor heat sink Replacing the processor Replacing the system board I This procedure is best performed with the server in a horizontal position Ê Shut down the server and disconnect the AC power cord from the system Ê Remove the side cover as described in section 4 1 1 1 on page 23 Ê Open the HDD cage as described in section 4 1 2 1 on page 25 Par...

Страница 34: ...es Figure 12 Disconnecting unhooking cables Ê Disconnect power cables P1 P8 and P9 from the system board Ê Unhook all cables from the brackets on the air duct 1 see orange arrows Ê Ensure that the power cable harness is not obstructing the air duct 2 ...

Страница 35: ... 35 Replacement routines Figure 13 Unlatching the air duct Ê Press down on the locking latch to detach the air duct 1 Ê Slightly lift up the locking end of the air duct until the projecting end rests on the processor heat sink 2 ...

Страница 36: ...00 S2 Replacement routines Figure 14 Removing the air duct Ê While pressing down on the projecting end of the air duct 1 carefully pull up on the locking end 2 until it is fully disengaged Ê Remove the air duct from the chassis ...

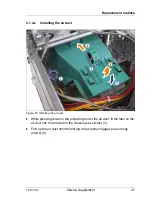
Страница 37: ...ling the air duct Figure 15 Installing the air duct Ê While pressing down on the projecting end of the air duct fit the tabs on the air duct into the bracket on the chassis see circles 1 Ê Fold up the air duct until the locking tab properly engages see orange arrows 2 ...

Страница 38: ...arness and SATA cables into the brackets on the air duct as shown see orange arrows Ê Reconnect power cables P1 P8 and P9 to the system board Ê Close the HDD cage as described in section 4 1 2 2 on page 27 Ê Close the side cover as described in section 4 1 1 2 on page 24 and reconnect the AC power cord ...

Страница 39: ... cable Replacing the front USB module Replacing the power supply unit optional Ê Shut down the server and disconnect the AC power cord from the system Ê Remove the side cover as described in section 4 1 1 1 on page 23 Ê Open the HDD cage as described in section 4 1 2 1 on page 25 Figure 17 Removing accessible drives A Ê Remove four screws from each accessible drive Ê Disconnect all cables from the...

Страница 40: ...s Figure 18 Removing accessible drives B Ê Push out the accessible drives from inside the chassis 1 Ê Pull the defective accessible drives out of the chassis and remove them 2 4 1 5 2 Installing accessible drives Figure 19 Installing accessible drives ...

Страница 41: ...ve Ê Close the side cover as described in section 4 1 1 2 on page 24 and reconnect the AC power cord 4 1 6 Replacing dummy covers 4 1 6 1 Removing a dummy cover The following replacement routines require removing dummy covers Replacing the front panel cable Replacing the front USB module Ê Shut down the server and disconnect the AC power cord from the system Ê Remove the side cover as described in...

Страница 42: ...42 Service Supplement TX100 S2 Replacement routines Figure 20 Removing dummy covers A Ê Remove two screws from the dummy cover Figure 21 Removing dummy covers B ...

Страница 43: ... remove it 2 4 1 6 2 Installing dummy covers Figure 22 Installing dummy covers Ê Insert the dummy cover into its installation bay and slide back until it is flush with the front bezel 1 Ê Secure the dummy cover to the drive cage with two screws M3 x 4 5 mm 2 Ê Close the side cover as described in section 4 1 1 2 on page 24 and reconnect the AC power cord ...

Страница 44: ... on page 23 Ê Open the HDD cage as described in section 4 1 2 1 on page 25 Ê Remove the air duct as described in section 4 1 4 1 on page 33 Ê Remove the front fan module as described in section 4 6 1 on page 72 Figure 23 Opening the front bezel Ê Open the front bezel as described in section 4 1 3 1 on page 28 I You are advised to lay the server on its side with the chassis slightly elevated above ...

Страница 45: ...2 Service Supplement 45 Replacement routines Figure 24 Disconnecting the front panel cable Ê Disconnect the front panel cable from the system board 1 Ê Open the cable clamps 2 and detach the front panel cable ...

Страница 46: ... Service Supplement TX100 S2 Replacement routines Figure 25 Detaching the front panel cable Ê Carefully detach the On Off button and both LED indicators from the retaining brackets inside the front bezel ...

Страница 47: ... front panel cable Ê Thread the cable strap on the front panel cable through the recess in the chassis front 1 Ê Carefully pull the front panel cable out of the chassis 2 Thread the system board connector through the recess in the chassis front and remove the defective cable ...

Страница 48: ...erting the front panel cable Ê Thread the system board connector on the new front panel cable through the recess in the chassis front Ê From inside the server carefully pull the front panel cable into the chassis 1 Ê Thread the cable strap on the front panel cable through the recess in the chassis front 2 ...

Страница 49: ...uns properly inside the three metal brackets on the chassis front see orange arrows 1 I Otherwise the front panel cable could be damaged when reinstalling the front fan module Ê Route the front panel cable through the cable clamps 2 Snap close both cable clamps Ê Reconnect the front panel cable T26139 Y3701 V147 to the system board 3 ...

Страница 50: ...29 Reconnecting the front panel cable to the front bezel Ê Carefully snap the On Off button and both LED indicators on the new front panel cable into the front bezel 1 black blue On Off button 2 black green Power on indicator 3 black red HDD activity indicator ...

Страница 51: ...ection 4 1 3 2 on page 31 Ê Reinstall the front fan module as described in section 4 6 1 on page 72 Ê Reinstall the air duct as described in section 4 1 4 2 on page 37 Ê Close the HDD cage as described in section 4 1 2 2 on page 27 Ê Close the side cover as described in section 4 1 1 2 on page 24 and reconnect the AC power cord ...

Страница 52: ...er cord from the system Ê Remove the side cover as described in section Removing the side cover on page 23 Ê Open the front bezel as described in section 4 1 3 1 on page 28 Ê Open the HDD cage as described in section 4 1 2 1 on page 25 Figure 31 Disconnecting the front USB connector Ê Disconnect the USB FRONT connector from the system board Part number T26139 Y3894 V513 ...

Страница 53: ...3 Replacement routines Figure 32 Detaching the front USB cable Ê Remove one screw from the front USB mounting plate Figure 33 Removing the front USB cable A Ê Fold out the front USB mounting plate 1 and unhook it from the chassis 2 ...

Страница 54: ...54 Service Supplement TX100 S2 Replacement routines Figure 34 Removing the front USB cable B Ê Carefully pull the defective front USB cable out of the chassis ...

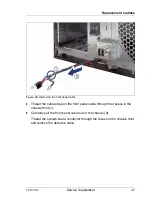
Страница 55: ...es 4 3 2 Installing the front USB module Figure 35 Installing the front USB cable A Ê Thread the new front USB cable T26139 Y3894 V513 through the recess in the chassis front Ê From inside the server carefully pull the front USB cable into the chassis ...

Страница 56: ... routines Figure 36 Installing the front USB cable B Ê Hook the front USB mounting plate to the chassis 1 and fold it in 2 Figure 37 Installing the front USB cable C Ê Secure the front USB mounting plate to the chassis with one screw M3 x 6 mm ...

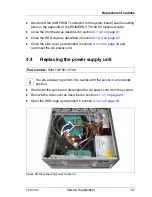
Страница 57: ...2 2 on page 27 Ê Close the side cover as described in section 4 1 1 2 on page 24 and reconnect the AC power cord 4 4 Replacing the power supply unit I You are advised to perform this routine with the server in a horizontal position Ê Shut down the server and disconnect the AC power cord from the system Ê Remove the side cover as described in section 4 1 1 1 on page 23 Ê Open the HDD cage as descri...

Страница 58: ...nnect all power cables from the system board Ê Unhook the power cable harness from the bracket on the air duct as shown in section Removing the air duct on page 33 Figure 39 Disconnecting power cables B Ê Disconnect the SATA power connector from HDD 1 as shown ...

Страница 59: ...ting power cables C Ê Open the four cable clamps on the accessible drive bay and the HDD cage see circles and detach the power cables 1 Ê Disconnect the SATA power connector P6 from SATA power adapter cable T26139 Y3942 V221 for 4 HDD configurations only see orange arrow 2 ...

Страница 60: ...cement routines Figure 41 Removing long accessible drives Ê Long accessible drives may block the power supply unit when being replaced If applicable remove long accessible drives from the chassis as described in section 4 1 5 1 on page 39 ...

Страница 61: ...TX100 S2 Service Supplement 61 Replacement routines Figure 42 Detaching the PSU Ê Remove four screws from the power supply unit see circles ...

Страница 62: ...ervice Supplement TX100 S2 Replacement routines Figure 43 Removing the PSU Ê Slide the defective power supply unit about 3 cm inside the chassis 1 Ê Lift the defective power supply unit out of the chassis 2 ...

Страница 63: ...e 44 Mounting the PSU A Ê Insert the new power supply unit into the chassis leaving a gap of about 3 cm to the rear chassis wall Ê Ensure that the mounting bracket on the chassis see circle engages with the notch on the lower surface of the power supply unit ...

Страница 64: ...64 Service Supplement TX100 S2 Replacement routines Figure 45 Mounting the PSU B Ê Slide the new power supply unit towards the rear of the chassis ...

Страница 65: ...lacement routines Figure 46 Securing the PSU Ê Secure the power supply unit to the chassis with four screws M3 x 4 5 mm see circles Ê If accessible drives have been removed in order to replace the power supply unit reinstall the drives ...

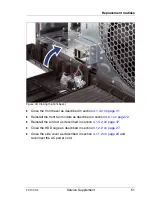
Страница 66: ...221 for 4 HDD configurations only see orange arrow 2 Ê Reconnect the SATA power connector to HDD 1 Ê Reconnect all power cables to the system board see the cabling plans in the appendix of the PRIMERGY TX100 S2 Options Guide Ê Hook the power cable harness into the bracket on the air duct as shown in section Installing the air duct on page 37 Ê Close the HDD cage as described in section 4 1 2 2 on ...

Страница 67: ... the side cover as described in section 4 1 1 1 on page 23 Ê Open the HDD cage as described in section 4 1 2 1 on page 25 Figure 48 Removing HDD cables Ê Remove all cables from the desired hard disk drive I In 4 HDD configurations when replacing hard disk drives 3 and or 4 you will also need to disconnect cables from hard disk drives 1 and or 2 see orange arrows ...

Страница 68: ...8 Service Supplement TX100 S2 Replacement routines Figure 49 Detaching an HDD Ê Press in on the locking latches on both Easyclick rails to unlatch the defective hard disk drive Figure 50 Removing an HDD ...

Страница 69: ...ment routines Ê Remove the defective hard disk drive from its installation bay Figure 51 Removing HDD Easyclick rails Ê Remove the Easyclick rails C26316 K716 C370 from the defective hard disk drive Figure 52 Mounting HDD Easyclick rails A ...

Страница 70: ...nt routines Ê Align the three pins on the Easyclick rails with the screw holes on the new hard disk drive Figure 53 Mounting HDD Easyclick rails B Ê Attach an Easyclick rail on each side of the new hard disk drive Figure 54 Installing an HDD ...

Страница 71: ...king latches engage Figure 55 Connecting HDD cables Ê Reconnect all cables to the hard disk drives see the cabling plans in the appendix of the PRIMERGY TX100 S2 Options Guide Ê Close the HDD cage as described in section 4 1 2 2 on page 27 Ê Close the side cover as described in section 4 1 1 2 on page 24 and reconnect the AC power cord ...

Страница 72: ...emove the side cover as described in section 4 1 1 1 on page 23 Ê Bring the server to its horizontal position Ê Open the HDD cage as described in section 4 1 2 1 on page 25 Ê Remove the air duct as described in section 4 1 4 1 on page 33 Figure 56 Disconnecting the front fan cable Ê Disconnect the FAN1 SYS connector of the defective fan module from the system board Part number C26361 K1007 B891 ...

Страница 73: ...TX100 S2 Service Supplement 73 Replacement routines Figure 57 Detaching the front fan module A Ê Remove two screws on the lower surface of the server see circles ...

Страница 74: ...ement TX100 S2 Replacement routines Figure 58 Detaching the front fan module B Ê Slide the front fan module about 2 cm to the right to disengage the locking tabs on the upper edge of the front chassis wall see circles ...

Страница 75: ...TX100 S2 Service Supplement 75 Replacement routines Figure 59 Removing the front fan module Ê Fold down the defective front fan module 1 and lift it out of the chassis 2 ...

Страница 76: ...76 Service Supplement TX100 S2 Replacement routines Figure 60 Installing the front fan module A Ê At a slight angle fit the new front fan module into the chassis 1 and rotate it toward the chassis 2 ...

Страница 77: ...pplement 77 Replacement routines Figure 61 Installing the front fan module B Ê Slide the front fan module to the left as far as it will go to engage the locking tabs on the upper edge of the front chassis wall see circles ...

Страница 78: ...78 Service Supplement TX100 S2 Replacement routines Figure 62 Securing the front fan module Ê Secure the front fan module with two screws on the lower surface of the server see circles ...

Страница 79: ...nnect the FAN1 SYS connector of the new fan module to the system board Ê Reinstall the air duct as described in section 4 1 4 2 on page 37 Ê Close the HDD cage as described in section 4 1 2 2 on page 27 Ê Close the side cover as described in section 4 1 1 2 on page 24 and reconnect the AC power cord ...

Страница 80: ...rom the system Ê Remove the side cover as described in section 4 1 1 1 on page 23 Ê Bring the server to its horizontal position Ê Open the HDD cage as described in section 4 1 2 1 on page 25 Figure 64 Detaching the rear fan module Ê Press down on the locking latch to detach the rear fan module 1 Ê Fold down the rear fan module 2 Part number C26361 K1007 B821 ...

Страница 81: ...0 S2 Service Supplement 81 Replacement routines Figure 65 Removing the rear fan module Ê Carefully lift the defective rear fan module up until you can access the fan connector on the system board see circle ...

Страница 82: ...nes Figure 66 Disconnecting the rear fan cable Ê Disconnect the FAN2 SYS connector of the defective fan module from the system board Figure 67 Connecting the rear fan cable Ê Reconnect the FAN2 SYS connector of the new fan module to the system board ...

Страница 83: ...X100 S2 Service Supplement 83 Replacement routines Figure 68 Installing the rear fan module A Ê At a slight angle fit the two tabs on the new rear fan module into the recesses in the chassis see circles ...

Страница 84: ... fan module B Ê Rotate the rear fan module toward the chassis and press firmly until the locking latch see circle engages Ê Close the HDD cage as described in section 4 1 2 2 on page 27 Ê Close the side cover as described in section 4 1 1 2 on page 24 and reconnect the AC power cord ...

Страница 85: ... antistatic surface Never push a processor over a surface 4 7 1 Removing the processor heat sink Ê Shut down the server and disconnect the AC power cord from the system Ê Remove the side cover as described in section 4 1 1 1 on page 23 Ê Open the HDD cage as described in section 4 1 2 1 on page 25 Ê Remove the air duct as described in section 4 1 4 1 on page 33 Figure 70 Clearing the CPU heat sink...

Страница 86: ... TX100 S2 Replacement routines Ê Ensure that the SATA cables are not obstructing the CPU heat sink 2 Figure 71 Removing the processor heat sink A Ê Loosen the four captive screws on the heat sink in a crossover pattern 1 4 ...

Страница 87: ...eat sink out of the chassis I Due to the adhesive quality of the thermal paste located between the heat sink and processor it may be necessary to turn the heat sink back and forth to detach it from the processor Ê Thoroughly clean residual thermal paste from the surface of the heat sink using a lint free cloth ...

Страница 88: ...lement TX100 S2 Replacement routines 4 7 2 Replacing the processor Figure 73 Unlatching the socket lever Ê Unlatch the socket lever by pushing it down and away from the socket 1 Ê Fold back the socket release lever 2 ...

Страница 89: ...page 96 the protective socket cover on the new system board needs to be removed before proceeding Ê Place your thumb against the front edge of the protective socket cover and rest your index finger on the rear grip Lift the front edge of the socket to disengage the cover from the socket and lift the cover up and away from the socket Be careful not to touch or bend the pins on the processor socket ...

Страница 90: ...nt TX100 S2 Replacement routines Figure 75 Removing the processor Ê Carefully remove the defective processor from its socket in a vertical motion V CAUTION Be careful not to touch or bend the pins on the processor socket ...

Страница 91: ...th the posts on the socket see circle Ê Lower the processor straight down without tilting or sliding it in the socket V CAUTION Ensure that the processor is level in the socket Be careful not to touch or bend the pins on the processor socket Never touch the underside of the processor Even minor soiling such as grease from the skin can impair the processor s operation or destroy the processor ...

Страница 92: ...92 Service Supplement TX100 S2 Replacement routines Figure 77 Closing the load plate Ê Lower the load plate over the processor while leaving the socket lever in the open position ...

Страница 93: ...ge of the load plate slides under the shoulder screw cap see circle as the lever is lowered 1 Ê Latch the socket lever under the load plate tab 2 Ê Reapply a small amount of thermal paste to the surface of the processor Thermal paste part number FSP P304000003 I Ensure a thin and even distribution of thermal paste before reinstalling the heat sink ...

Страница 94: ...lling the processor heat sink A Ê Carefully seat the heat sink V26898 B953 V300 on the four threaded holes as shown V CAUTION Ensure that the screws on the heat sink are properly seated on the threaded holes Ensure that the heat sink cooling fins match the direction of the airflow Part number V26898 B953 V300 ...

Страница 95: ...ew torque 0 6 Nm 1 4 Ê Reconnect all power cables to the system board see the cabling plans in the appendix of the PRIMERGY TX100 S2 Options Guide Ê Reinstall the air duct as described in section 4 1 4 2 on page 37 Ê Close the HDD cage as described in section 4 1 2 2 on page 27 Ê Close the side cover as described in section 4 1 1 2 on page 24 and reconnect the AC power cord ...

Страница 96: ... the system Ê Disconnect all external cables Ê Bring the server to its horizontal position Ê Remove the side cover as described in section 4 1 1 1 on page 23 Ê Open the HDD cage as described in section 4 1 2 1 on page 25 Ê Remove the air duct as described in section 4 1 4 1 on page 33 Ê Remove all cables from the system board Ê Remove the following components from the system board as shown in the ...

Страница 97: ...TX100 S2 Service Supplement 97 Replacement routines Figure 81 Detaching the system board A Ê Remove five screws from the system board see circles ...

Страница 98: ... the system board B Ê Slightly lift up the system board by the memory module ejectors and a PCI slot 1 in order to detach it from the centering bolts C Ê Carefully shift the system board to the left until the plug shells disengage from the cut outs in the connector panel 2 ...

Страница 99: ... board Ê Hold the defective system board by the memory module ejectors and a PCI slot Rotate the system board as shown 1 2 and at an angle lift it out of the chassis 3 Ê If applicable remove the TPM module as described in section Replacing the Trusted Platform Module TPM on page 104 ...

Страница 100: ... CAUTION Do not lift or handle the system board by any of its heat sinks Ensure not to damage the EMI springs to comply with applicable EMC regulations and satisfy cooling requirements and fire protection measures Ê Rotate the system board as shown and at an angle lower it into the chassis 1 Ê Carefully insert the system board into the chassis in a circular motion 2 ...

Страница 101: ...ully shift the system board towards the server rear until the plug shells engage with the cut outs in the connector panel 1 Ê Lower the system board onto the centering bolts 2 Figure 86 Installing the system board C Ê Ensure that the system board is properly seated on both centering bolts see circles ...

Страница 102: ...que 0 6 Nm Tighten the screws in a cross diagonal pattern Ê Verify the settings on the new system board DIP switches jumpers For a detailed description please refer to the System Board D2779 for PRIMERGY TX100 S2 Technical Manual Ê Remove the processor from the defective system board and install it on the new system board as described in section Replacing the processor on page 88 ...

Страница 103: ...n the right order see the cabling plans in the appendix of the PRIMERGY TX100 S2 Options Guide The boot HDD should always be connected to SATA connector HDD0 Ê Reinstall the air duct as described in section 4 1 4 2 on page 37 Ê Close the HDD cage as described in section 4 1 2 2 on page 27 Ê Close the side cover as described in section 4 1 1 2 on page 24 and reconnect the AC power cord Ê Reconnect ...

Страница 104: ...ols 4 9 Replacing the Trusted Platform Module TPM V CAUTION Advise the customer that he must provide you with TPM backup copies For security reasons the TPM must be restored re saved by the customer If the customer DOES NOT have a backup copy available inform him that replacing the TPM will cause him to lose all his data Ê Shut down the server and disconnect the AC power cord from the system Ê Rem...

Страница 105: ...TPM screw see circle Ê Remove the TPM screw using a thin slotted screwdriver e g watchmaker s screwdriver V CAUTION Ensure to turn the screw clockwise in order to remove it Otherwise the thin metal bar may break rendering it impossible to loosen the screw Ê Remove the defective TPM board on the upper side of the system board ...

Страница 106: ...ce Supplement TX100 S2 Replacement routines Figure 89 TPM mounting location Ê Reinstall the system board as described in section Replacing the system board on page 96 Ê The TPM spacer remains on the system board ...

Страница 107: ...ement routines Figure 90 Mounting the TPM board Ê Mount the new TPM board to the system board and the remaining TPM spacer Figure 91 TPM bit insert Ê Attach the TPM bit insert provided with the spare kit S26361 F3552 L1 to a bit screwdriver ...

Страница 108: ... Secure the TPM board with the TPM screw C26192 Y10 C176 using the TPM bit insert V CAUTION Do not fasten the screw too firmly Ê Close the HDD cage as described in section 4 1 2 2 on page 27 Ê Close the side cover as described in section 4 1 1 2 on page 24 and reconnect the AC power cord ...

Страница 109: ...and disconnect the AC power cord from the system Ê Remove the side cover as described in section 4 1 1 1 on page 23 Ê Open the HDD cage as described in section 4 1 2 1 on page 25 Figure 93 Removing the UFM board A Ê Remove the nylon screw on the defective UFM board 1 Ê Disconnect and remove the defective UFM board 2 ...

Страница 110: ...110 Service Supplement TX100 S2 Replacement routines Figure 94 Removing the UFM board B Ê The UFM spacer remains on the system board Figure 95 Preparing the replacement UFM board ...

Страница 111: ... Supplement 111 Replacement routines Ê Remove the nylon screw from the new UFM board Ê Remove the UFM spacer Figure 96 Installing the UFM board Ê Mount the new UFM board to the system board and the remaining UFM spacer ...

Страница 112: ...igure 97 Securing the UFM board Ê Secure the UFM board to the UFM spacer with the nylon screw Ê Close the HDD cage as described in section 4 1 2 2 on page 27 Ê Close the side cover as described in section 4 1 1 2 on page 24 and reconnect the AC power cord ...

Страница 113: ... rear 80 front bezel installing 31 removing 28 front fan 33 72 front panel cable 44 front USB module 52 H hard disk drive HDD cage 25 hard disk drive HDD 67 HDD cage 25 heat sink installing 94 removing 85 L laser information 20 light emitting diode LED 20 lithium battery 18 M meaning of the symbols 12 N notational conventions 12 O opening the server 23 optical drives 39 dummy cover 41 installing 4...

Страница 114: ...114 Service Supplement TX100 S2 Index system board 96 system fans 72 front 72 rear 80 T target group 9 TPM Trusted Platform Module 96 104 U UFM USB Flash Module 109 USB 52 ...

Отзывы: