E-9
English
PART NAMES AND FUNCTIONS
4
Power button [POWER]
Turns the power ON or OFF when the main power switch,
provided at the bottom of the display, is ON.
5
Input mode selector button [MODE]
Switches between image input modes.
6
Wide screen selector button [WIDE]
Switches the screen over to a desired wide screen.
7
Menu button [MENU]
Displays image and sound adjustment menus.
8
Volume adjustment buttons [VOLUME -/+]
Adjust the volume.
Note: The [
/
] buttons can also be used to scroll through
the options when a menu is displayed.
9
Adjustment buttons [ / ]
The [ / ] buttons can also be used to scroll through options
in a menu, or to change values.
0
Set button [ENTER]
Press this button to finalize the selection of a desired option in
a menu.
POWER
P O W E R
M O D E
W I D E
MENU
VOLUME
ENTER
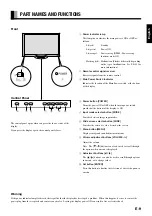
Front
1
Power indicator lamp
This lamp shows whether the main power is ON or OFF, as
follows:
Lit (red):
Standby
Lit (green):
Power ON
Lit (orange):
Power saving (DPMS: Power saving
function) mode ON
Flashing (red): Malfunction (Flashes differently depending
on the type of malfunction. See P. E-44 for
more information.)
2
Remote control signal receiver
Receives signals from the remote control.
3
Main Power Switch Indicator
Indicates the location of the Main Power switch, at the bottom
of the display.
Control Panel
Warning
If the power indicator lamp flashes red, this signifies that the display has developed a problem. When this happens, be sure to remove the
power plug from the receptacle and contact your dealer. Leaving the display power ON can result in fire or electric shock.
2
3
4
5 6
7
8
9
0
1
The control panel opens when you press the lower center of the
display.
If you press the display again, the control panel closes.

