U s e r - I n s t a l l a b l e Fe a t u r e s
39
Removing a Memory Upgrade
Module
1. Perform steps 1 through 4 of Installing a
Memory Upgrade Module.
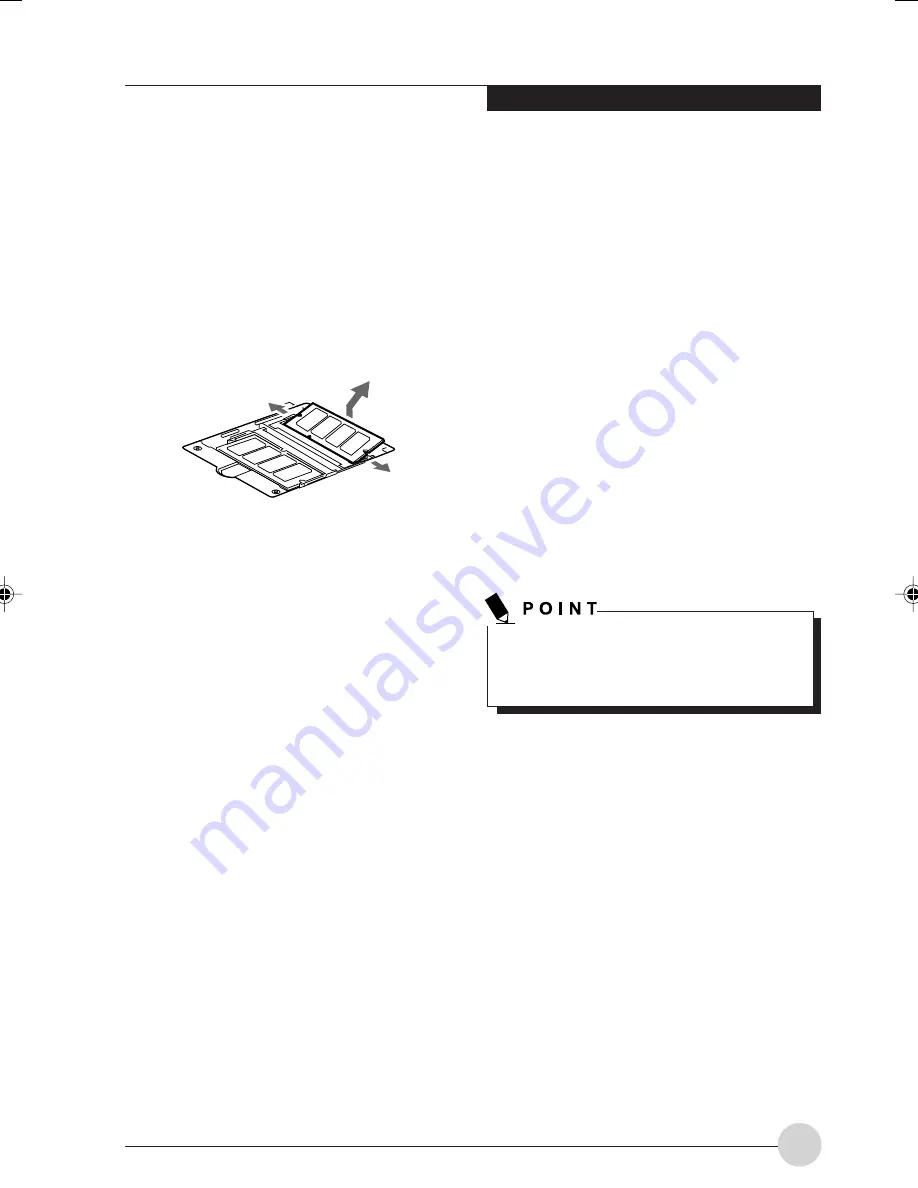
2. Pull the clips sideways away from each side of
the memory upgrade module at the same time.
3. While holding the clips out, remove the module
from the slot by lifting it up and pulling towards
the rear of your notebook.
(Figure 4-5)
Figure 4-5. Removing a Memory Upgrade Module
4. Store the memory upgrade module in a static
guarded sleeve.
5. Replace the cover.
(Figure 4-4)
6. Replace the screws.
Checking the Memory Capacity
Once you have changed the system memory
capacity by either adding or removing a memory
upgrade module, be sure to check that your
notebook has recognized the change.
Your LifeBook T Series Tablet PC is designed to
share system memory with video memory, using
Dynamic Video Memory Technology (DVMT).
As a result, the amount of memory that appears
on your screen is reduced by the amount of
DVMT that have allocated to video memory.
You can check the memory capacity by clicking
[Start]
→
Control Panel, then double-clicking the
System icon. Select the General tab and check
the amount of memory under “Computer:”.
The default 8MB is dedicated to video memory
by Intel Chipset, and if the system has 256 MB
of RAM installed, the display will indicate that
there is 248 MB of RAM installed.
If the total memory displayed is incorrect,
check that your memory upgrade module is
properly installed.
LB_Soriel 06 (33-42)
26/11/04, 3:34 PM
39
Содержание LIFEBOOK T Series
Страница 10: ...1 Preface 1 ...
Страница 11: ...2 ...
Страница 13: ...4 ...
Страница 14: ...5 Getting to Know Your Tablet PC 2 ...
Страница 15: ...6 ...
Страница 34: ...Using Your Tablet PC 25 UsingYour Tablet PC 3 ...
Страница 35: ...26 ...
Страница 41: ...32 ...
Страница 42: ...User Installable Features 33 User Installable Features 4 ...
Страница 43: ...34 ...
Страница 52: ...43 Troubleshooting 5 ...
Страница 53: ...44 ...
Страница 70: ...1 前言 1 ...
Страница 71: ...2 ...
Страница 73: ...4 ...
Страница 74: ...5 筆記本概述 2 ...
Страница 75: ...6 ...
Страница 94: ...使用 Tablet PC 25 使用 Tablet PC 3 ...
Страница 95: ...26 ...
Страница 101: ...32 ...
Страница 102: ...用戶自行安裝功能 33 用戶自行安裝功能 4 ...
Страница 103: ...34 ...
Страница 112: ...43 故障排除 5 ...
Страница 113: ...44 ...
Страница 130: ...1 前言 1 ...
Страница 131: ...2 ...
Страница 133: ...4 ...
Страница 134: ...5 筆記本概述 2 ...
Страница 135: ...6 ...
Страница 154: ...使用 Tablet PC 25 使用 Tablet PC 3 ...
Страница 155: ...26 ...
Страница 161: ...32 ...
Страница 162: ...用戶自行安裝功能 33 用戶自行安裝功能 4 ...
Страница 163: ...34 ...
Страница 172: ...43 故障排除 5 ...
Страница 173: ...44 ...


